Segmenting with aluminum and wood

Signed-In Members Don't See This Ad

spilperson

Member
Joined
Aug 24, 2010
Messages
57
Location
Laplace, Louisiana
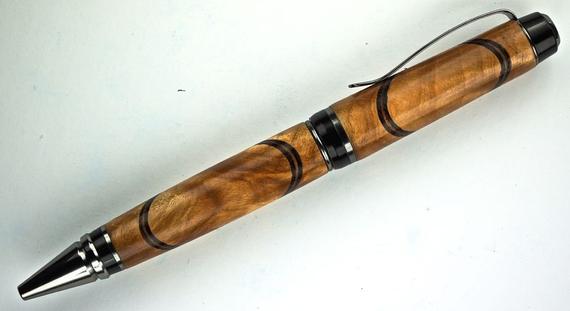
Wow, Mike, that is beautiful. I will definitely be trying some of your methods.

On drilling... Until recently, I have had a lot of problems with blowing out the bottom, stuff like that. A couple of weeks ago, I told myself I had to slow down and quit ruining these expensive blanks! I also have done a few other things, and suddenly my drilling seems to be near perfect.

First, I made a simple little jig for holding the blank in the vise. It is just two pieces of MDF with a V-groove cut down the middle of each to a depth of 1/2". When you hold a 3/4" blank between the two boards in the grooves, that leaves a small gap so when you tighten up the vise on the boards it still clamps the blank, but almost all of the four sides of the blank are enclosed and supported by the walls of the grooves. I also sized and marked the boards such that one side lines up with the side of my vise, so the blank is consistently positioned in the vise, and that helps with keeping it centered up.

Secondly, i started "peck" drilling, which is where you just barely peck at the wood, let it drill just a bit, maybe 1/8" or so, then pull out, then peck again... Slowly.

Thirdly I invested in a carbide tipped brad point bit. These are danged expensive, but I lucked out and found a place that wasn't tooooo bad.

Anyway, suddenly I am no longer blowing out blanks, and my exit holes look great, and my centering has improved too. Maybe some of this will help you or somebody else.

I have done step drilling in the past, and it works too, but I have to say I find it a PITA to keep changing bits. A few times I would line up several blanks and go through the steps together, and that obviously helps.

Anyway, thanks tons for your tutorials, and I have to tell you I am going to be stealing that pattern and the wood types shamelessly!
 
Signed-In Members Don't See This Ad
Joined
Feb 24, 2012
Messages
4,368
Location
Claremont NH
I think sometimes you just have to accept the fact that you are going to get some aluminum in places that you don't want it. I use alcohol bath a few times after sanding but still don't get rid of all of it. I just accept the fact that some of it is going to get where I may not want it. Then I spin it fast on the lathe to dry it out before I continue.
 

Dale Parrott

Member
Joined
Feb 22, 2012
Messages
286
Location
Goshen, Indiana
Thank you for being so open with you procedures because your information kept me busy for 4 hours in my small shop.:beauty:

I tried one of these yesterday and for the most part was pleased with the results. A couple of points came to mind during my experimenting.

After the starter hole has been drilled is it best not use the brad point bits to bring it up to size?

I would also be interested in what the thoughts are concerning the grain direction of the small cube. It looked to me like the photos in this post showed it as 90 degrees from the blanks grain. That's the way I tried it but I think I'd like it better aligning it with the blank's grain. Might turn easier also if the grain aligns. I'm anxious to get back out there and try it again.
 

jttheclockman

Member
Joined
Feb 22, 2005
Messages
19,132
Location
NJ, USA.
Thank you for being so open with you procedures because your information kept me busy for 4 hours in my small shop.:beauty:

I tried one of these yesterday and for the most part was pleased with the results. A couple of points came to mind during my experimenting.

After the starter hole has been drilled is it best not use the brad point bits to bring it up to size?

I would also be interested in what the thoughts are concerning the grain direction of the small cube. It looked to me like the photos in this post showed it as 90 degrees from the blanks grain. That's the way I tried it but I think I'd like it better aligning it with the blank's grain. Might turn easier also if the grain aligns. I'm anxious to get back out there and try it again.


Hello Dale

I know this is Mike's thread and he probably will answer you better but i would like to throw a thought or 2 out there being I love segmenting work. First great to see you giving this a try and hopefully you will do others. That is tthe whole point of these type postings, to share ideas and to pique interest in this aspect of blank making. So many ideas and concepts are yet to be tried.

To address your concern. With wood you will always have movement and you run the risk of cracking and pieces letting go. This is the nature of pen making as well as any woodworking. With what Mike did he seperated the 2 grains of wood with aluminum and thus one wood reacting against the other is not there. Now will the joints seperate over time??? That is for time to tell us and the extremes the pen endures. Can not say it won't happen. One way to take out this factor is to use materials that do not move such as metals and acrylics. Something to think about when you do the next one. Have fun in the shop and work safely.


One other thing. I suggest losing the bradpoint bits. Too many bad things happen with them in what we do. Just my opinion.
 
Last edited:
Joined
Feb 24, 2012
Messages
4,368
Location
Claremont NH
I agree with all that John T. has said. You never know how different wood or materials are going to work with each other and expansion and contraction are a big worry for me but not enough that I am not churning out these pens still. I am trying to set my pens apart and will continue to experiment and try new things. I have a blank curing up down in the shop right now that may be a great looking pen, then again maybe it won't work or I will destroy the blank drilling it?

I don't use any brad point bits for this type of drilling just like John T. said I am not sure if they would work or not but I am not willing to even try them for this. I also don't use carbide tipped drills any longer. I use simple old fashioned drill bits. Now I do try to get quality bits. The biggest thing on drilling is to go very slowly with the advancement of the bit and let things cool often. The more segments to slower you will need to go. I do all my drilling on my lathe it gives me better control over my drill press. Now some may have much better setups for their drill press than me but mine is not up to it.

As far as using the end grain vs. the sides I think we need to shake that up a bit. The end grain in the first one of these that I made was of walnut and I did put it end grain and it came out nice and dark. For other woods you may want to not do that. I didn't with the Madrone Burl because it already had great grain and I didn't want to hide that.

I do hope as those of you out there that improve on my setup will share the improvement so I can also take advantage of it. I am just an experimenter not any sort of expert at all. I have been turning pens for only 1 1/2 years plus a month or so. I have a lot to learn and I learned most of what I know reading here on the IAP forums and library and asking questions. There is so much talent here we all need to tap into it and share.
 
Last edited:
Joined
Feb 24, 2012
Messages
4,368
Location
Claremont NH
Thank you for being so open with you procedures because your information kept me busy for 4 hours in my small shop.:beauty:

I tried one of these yesterday and for the most part was pleased with the results. A couple of points came to mind during my experimenting.

After the starter hole has been drilled is it best not use the brad point bits to bring it up to size?

I would also be interested in what the thoughts are concerning the grain direction of the small cube. It looked to me like the photos in this post showed it as 90 degrees from the blanks grain. That's the way I tried it but I think I'd like it better aligning it with the blank's grain. Might turn easier also if the grain aligns. I'm anxious to get back out there and try it again.

Post your pen here so we can all see it. Don't worry if it isn't perfect neither are mine.
 

Dale Parrott

Member
Joined
Feb 22, 2012
Messages
286
Location
Goshen, Indiana
Thank you for your suggestions. I will loose the brad point bits for these type of projects. I suppose this means i'll have to shop for some new bits. I hate it when that happens!:)
I am also new to wood turning and bought my lathe last May. It's a used Rikon 70-100.

I am posting a photo of what I made yesterday. When I experiment on projects like this it's all about learning so I usually use my domestic (free) wood. This time I used oak and a square of Rosewood for color. Didn't actually assemble a pen yet, keeping my options open.
This is a link to the pen that was my most complicated to date. I had mixed feelings about the way it turned out. Ended up selling it. I'll make another I'm happy with.
On the 6 knot I didn't have any problems with drilling it on my lathe. If I remember correctly I drilled the blank first and then assembled the knot. Only had to remove epoxy and the knot slices. Seemed to work.

http://www.penturners.org/forum/f13/six-ring-celtic-knot-103837/

Dale
 

Attachments

  • oak with rosewood & aluminum.jpg
    oak with rosewood & aluminum.jpg
    101.2 KB · Views: 571
Joined
Feb 24, 2012
Messages
4,368
Location
Claremont NH
Hey that came out just fine you should put that onto a piece of brass tube and make something out of it. The celtic knot is great. I have never made one of those. I just glued my tubes in my latest and will post it here when it if finished.

I hear you on the drills I have to do the same thing. I also need to get one of the drill doctors so I can keep them sharp.
 
Joined
Feb 24, 2012
Messages
4,368
Location
Claremont NH
OK here is another variation. In this one I tried to turn the angle around over the top of the other angle. I wish it had come out with just a little more separation I will try to do better next time. I also sandwiched the aluminum between 2 pieces of light wood. In hindsight I wish I had used dark wood? Oh well live and learn.
il_570xN.446052713_39pq.jpg
 

Dale Parrott

Member
Joined
Feb 22, 2012
Messages
286
Location
Goshen, Indiana
Hey that came out just fine you should put that onto a piece of brass tube and make something out of it. The celtic knot is great. I have never made one of those. I just glued my tubes in my latest and will post it here when it if finished.

I hear you on the drills I have to do the same thing. I also need to get one of the drill doctors so I can keep them sharp.

Great looking pen you made today! I took your advise and finished it. It's a good thing I didn't see yours before finishing my simple Slimline. So here is the finished product using the soda can aluminum.
 

Attachments

  • segmented Slimline.jpg
    segmented Slimline.jpg
    139.3 KB · Views: 619
Joined
Feb 24, 2012
Messages
4,368
Location
Claremont NH
Hey that came out just fine you should put that onto a piece of brass tube and make something out of it. The celtic knot is great. I have never made one of those. I just glued my tubes in my latest and will post it here when it if finished.

I hear you on the drills I have to do the same thing. I also need to get one of the drill doctors so I can keep them sharp.

Great looking pen you made today! I took your advise and finished it. It's a good thing I didn't see yours before finishing my simple Slimline. So here is the finished product using the soda can aluminum.

That came out great. I love using soda can in my pens. Now after you are done with that get some aluminum flashing from the hardware store. Get the thinnest you can find. Make sure you really rough it up and clean it before you glue it up.

BTW that blank you have in the background is going to be a real looker!
 
Last edited:

Dale Parrott

Member
Joined
Feb 22, 2012
Messages
286
Location
Goshen, Indiana
I did a Celtic Knot last summer using aluminum. As it turns out my extra house siding is the same thickness as my bandsaw kerf. Turned out good but I don't have a picture of that one. I would love to do this segment onto a Pentel pencil, not sure it would be strong enough since those don't use tubes.
 
Joined
Feb 24, 2012
Messages
4,368
Location
Claremont NH
I don't know if it would be strong enough. I always sigh a sigh of relief when I get the tube glued in. Usually after the tube is in things firm up and hold together.
 

EagleTa2

Member
Joined
Mar 23, 2013
Messages
20
Hi all

Mike, I just wanted to let you know that I just finished gluing up my blanks...that you inspired me to do...

The first blank is going to be a 2 piece slim line.. walnut and cherry with .010 brass between the different woods. The second blank will be for a one piece slim line and is walnut burl with corian in light granite with .005 brass in between.

I wasn't sure what thickness of brass to use hence the difference. Once the epoxy is cured, I will trim the excess brass and the extra corners on the band saw and post pictures before I drill and turn.

Thanks for the inspiration again! What thickness aluminum have you been using?

Geo


Decided to start a new thread....felt bad for hijacking this one:rolleyes:
 
Joined
Aug 9, 2009
Messages
528
Location
Paso Robles ca.
Now you are just plain showing off:biggrin: First you do a real nice segmented pen and now some nice photo work.

Seriously though great to see you sharing these ideas in your way or method of doing them. I want to thank you for coming over to the segmented forum and sharing your beautiful work. Hopefully this will inspire others to try things as we build this forum with a whole bunch of ideas and methods of doing some terrific segmented pens.

Now you have to ask yourself, doesn't that blank look a whole lot better than some plain old wood blank??? Look at the WOW factor you added to it that has been discussed in the recent Bash contests.

Keep up the great work and continue taking this idea and expanding. I am thrilled to see some segmented work showing up on the site. :)

Showoff some more, inquiring minds need to know
 

RMayoIII

Member
Joined
Feb 14, 2012
Messages
211
Location
Belmont, NH
I love your latest segmented cigar! Those color combinations are amazing. What wood did you use for the sandwich? Great job on keeping the grain matched up on the large pieces. Keep it up!
 
Joined
Feb 24, 2012
Messages
4,368
Location
Claremont NH
I love your latest segmented cigar! Those color combinations are amazing. What wood did you use for the sandwich? Great job on keeping the grain matched up on the large pieces. Keep it up!

I am not sure what it is. I got a lot of different veneers from ebay last week and I use that. I looks like black walnut but the center is very bright like the color of copper and has lots of shine in it. I have another pen coming up later on that uses the same stuff but reverses it. OH DANG I just gave away my secret of veneer. Oh well not much of a secret anyway. It is cheap and works great.

Mike
 

Dale Parrott

Member
Joined
Feb 22, 2012
Messages
286
Location
Goshen, Indiana
Well Mike you have really challenged my skills as a wood turner. Yesterday afternoon I cut, glued (with 30 minute epoxy), rough turned, and drilled.my blanks. Today I finished one of them up. I know it's Slimline but that's what I have on hand. I used Nigerian Satinwood, Jatoba, and Padauk. This is fun!
Dale
 

Attachments

  • Segmented Slimline low res.jpg
    Segmented Slimline low res.jpg
    73.1 KB · Views: 774

BKelley

Member
Joined
Jan 31, 2010
Messages
891
Location
Tucker, Georgia, 30084
Nice work, I am doing some acrylic/metal segmenting and have a couple of questions:

1. What is the best adhesive to use to hold acrylic and aluminum together
2. Will the aluminum tarnish

any help will be most appreciated.

Ben
 

jttheclockman

Member
Joined
Feb 22, 2005
Messages
19,132
Location
NJ, USA.
Nice work, I am doing some acrylic/metal segmenting and have a couple of questions:

1. What is the best adhesive to use to hold acrylic and aluminum together
2. Will the aluminum tarnish

any help will be most appreciated.

Ben


I use epoxy all the time. Unless it is wood to wood then yellow carpenter's glue. No aluminum will not tarnish. If you are doing a mixture of wood and aluminum you probably will use a CA finish so that will seal it as well.
 
Joined
Feb 24, 2012
Messages
4,368
Location
Claremont NH
What about my segmenting John T. I don't use CA for my finish but the finish that I do use has Shellac in it. That should seal just like the CA? What are your thoughts on that. I have also wondered if the aluminum would tarnish?

I use epoxy on all but have just ordered some odorless CA and will give that a try.

Also most of the kits that I use are either Atrax or Jr. Gent 2 or a variation of them.
 
Last edited:

jttheclockman

Member
Joined
Feb 22, 2005
Messages
19,132
Location
NJ, USA.
What about my segmenting John T. I don't use CA for my finish but the finish that I do use has Shellac in it. That should seal just like the CA? What are your thoughts on that. I have also wondered if the aluminum would tarnish?

I use epoxy on all but have just ordered some odorless CA and will give that a try.

Also most of the kits that I use are either Atrax or Jr. Gent 2 or a variation of them.


Well Mike from my experience you will have no problems with aluminum. Now I am no metallurgist. What makes aluminum dull and pitted is moisture and you do not have that with a pen unless you leave it outdoors. Every time you use the pen you are actually polishing it. I did an all aluminum pen that I use as my everyday desk pen about 3 maybe 4 years ago. Time flys. It still looks the same as the day I made it. Maybe a scratch or two and a new refill but no discoloration.

CopyofIMGP0368.jpg


Once again I will show these 2 pens. One which is the Panache is acrylic and aluminum and I still have this one in my collection and there is no top coat and it too is just fine and that was done almost 1 year ago. as well as the Baron with the dots. Now that was done with ebony and aluminum and has 8 coats of med ca on it. The cap is all aluminum and no top coat. Now unfortunately that pen sold before I got it off the lathe so I have not seen it since then but I suspect no problems or else I would have heard about it believe me.

CopyofIMGP0946.jpg


CopyofIMGP0933-1.jpg


Now if using brass that is a whole other ballgame. Brass will turn dark over time if untreated. Now the only experience I have right now with brass is my bullet pens but with them I powdercoat them to keep them from tarnishing. I have a few pen ideas where I will be using some brass in the future and will see how that goes. I do have a blank sitting in my shop that I am too scared to turn:eek: that is aluminum with an aluminum and brass celtic knot in it.

Now to your finish. I am guessing it is some sort of oil based poly. If that is the case that will yellow over time. You won't be able to see it on the darker woods. You notice it on light colored woods.

As far as CA as the glue source. You know my position on that. I do not like it but have on occassion used it on segmentation when I needed something glued in a hurry. But will always glue the tubes in with epoxy. CA becomes brittle over time as it cures and any drop of the pen could be a disaster. Now will epoxy stand up better I am not sure and do not want to find out.:) I let you experiment on that one.


This is just my opinion.:)
Good luck and keep up the fine segmenting. They all look great. I have to get back in the game myself.
 

jttheclockman

Member
Joined
Feb 22, 2005
Messages
19,132
Location
NJ, USA.
I do have a blank sitting in my shop that I am too scared to turn:eek: that is aluminum with an aluminum and brass celtic knot in it.

Wow!! I don't even wanna think about turning that. You gotta post a pic of that one!

come on John T. you can't tease us and not show the pic. No pic no blank!:biggrin:


I did not mean to tease anyone. In fact I did not think anyone read what I wrote. But here is the blank I made up about a year ago. I had planned on using it on either a cigar or a sierra but was thinking of doing a bit more in the way of segmenting and now that I made my jig I just might do that. I had no idea back then I would be making a jig for segmenting pens. Still not sure what design on want and boy drilling and turning this will be a pucker factor of 1000. But like good old Eagle used to say "it is just a blank. We can make more. "

Don't expect to see this pen any time soon:) I have sooooo many more irons in the fire right now and now that my work situation has slowed I can get back in the shop and join in the fun once again. I will try to stamp my ticket for reentry very soon. I am trying to finish up the black and aluminum blank I had shown here awhile back. Many have asked if I had turned it yet. I have not but have just glued the tubes in and if it does not blow up on me I should have it done soon.

Here is the aluminum and brass knot blank. The grey stuff is epoxy.:) Or it might be grey matter from my head. What was I thinking????


IMGP0990_zpsa2f6dc81.jpg
 

Jim Burr

Banned
Joined
Feb 23, 2010
Messages
3,060
Location
Reno, Nv
Holy cow!! You guys are rockin' this!! Mine were simple...except for the deer antler, buckeye burl and aluminum :rolleyes:. I have way to much aluminum for what I'll use, found a stash on ebay of 12x24...thought I was buying 1 sheet and ended up with 3! Don't forget about veneer too...works well as a contrast insert in the absence of metals of any sort. Someone mentioned glue a million posts back. System 3 makes a Hi temp epoxy that works really good. Most stuff fails at temps...any temp increase to 100* will delaminate CA, 5 minute, Titebond will all fail with even that small of a temp increase.
 
Last edited:
Joined
Feb 24, 2012
Messages
4,368
Location
Claremont NH
The color stuff most likely won't work. You won't see the color anyway as the edge is all you see. The color may keep the glue from really bonding. The plain aluminum looks great and that copper is really great. I have not tried copper but have some to try.
 
Joined
Feb 24, 2012
Messages
4,368
Location
Claremont NH
Thanks for reading this post guys and gals. Please feel free to post any pics to this if you try it out. Remember it doesn't have to be perfect and it won't be on your first try. I am getting better at drilling them now. I am able to get them glued up with epoxy and get a few steps done per night. I have a bacote blank coming up tomorrow night that will have aluminum scallops in it. This was a fun piece of wood that I got from Alton. If he posts any of his burl up it will be a great catch for you guys.
 
Signed-In Members Don't See This Ad

PeterBkk7

Member
Joined
Dec 23, 2011
Messages
5
Location
Bangkok
Fantastic results.....
I don't drink coke so I will try with a can of Bud..... My plan is to pour the beer in a glass, make the pen.... Then celebrate the results....
 
Top Bottom