Segmenting with aluminum and wood

Signed-In Members Don't See This Ad
Joined
Feb 24, 2012
Messages
4,368
Location
Claremont NH
Ok so after reading all over the place in this great forum and getting pointers from all those that did this long before me I decided to give this a try. Here are some of the steps it takes to make this work. It really isn't all that hard.

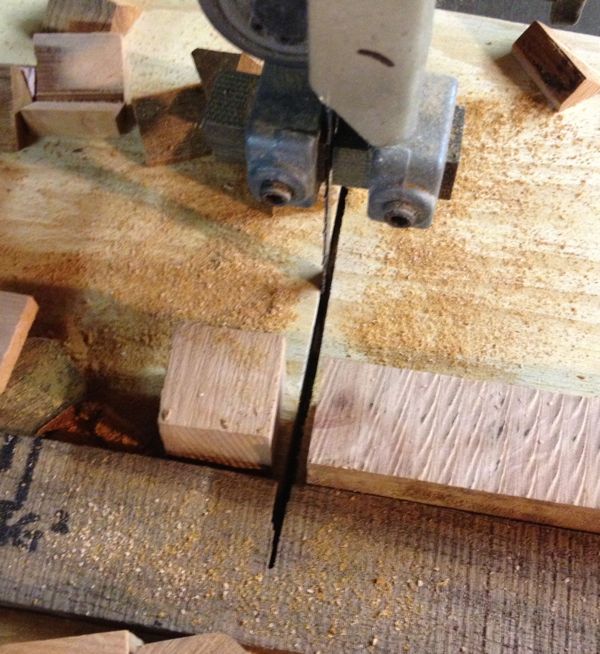
First take a blank and cut a cube out of it. This cut needs to be about square notice that I made a slide for my bandsaw and it really helps with all of these cuts.
1_SegPen1a.jpg


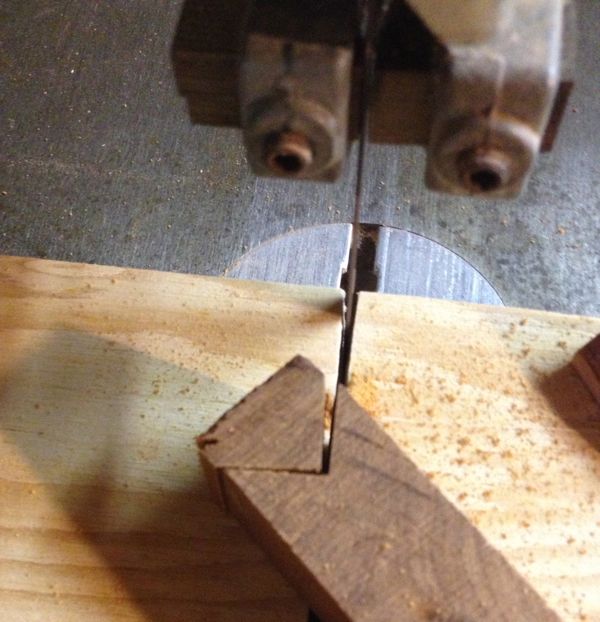
Then I use a V-Block to get a 45 degree angle still on my slide.
1_SegPen1b.jpg


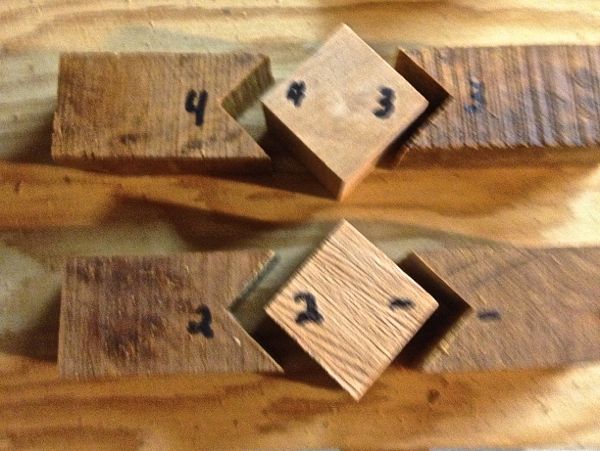
This is what your parts will look like when you are finished at the bandsaw. You will have to sand to make things nice and smooth.
1_SegPen1c.jpg


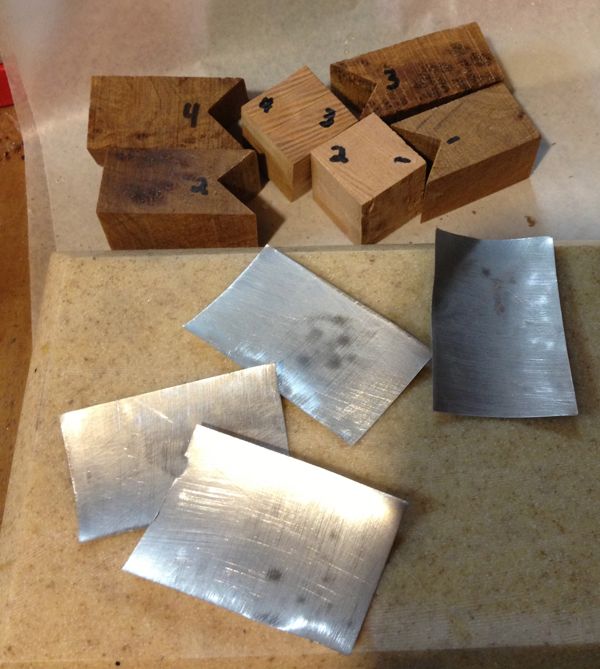
Now take care of the aluminum. I used a dremel tool to cut the bottom and top off a Diet Coke can then used sheers to cut it into a sheet. Then I sanded the devil out of it. I used some 100 grit to make it nice and rough on both sides.
1_SegPen1D.jpg


The next step is to fit the aluminum. I fold them then unfold them to about 90 degrees.
1_SegPen1e.jpg


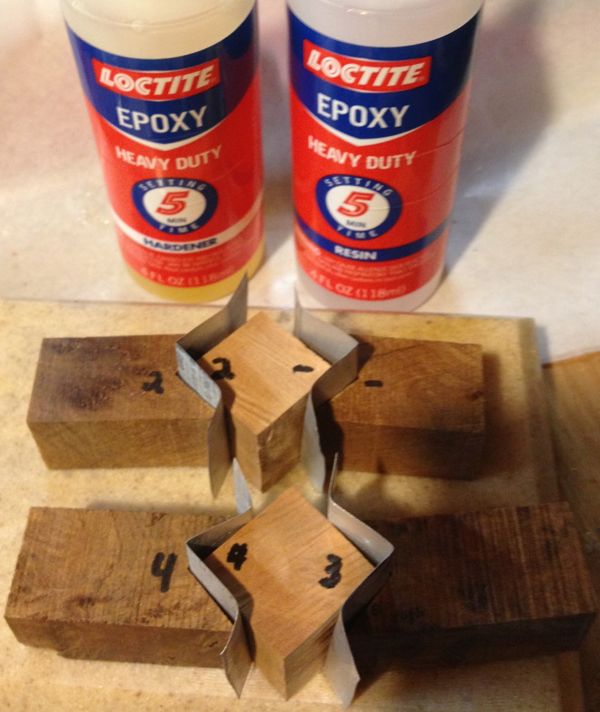
Now go ahead and start glueing them up. And clamp them overnight. I know it says 5 minute epoxy but it takes longer before it can take the kind of stresses of turning, drilling and more turning.
1_SegPen1f.jpg


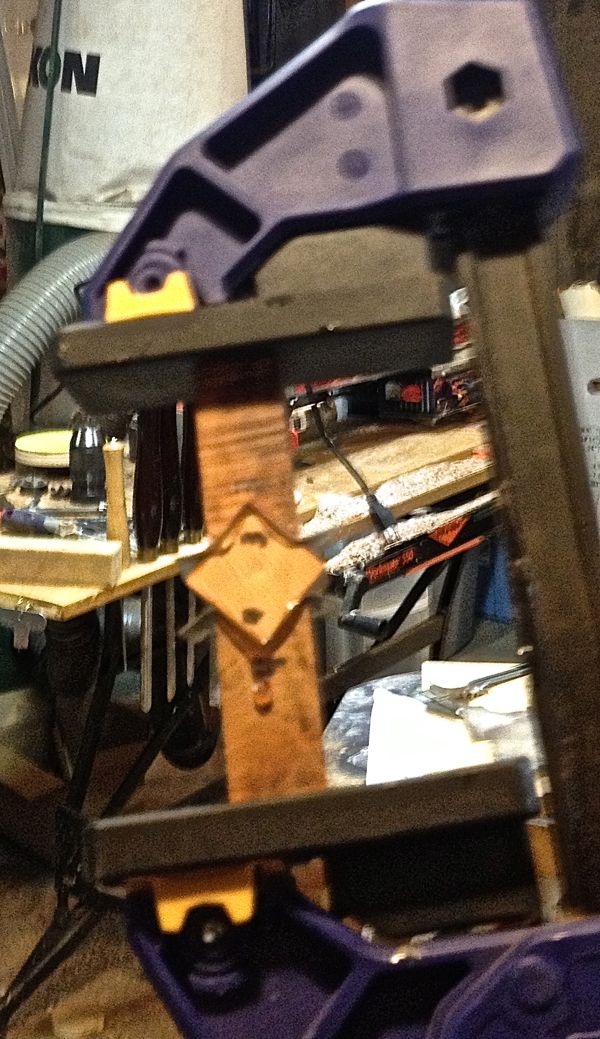
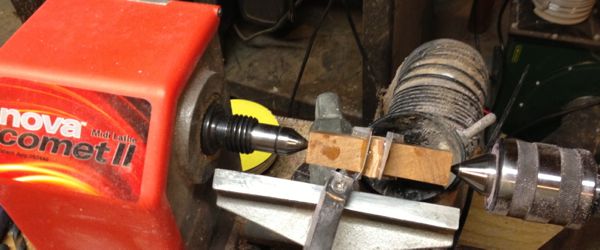
After proper drying time rough turn it down and then cut to length
1_SegPen1g.jpg


I have learned that you have to drill these very slowly and I am still having some of them come apart. Be prepared to reglue if needed. I think also it may be better to drill them in steps? I will test this on the next one. When you are done you will have something special.
1_pen-1a_1.45.33_PM.jpg


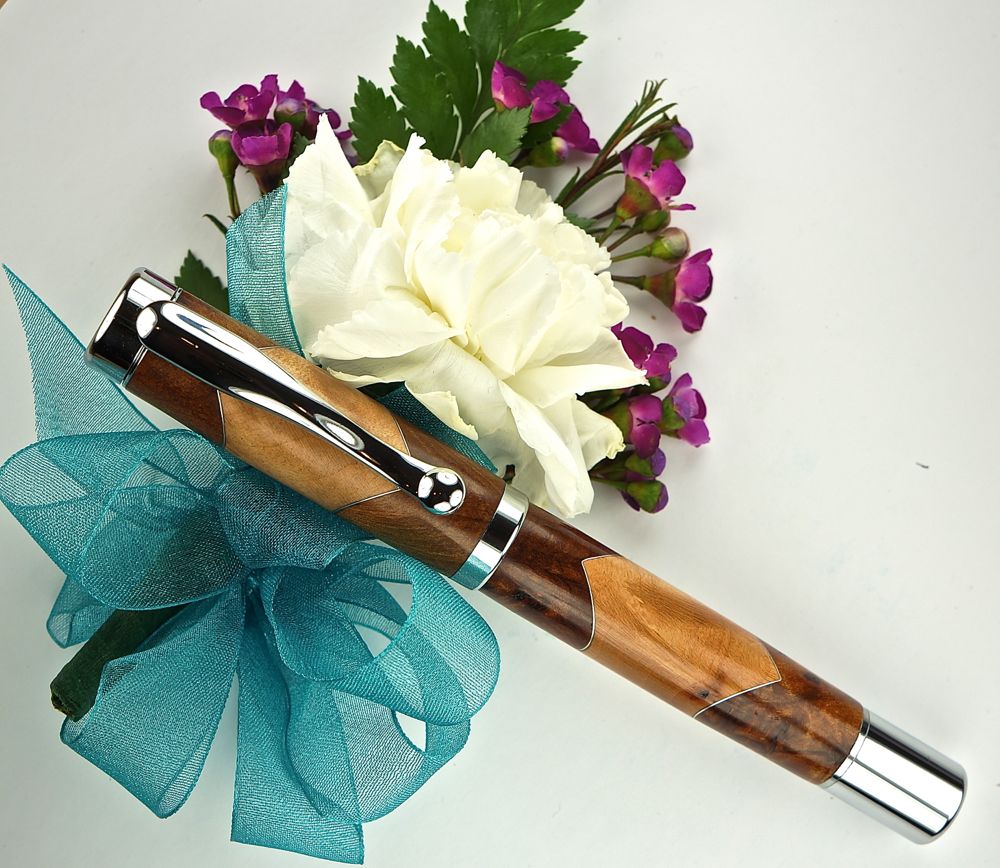
I hope this helps you.
 
Last edited:
Signed-In Members Don't See This Ad

jttheclockman

Member
Joined
Feb 22, 2005
Messages
19,148
Location
NJ, USA.
Now you are just plain showing off:biggrin: First you do a real nice segmented pen and now some nice photo work.

Seriously though great to see you sharing these ideas in your way or method of doing them. I want to thank you for coming over to the segmented forum and sharing your beautiful work. Hopefully this will inspire others to try things as we build this forum with a whole bunch of ideas and methods of doing some terrific segmented pens.

Now you have to ask yourself, doesn't that blank look a whole lot better than some plain old wood blank??? Look at the WOW factor you added to it that has been discussed in the recent Bash contests.

Keep up the great work and continue taking this idea and expanding. I am thrilled to see some segmented work showing up on the site. :)
 

Pjohnson

Member
Joined
Feb 16, 2012
Messages
278
Location
Plympton, MA
Do you need to switch to carbide cutters if you segment with a metal?
It is tempting, but I only have HSS gouges and skews
 

RMayoIII

Member
Joined
Feb 14, 2012
Messages
211
Location
Belmont, NH
Mike, when you drill these type of blanks are you using the drill press or on the lathe? Just curious if it makes a difference. I was thinking of roughing it between centers and then drilling on the lathe to get it dead centered.
The pen looks awesome and I think I'm going to give it a go sometime this week.
 

Penl8the

Member
Joined
Jul 8, 2009
Messages
414
Location
Calgary
Hi Mike,

Super cool. I like to whole set up. Thank you for sharing.

P.S. Is the boutonnière for someone special? :wink::wink::wink:
 

jttheclockman

Member
Joined
Feb 22, 2005
Messages
19,148
Location
NJ, USA.
Very nice Mike! looks really good, too add strength to the blank before ruff turning it. l square the blank up then glue pop sticks to all sides, then turned the blank round,then you can wrap the round blank with string then soak it in CA, this will add strength before you drill the blank to size.


For those doing segmenting that has alot of different segments and took a lot of time to put together, these little tips are perfect that John has mentioned. Just keep them in mind if you are really getting into some tough segmenting. I have one on the burner that I have yet to put all the components together and I will be using these methods and more to keep that baby together. Hopefully will get it done soon.
 
Joined
Feb 24, 2012
Messages
4,368
Location
Claremont NH
Very nice Mike! looks really good, too add strength to the blank before ruff turning it. l square the blank up then glue pop sticks to all sides, then turned the blank round,then you can wrap the round blank with string then soak it in CA, this will add strength before you drill the blank to size.


For those doing segmenting that has alot of different segments and took a lot of time to put together, these little tips are perfect that John has mentioned. Just keep them in mind if you are really getting into some tough segmenting. I have one on the burner that I have yet to put all the components together and I will be using these methods and more to keep that baby together. Hopefully will get it done soon.

So John is the problem that I had with glue joints letting go common. Can you recommend other kinds of glue that may be better than what I used?
 

jttheclockman

Member
Joined
Feb 22, 2005
Messages
19,148
Location
NJ, USA.
Very nice Mike! looks really good, too add strength to the blank before ruff turning it. l square the blank up then glue pop sticks to all sides, then turned the blank round,then you can wrap the round blank with string then soak it in CA, this will add strength before you drill the blank to size.


For those doing segmenting that has alot of different segments and took a lot of time to put together, these little tips are perfect that John has mentioned. Just keep them in mind if you are really getting into some tough segmenting. I have one on the burner that I have yet to put all the components together and I will be using these methods and more to keep that baby together. Hopefully will get it done soon.

So John is the problem that I had with glue joints letting go common. Can you recommend other kinds of glue that may be better than what I used?


Mike if you are asking me my answer is all segmented blanks are subject to failure just because you are using so many different materials and different grains of woods. The epoxy you are using is one I am not familar with. Not all epoxys are good for every material so you need to look at that. I use System 3 epoxies and have had good success. As mentioned heat is a huge enemy when drilling. John gave you some ideas as to how to try to avoid failures that work quite well. Just my opinion:)
 

Wood Butcher

Local Chapter Leader
Joined
Jun 8, 2005
Messages
970
Location
Westfield, IN, USA.
Great job on the execution and the instructions, I'm gonna try something like it soon. The other obvious thing is the quality of the photo, simply amazing, I'm so envious.
WB
 
Joined
Feb 24, 2012
Messages
4,368
Location
Claremont NH
I have a new design that I glued up and drilled tonight that I will post tomorrow but when I drilled this one I started with a small drill and worked my way up slowly and all held together so maybe that is the secret to drilling.
 

Parson

Member
Joined
Jun 10, 2009
Messages
798
Location
Houston, Texas
Coating the blank with thick CA glue and applying a paper towel for some structure is something I picked up from another IAP member. He does this a couple of rounds and then after it's fully dried, he drills sloooooowly.
 

plano_harry

Member
Joined
Jan 12, 2012
Messages
1,959
Location
Plano, TX 75093
Thanks for a great tutorial. For drilling success, here is a comment from Hank Lee that was helpful to me:
The key is to take your time and think through the process. If you are building up a nice blank or have an unusually beautiful blank, take your time. Some people take a week to drill out snakewood. They drill 1/4 to 1/2 inch and then let the snakewood cool and acclamate. The next day, the same again. I personally drill a little faster (over a whole day or two), but the point is - on a beautiful blank or one that you have struggled in making - don't rush it.
I can't go that slow, but I did slow way down on segmented work. the glues seem to break down when the metal hits around 150. As a guideline, If you can't hold on to the tip of the bit :eek:, you are probably drilling too fast or too hard.

Harry
 

Freethinker

Member
Joined
Jun 26, 2007
Messages
275
Location
MO.
I have done quite a bit of segmenting with aluminum. My number 1 problem is in the sanding; it is sometimes very hard to keep the small aluminum dust from becoming embedded in the surrounding wood. On one pen, after sanding all the way thru the grits, I had to start over. It did it again. I finally sharpened a skew scary sharp, and took a microscopic cut across the surface and applied CA after the skew cut, without any sanding. It was not perfect, but I could not manage to sand it without the transfer of very tiny aluminum particles to the wood.

I have also had the aluminum transfer to alternative ivory scallops on a set of segmented pen blanks that i had spent a long time putting together. I had to scrap them. I could not get the imbedded aluminum out of the alternative ivory, and it had an ugly dark "smudged" look to it.

Has anyone had the same trouble? How did you deal with it?
 
Joined
Feb 24, 2012
Messages
4,368
Location
Claremont NH
I have also had the aluminum transfer to alternative ivory scallops on a set of segmented pen blanks that i had spent a long time putting together. I had to scrap them. I could not get the imbedded aluminum out of the alternative ivory, and it had an ugly dark "smudged" look to it.

Has anyone had the same trouble? How did you deal with it?
__________________
Dan in Missouri

I usually bath my blank in denatured alcohol before I finish it and can see the aluminum on the paper towel that I use to dry. I am not sure if I get all of the aluminum off but I do the best that I can. I always use a scary sharp skew for this work. I usually hone it on a diamond hone. I need to get a slow speed sharpening system here and have been looking and drooling.

Eric, the aluminum on a diet coke can is not thinner but it weighs less:biggrin:
 
Joined
Nov 14, 2012
Messages
569
Location
Hopkins SC
Mike, before drilling like the others have said use CA to coat and seal the blank..then I wrap with duct tape very tight and then stage drill like you did. I am 100% so far with the duct tape so far and I always sharpen my bits before each pass. Your pen looks wonderful!!!
 

jttheclockman

Member
Joined
Feb 22, 2005
Messages
19,148
Location
NJ, USA.
Mike, before drilling like the others have said use CA to coat and seal the blank..then I wrap with duct tape very tight and then stage drill like you did. I am 100% so far with the duct tape so far and I always sharpen my bits before each pass. Your pen looks wonderful!!!


Duct Tape??????????? I am not sure I would go this route. Doesn't that gum up the tools when cutting??? I guess if it works for you why not. Just my opinion. :)
 

jttheclockman

Member
Joined
Feb 22, 2005
Messages
19,148
Location
NJ, USA.
I have done quite a bit of segmenting with aluminum. My number 1 problem is in the sanding; it is sometimes very hard to keep the small aluminum dust from becoming embedded in the surrounding wood. On one pen, after sanding all the way thru the grits, I had to start over. It did it again. I finally sharpened a skew scary sharp, and took a microscopic cut across the surface and applied CA after the skew cut, without any sanding. It was not perfect, but I could not manage to sand it without the transfer of very tiny aluminum particles to the wood.

I have also had the aluminum transfer to alternative ivory scallops on a set of segmented pen blanks that i had spent a long time putting together. I had to scrap them. I could not get the imbedded aluminum out of the alternative ivory, and it had an ugly dark "smudged" look to it.

Has anyone had the same trouble? How did you deal with it?


Dan you are not alone. I have answered this question numerous times on various forums because i do alot of work with aluminum and holly and also dark and light woods will give you fits too. Learn to use your skew well. I always use the skew and then right to finish. I never sand segmented blanks with that much different materials. Sanding leaves scratch marks in metal parts too and being so thin you do not see them but doing larger pieces you will see them big time. This is my opinion:)
 
Joined
Feb 24, 2012
Messages
4,368
Location
Claremont NH
Alas I am alergic to CA and use it very sparingly. That is why I no longer use CA as a finish. I have had very good luck with drilling if I go very slow, step my way up to the drill size that I need, and make sure to chuck the blank right.
 

Russknan

Member
Joined
Mar 13, 2012
Messages
537
Location
Nanuet, NY
Great tutorial and outcome! Thanks for helping all of us out. BTW, Wayne R. was looking for articles to go into the library. I would like to nominate this one so it will remain easily available to all members. Russ
 

jttheclockman

Member
Joined
Feb 22, 2005
Messages
19,148
Location
NJ, USA.
Great tutorial and outcome! Thanks for helping all of us out. BTW, Wayne R. was looking for articles to go into the library. I would like to nominate this one so it will remain easily available to all members. Russ

Russ

Even if this is not turned into an article for the library, it should always be here in this forum. That is why I lobied hard to get this seperate forum. From now on any segmenting processes or pens done hopefully wide up here. So in the future it would be easier to find things related to segmenting. Right now you have to do searches and some of it is in the library but alot of good info gets played out in the posts. Hopefully we can keep this going and continue to add some great info and some great looking pens.
 

Freethinker

Member
Joined
Jun 26, 2007
Messages
275
Location
MO.
Thanks for the answers. You guys seem to have resorted to the same things I did; using a VERY sharp skew, and beginning the CA process right after the skew without sanding.

I just thought there might possibly be some other way of combating the aluminum transfer, but I guess not.

I was kinda teed off at spending so much time on a set of blanks only to have to scrap them,......but after hearing you guys have the same problems and similar solutions, I think I'll go back to doing some more aluminum segmenting soon.

I DO love the looks of it.
 
Joined
Jan 22, 2012
Messages
307
Location
Laurens,SC
Thanks for the answers. You guys seem to have resorted to the same things I did; using a VERY sharp skew, and beginning the CA process right after the skew without sanding.

I just thought there might possibly be some other way of combating the aluminum transfer, but I guess not.

I was kinda teed off at spending so much time on a set of blanks only to have to scrap them,......but after hearing you guys have the same problems and similar solutions, I think I'll go back to doing some more aluminum segmenting soon.

I DO love the looks of it.

Would it work to seal the blank with thin CA for sanding? I do this for cross cut blanks and think I get the effect fairly deep. So far they cut great. Thanks for such a great tutorial. And thanks to all for contributing so much.
 
Signed-In Members Don't See This Ad

Freethinker

Member
Joined
Jun 26, 2007
Messages
275
Location
MO.
Would it work to seal the blank with thin CA for sanding? I do this for cross cut blanks and think I get the effect fairly deep. So far they cut great.

Yes, i've done that also, with varying success. Sometimes the aluminum still transfers into the finish. I think i may be oversanding a bit, getting the particles too microscopically fine.

I may try a combo of --seal with thin CA/very light smooth skew cut/repeat thin CA/repeat thin skew cut/move to 15-25 coats of CA finish.

Also, when the aluminum segment is 90 degrees to the pen barrel, it is --naturally-- far less of an issue.
 
Top Bottom