Need help creating/finishing segmented blanks

Signed-In Members Don't See This Ad
Joined
Sep 22, 2015
Messages
115
Location
Lathrop, CA
Sorry if something similar was posted before. I have searched but not able to find anything.

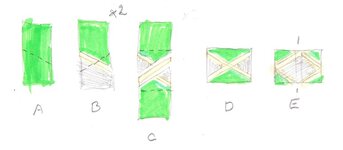
I am creating a blank for a Sierra pen that will have the Jamaican flag made out of acrylic and then some stabilized Blue Mahoe on each side. I will be starting the blank as a 3/4 square before turning.

The Jamaican flag is a yellow X with green on top/bottom and black on the sides. I was thinking of stacking a yellow blank on top of either the black or green blanks then cutting both at the same time for the respective areas. Will this work or is there a better way cut them so they match?

When it comes to finishing, I have reactions to CA so using that is out. I usually use Pen Plus for wood and wet sanding/novus for acrylic. Can I tape off the acrylic and finish the wood then vice versa to finish the acrylic? Is there another way to get a consistent finish without using CA?

Thanks in advance.
 
Signed-In Members Don't See This Ad

MikeinSC

Member
Joined
Mar 10, 2014
Messages
495
Location
SC
The stabilized wood should be able to take on a shine. That is assuming the wood was stabilized with a resin like Cactus Juice.

It won't be a high luster, but will be a shine. I've done this with stabilized maple and is a pen that I use regularly and have had no issues. I used micro mesh up to 12,000.

An alternative would be something like Shellawax. That shines well and goes on easy. Once I changed to a friction polish, Ive never done another CA finish again.
 

CREID

Member
Joined
Jul 23, 2008
Messages
3,009
Location
Vancouver, wa
You could try lacquer dipping, but I would try the lacquer on the acrylic first to make sure. You can find a couple dipping finish articles in the library.

Curt
 

dthayer

Member
Joined
Jul 29, 2015
Messages
300
Location
Prescott, AZ
I'm not sure if this is what you have in mind but I enjoy trying to figure out segments so here is a way I came up with for the Jamaican flag that might work...

attachment.php


You would start with your green acrylic and cut it at the appropriate angle (A). Then cut a yellow piece of the appropriate width and a black piece with the same angle as the first cut. Glue all these pieces together and (once dry) cut the result using the same angle (B). You will need to make two of these. Once those are assembled, cut another yellow just like the others and glue it between the two assemblies (C). When that is done, you can cut the excess green off and you will have the flag (D).

Of course, the side view will look like (E) so you may want to split the final assembly down the middle (as marked in (E)) and glue in some kind of separator piece (maybe more of the Blue Mahoe).

You would have to be very careful to be consistent with the angles of your cuts and the thickness of the pieces (especially the yellow) but I think this would work.

As for the finish, I have done a pen before that used both wood and acrylic:

attachment.php


I sanded the whole piece with Micromesh up through 12000 and then finished with Pens Plus. Usually with acrylic, I just do the MM and then some Maguires Plastx polish but since this had the wood, I did the whole blank. It didn't work out so well though as there were some flaws in the acrylic parts when I was done. The only thing I could think of was that it got so hot while applying the Pens Plus that it caused the blemishes (I really let the friction build up when applying the friction polish). I went through the MM again, this time being careful to only sand the acrylic parts and then used the Plastx and when I was done the blemishes were gone.

I hope this helps!
 

Attachments

  • JamaicanFlagSegment.jpg
    JamaicanFlagSegment.jpg
    46.8 KB · Views: 361
  • DirkThayer_Pens-29.jpg
    DirkThayer_Pens-29.jpg
    222 KB · Views: 393

jttheclockman

Member
Joined
Feb 22, 2005
Messages
19,132
Location
NJ, USA.
th


If it were me I would build this using all acrylic. When I say build this, I mean just that. You will not be able to just double a cut. Again I do not know your skill level. I do not know what tools you have available. You will have to do the math but i can make an educated guess. You will need the length of the Sierra tube to work off.

This is somewhat like doing a scalloped blank except you are only cutting 2 sides


The only difference also is I can not tell you the angles. It will be a trial and error thing.

Say the Sierra tube is 2-1/4" long I would draw a rectangle on a sheet of paper that is 2-3/8" long and 7/8" wide I like to have leeway. Now work on the X. Take a yellow strip and make it as wide as you want but i think something like 1/8" would do. Cut one length from corner to corner. This will be one piece. Then to make the X you need 2 shorter pieces. These go from corner to center of the first piece. Now you have the basis of the blank. All you need to do is fill in the spaces. The 2 black ends should be equal angles as well as the green pieces. What that angle is I do not know and you will have to figure that out. Same for the green ones.

Once you have everything dry fitted then glue it up. I prefer epoxy but CA will work but use at least med CA to give you the open time you will need. Something like this you need to be dead center when drilling so be aware of that.

It is alot harder to explain than to do. It is very doable. This is the way I would approach this. Maybe some others would have a better solution. Good luck.
 
Top Bottom