My Jig

Signed-In Members Don't See This Ad

Edward Cypher

Member
Joined
Feb 8, 2011
Messages
1,901
Location
Denver, Colorado
Plus 1 on Alisam Engineering!!! I have there indexer for a 10 inch lathe, works flawlessly!!!! Fast and friendly service.


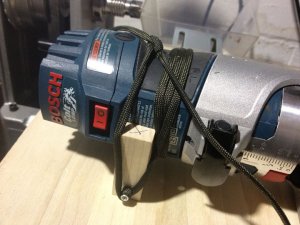
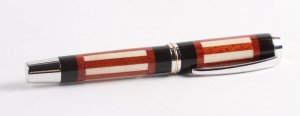
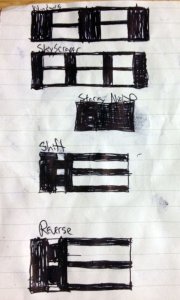
Great post John. I had seen your pens a while back and tried to re-create the design. Not successfully! Qick question - where did you get the indexing plate that is attached to the lathe?


Here you go.


Alisam Engineering - Hand Tool Manufacturing: Jet mini-lathe indexing system


Very well made and fits very easily. Has enough indexing for what we need to do.

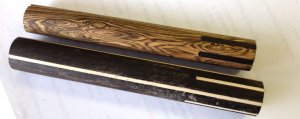
I plan on a few more pens hopefully over the Holiday I can find some shop time. I have a week off.
 
Signed-In Members Don't See This Ad

mpex

Member
Joined
Nov 18, 2012
Messages
152
Location
Columbus, Ohio
From the last we spoke you had an issue of routing off center. Did you fix that???
No I haven't. I'm still not sure what the problem is. When I put in the V bit, it lines up perfectly to the center. I also used a Wexley angle finder to make sure the jig was on the same plain as the bed of the lathe AND that the router was sitting at a pretty much perfect 90deg angle. It is actually something like 89.7degrees.


I now either take a drill bit that matches the measurement I just got or I actually have been using and here is another use for the transfer punches. I find one that is closest to my measurement.

It sounds like if I find one that measures the final depth, I would not be making multiple cuts, just a single cut to the finished depth. I thought I was supposed to make several passes in order to insure a good cut. Can you explain this? What would make sense is that you find a bit or punch that matches the depth and then find 2 more that are steps in between to measure the different passes.

To set the correct depth you need to adjust the jig in or out.

This makes perfect sense! I can't wait to try this! I think this will fix the problem. One question on work flow. Assuming I am adjusting it to make 3 passes per grove per thoughts above. Rather than making the adjustment 3 times for each groove (6 grooves, 18 adjustments) Adjust for the first depth, make the first groove path, rotate the piece using the indexing wheel to the other 5 grooves. Once I get back to the original groove, THEN adjust for the second depth, rotate, then do the third depth the same. Is this reasonable thinking? Alternately, see next question, as you recommended.

Now you have your depth set. As I told you you need to take small cuts or else the router will climb on you. You advance the router making sure you hold it down square and that it slides evenly over the platform. You back off when you get to the end and again advance the router into the blank untill you finally now have the base riding against the rail on the jig.

So using this method instead of what I suggested above, I would be sort of eye balling the depth of the cuts right? So it might be deeper at first in some spots? I'm just concerned I wont be able to control the router if it's not riding on the rail to begin with.


See I told you it was easy. So now lets see something.

We are not at 'easy' yet. :) I'm hoping if all goes well, I should have something finished in a few days.


Here is my second Mod. Used a couple screws and paracord to secure the router to the wood leveling plate. I only have the one router so something less permanent will allow me to use it for other things. I haven't tried any cuts with this yet. In theory it should work...I think...

1_routermod2.JPG
 

jttheclockman

Member
Joined
Feb 22, 2005
Messages
19,143
Location
NJ, USA.
I guess my instructions were not too clear. You only set the router depth once. Yes you will be freehanding some of the cuts but if you do not go too deep with your cuts you will be just fine. The big key is to keep the router riding on the platform at all times. You make about a 1/4" cut each time is fine. So what it is not perfect inside. The final cut will be with the router against the fence and it will clean everything up. If you did not raise or lower the router your cuts should be exactly in that groove every time.

If you keep changing the depth of cut with the router slide, you will come out with what you showed in your photo. Unless that is a plunge router which it is not you can not do what you want and get perfect slots. I do this all the time and believe me it is not bad at all. You will have perfect control of that router because your cuts are not that deep with each pass. Try it this way first and see how it feels.

Back to your first problem. There is only 2 things that can be off. The router holder is not putting the router on a straight plain. It is making it tilt upwards ever so slightly. Or the platform is lower in the back end and it is not sitting level with the base of the lathe.

Good luck.


I just thought of something that may help you if you are that concerned about having the router riding against the fence. Whatever the measurement is for the final depth of cut is, say it is 5/8" . Take that 5/8" and divide it by as many passes you feel is necessary to make that depth of cut and make yourself some spacers to put between the fence and your router. You now have the router riding against a solid object. When you go to make the next pass just remove one of the spacers. Then do this again and again till your final cut is against the fence with the router. Like I said you can make 3 spacers or 2 spacers. Whatever is confortable for you. You can place a clamp or some sort of stop so that the spacers do not slide off as you push the router against them. I hope this is clear. Chalk this up to another MOD. You can double sided tape to the router base if you prefer instaed of the fence. Have to think outside the box a bit. Just remember that is a free air spinning bit you have there. Router are no toys.
 
Last edited:

mpex

Member
Joined
Nov 18, 2012
Messages
152
Location
Columbus, Ohio
Back to your first problem. There is only 2 things that can be off. The router holder is not putting the router on a straight plain. It is making it tilt upwards ever so slightly. Or the platform is lower in the back end and it is not sitting level with the base of the lathe.

I'm going to try to put a couple pieces of veneer between the router and the router holder and see if that does it. Hopefully it won't also mean that I have to raise the platform to bring the bit to center...


Can you show a better photo of your router as it is set up? I am no expert, but I have mine mounted on plywood., leveled etc., to the centerline of my lathe

My setup is almost identical to JT's above. Only exception is the 2 modifications that I have posted.
 

airborne_r6

Member
Joined
Oct 28, 2008
Messages
279
Back to your first problem. There is only 2 things that can be off. The router holder is not putting the router on a straight plain. It is making it tilt upwards ever so slightly. Or the platform is lower in the back end and it is not sitting level with the base of the lathe.

I'm going to try to put a couple pieces of veneer between the router and the router holder and see if that does it. Hopefully it won't also mean that I have to raise the platform to bring the bit to center...

Putting a 1/4" straight rod in the collet of your router will help you visualize what is going on there. Also, I think if it was me I would make sure the platform is level and flat and at the right height before shimming the router up. I would be worried that just shimming the router could give you very slight differences in angle and cut entry point which might make the width of the groove wider than desired. That would only be an issue if the material you are putting in the groove is a specific thickness.
 

jttheclockman

Member
Joined
Feb 22, 2005
Messages
19,143
Location
NJ, USA.
Can you show a better photo of your router as it is set up? I am no expert, but I have mine mounted on plywood., leveled etc., to the centerline of my lathe

I am sorry I missed this question. I was concentrating on answering Moishe. Were you asking me or him?// I did not mean to overlook your question. I was rereading this post today and saw this question. If you want me to show other views just let me know what you want to see. Sorry about that.
 

mpex

Member
Joined
Nov 18, 2012
Messages
152
Location
Columbus, Ohio
Made good progress yesterday...for naught... Sketched out the final plan, came up with the cut lengths that I needed to execute, and then made my upper cuts to the lower... Ruined. I think I can still salvage something out of it. I just have to come up with a new plan. On the positive side, I did another pen along side of this one and didn't make the same mistake. Should have something finished in the next day or 2.

One question. For this setup, what type of glue should I be using? I am afraid even the thick CA will dry too fast. Woodglue I'm guessing won't be the best to secure it to the tube. Seems like epoxy might be the best, but I don't know if that works well for gluing wood segments.

Beyond that, what would you suggest as a gluing process? I am gluing the segements together at the same time as securing it to the tube right?
 

jttheclockman

Member
Joined
Feb 22, 2005
Messages
19,143
Location
NJ, USA.
Some times I have a hard time figuring out what some people are asking. But I know this is probably the case also for when I ask a question. Alot of times a photo is worth its weight in gold. I am going out on a limb here and thinking you cut the slots in a blank and you drilled for the tube. Now you are assembling the tube in the blank but also adding the inlays. I would not have done it that way for the simple reason of what you are asking. But to get around what you are doing I would use an epoxy that has a long open time. Yes epoxy sticks very well to wood.
 

jttheclockman

Member
Joined
Feb 22, 2005
Messages
19,143
Location
NJ, USA.
No to above. I did it the same as you (as far as I can tell.)

1_routedblank1.JPG


Very good. Yes you are stacking which is a whole lot easier to do. I used epoxy because you are gluing to the tube as well. This is going to look good. I see it already. Don't screw it up. We are watching. Gee I am getting excited to see this thing. Hurry up. No just kidding. Take your time with it and make sure the glue is dried and cured.

Edit one other note. You probably made the end pieces just abit proud of the tubes or at least you should have. So when you set the tube for final placement, make sure you have the same amount of overhang on each end or else the pattern will be off. Now get to work.
 
Last edited:

jttheclockman

Member
Joined
Feb 22, 2005
Messages
19,143
Location
NJ, USA.
Awesome. Might have some time to work on it tonight.


Any particular epoxy brand that I should use?


You need something with some open time and is good for wood and metal. You want something like at least 1 hour open time. 15 minutes and 30 minutes is too fast.

I have always been using System3 epoxys for years.

Can't wait to see it. My student:biggrin: makes me proud.
 

jttheclockman

Member
Joined
Feb 22, 2005
Messages
19,143
Location
NJ, USA.
Ok. I've been using 5 min epoxy, guess I'll have to upgrade!


Oh definetly that is not the glue. What happens as soon as it touches wood it absorbs and starts to set. Need to upgrade. Not sure what the Home centers carry.
 

mpex

Member
Joined
Nov 18, 2012
Messages
152
Location
Columbus, Ohio
So, pretty close to finished with the first. I'm not sure it's going to make it onto a pen kit. If I'm not going to be happy with the final result, then no reason to waste a kit. The thing that is troubling me is that you can very distictly see the glue seam between the segments at the bottom and the top. It doesn't flow. What can I do (going forward I assume) to get rid of this? I'm surprised they showed up this much. I cut with a finishing blade and sanded lightly. The main wood is Holly. The only thing I can think of is the new Epoxy I used. System 3 T-88.
Buy System Three T-88 Epoxy Syringe 16 ounces at Woodcraft

1_routedblank3.JPG


BTW, the yellowish tint is CA. I applied a thin coat to seal the wood before I do my final sand.
 
Last edited:

jttheclockman

Member
Joined
Feb 22, 2005
Messages
19,143
Location
NJ, USA.
So, pretty close to finished with the first. I'm not sure it's going to make it onto a pen kit. If I'm not going to be happy with the final result, then no reason to waste a kit. The thing that is troubling me is that you can very distictly see the glue seam between the segments at the bottom and the top. It doesn't flow. What can I do (going forward I assume) to get rid of this? I'm surprised they showed up this much. I cut with a finishing blade and sanded lightly. The main wood is Holly. The only thing I can think of is the new Epoxy I used. System 3 T-88.
Buy System Three T-88 Epoxy Syringe 16 ounces at Woodcraft

1_routedblank3.JPG


BTW, the yellowish tint is CA. I applied a thin coat to seal the wood before I do my final sand.


I am sorry I do not know what you are referring to. I do not have a closeup of what you are talking about. If you can point it out with a better photo maybe I can suggest something. I like the different size inlays. So many variations can be achieved doing this.
 

alphageek

Former Moderator
Joined
Jul 19, 2007
Messages
5,120
Location
Green Bay, WI, USA.

Sometimes we are our own worst critics. That seam is tight and clean, so I don't see an issue with it. If it really bothers you, then next time make sure to put either an alternate color on the end or something (veneer, metal) to make it seem like you WANTED that seam there.
 
Joined
Feb 24, 2012
Messages
4,368
Location
Claremont NH
Wow that is very clean. There is a limit to how close you can mate two pieces of wood. The glue has to have some thickness too when you put things together. This is just as alphageek says I use separators to hide these things. You can also add multiple layers to clean up a multitude of problems and space them out over several layers. Of course I would never do that :biggrin:
 

jttheclockman

Member
Joined
Feb 22, 2005
Messages
19,143
Location
NJ, USA.
As Mike and Dean mentioned you are being a little to picky. No wonder I could not see it on the first photo. I would put some sort of seperator between the end pieces and this does 2 things, takes the eye away from the glue joint and also hides it.

Not sure if i had mentioned this before but a trick that I discovered when working with Holly is to keep that white wood look moreso, I bleach it before assembly of the inlay pieces and other glueups. It does work. If you do try this be warned it is dangerous and it will swell the wood. And no Clorax is not the bleach to use. You need real wood bleach 2 part system.
 

alphageek

Former Moderator
Joined
Jul 19, 2007
Messages
5,120
Location
Green Bay, WI, USA.

Sometimes we are our own worst critics. That seam is tight and clean, so I don't see an issue with it. If it really bothers you, then next time make sure to put either an alternate color on the end or something (veneer, metal) to make it seem like you WANTED that seam there.

Oh - and if you REALLY don't want to turn them into a pen - PM me! I'll send you my address. I'd hate to see beautiful blanks like that wasted!!!
 

jttheclockman

Member
Joined
Feb 22, 2005
Messages
19,143
Location
NJ, USA.
I agree. Definetly throw some tubes in there. It won't cost you much at all to see what they look like and it would such a waste if you did not at least turn them. You can practice your sanding technique with the use of Holly wood and the other dark woods. That is always a bit of a challenge. I like the pattern. Should look really good when finished.
 

jfoh

Member
Joined
May 27, 2007
Messages
390
If you want to eliminate adjusting your depth of cut by altering the distance your bit is out of the chuck or by altering your setting of the router I have a suggestion. I place 1/8" metal spacers between the fence and router on the jig. If I want to cut 3/8" deep I set three spacers which are held in place on one end with a machine screw and wing nut fastened to the main fence and one non attached spacer. "Zero" the router by setting the bit to touch the surface of the blank. Remove the non attached one, 1/8" spacer. Push the router against the fence/shim combo and make one pass. This give you an exact 1/8" deep cut. Then remove one spacer and repeat. Do this until the full depth is routed. Makes for very repeatable passes with a minimum of time spent adjusting.

If you want 1/4" increments then use 1/4" spacers. Burls do better with very thin (shallow) cuts. DNAHIK. Hope my explanation is clear as I a very photo posting challenged.
 

mpex

Member
Joined
Nov 18, 2012
Messages
152
Location
Columbus, Ohio
First 2 done!

1_SegBWJG1ws.jpg


1_SegBWJG2ws.jpg


1_SegHollyJG1ws.jpg


1_SegHollyJG2ws.jpg


Not sure why the photos are so small here. They are larger in the Member Photo Album section.
 
Joined
Feb 24, 2012
Messages
4,368
Location
Claremont NH
Sweet... When someone writes a tutorial it is so rewarding to see someone run with it and do it. I just know John T. is smiling ear to ear on this one. Well done on the pens and to you John well done on the tutorial...
 

jttheclockman

Member
Joined
Feb 22, 2005
Messages
19,143
Location
NJ, USA.
Sweet... When someone writes a tutorial it is so rewarding to see someone run with it and do it. I just know John T. is smiling ear to ear on this one. Well done on the pens and to you John well done on the tutorial...


Well it does make you feel good that at least someone took the time to try something that a person spent some time on explaining. Moishe showed me these pens awhile ago and I was wondering when he was finally going to post them. :)

He did well all the way around. There are so many more things that can be done using the jig and I hope he continues.
 

mpex

Member
Joined
Nov 18, 2012
Messages
152
Location
Columbus, Ohio
There are so many more things that can be done using the jig and I hope he continues.

Definitely not done! I'm working out the next one in my head right now. I'm thinking almost a completely solid ebony, with just a single 1/8" ring of maple dots on each end of each blank.

I'm also going to try to do some points like a pool cue using the Vee bit.
Check this out: The Forearm - Start To Finish


John, you mentioned there is much that can be done. Looking forward to hearing more, when ever you have the time.
 

jttheclockman

Member
Joined
Feb 22, 2005
Messages
19,143
Location
NJ, USA.
There are so many more things that can be done using the jig and I hope he continues.

Definitely not done! I'm working out the next one in my head right now. I'm thinking almost a completely solid ebony, with just a single 1/8" ring of maple dots on each end of each blank.

I'm also going to try to do some points like a pool cue using the Vee bit.
Check this out: The Forearm - Start To Finish


John, you mentioned there is much that can be done. Looking forward to hearing more, when ever you have the time.


Skiprat has a tutorial on doing the points using his technique which can easily be adapted to the use of that jig.

I really need to get my butt in the shop and get some pens done.
 

mpex

Member
Joined
Nov 18, 2012
Messages
152
Location
Columbus, Ohio
It's interesting. I'm spending almost as much time trying to think of ideas and unique designs as I am creating them. Really struggling to come up with stuff.

Sketches:
1_segmentideas.JPG


2 new blanks:
The one on the top will be primarily Bacote. Each end will have a 3.5mm Ebony/Bacote Ring (as seen at the end of the blank) surrounded by 3.5mm Ebony rings
The one on the bottom is actually going to be 2 different pens. One of them will be either the skyscraper or window sketch from above. The other is going to be an all Ebony with the 8 point maple rings floating at the bottom and top of each blank.
If that doesn't make sense, no worries, pens coming in the next couple days...

1_routedblank4.JPG


2 others. Thinking about some asymmetrical ideas. Really outside my box, I'm a pretty symmetrical guy when it comes to arts and crafts.

The other idea is to do square floating windows. I'm pretty sure I can figure out how to do it, but not sure if it's worth the trouble. Deciding first if I think I will like the design in the end.
 
Last edited:

jttheclockman

Member
Joined
Feb 22, 2005
Messages
19,143
Location
NJ, USA.
It's interesting. I'm spending almost as much time trying to think of ideas and unique designs as I am creating them. Really struggling to come up with stuff.

Sketches:
1_segmentideas.JPG


2 new blanks:
The one on the top will be primarily Bacote. Each end will have a 3.5mm Ebony/Bacote Ring (as seen at the end of the blank) surrounded by 3.5mm Ebony rings
The one on the bottom is actually going to be 2 different pens. One of them will be either the skyscraper or window sketch from above. The other is going to be an all Ebony with the 8 point maple rings floating at the bottom and top of each blank.
If that doesn't make sense, no worries, pens coming in the next couple days...

1_routedblank4.JPG


2 others. Thinking about some asymmetrical ideas. Really outside my box, I'm a pretty symmetrical guy when it comes to arts and crafts.

The other idea is to do square floating windows. I'm pretty sure I can figure out how to do it, but not sure if it's worth the trouble. Deciding first if I think I will like the design in the end.


Man there are a ton of ideas you can do. I would never have that problem. My problem is having time to do them. The sky is the limit.
 

GaryMGg

Member
Joined
Nov 23, 2006
Messages
5,786
Location
McIntosh, Florida, USA.
Awesome thread; this needs to be archived into the library as it demonstrates soooo many important concepts.

The guidance while not a strict tutorial incentivizes (sp?) individuals to solve an issue by combining their experience
with experimentation, cognitive thinking, and creativity culminating in self-reliance, new insights and increased self-confidence.
This is an extra-ordinary skill builder! :biggrin:

Kudos all around y'all. :wink:
 

jyreene

Member
Joined
Feb 17, 2009
Messages
1,476
Location
Overseas location
I am amazed. I'm pretty much responding to put it in my archive so I can try and figure out how to do this without the router (don't own one and don't really want one yet unless I can't do this without it or can't figure it out).
 

mpex

Member
Joined
Nov 18, 2012
Messages
152
Location
Columbus, Ohio
I am amazed. I'm pretty much responding to put it in my archive so I can try and figure out how to do this without the router (don't own one and don't really want one yet unless I can't do this without it or can't figure it out).

You could do it with a Dremel... Someone also suggested some sort of dentist saw.

What I'd really like to do is to be able to make a cut as thin as a veneer. Not sure if or how that might be possible.
 

airborne_r6

Member
Joined
Oct 28, 2008
Messages
279
I am amazed. I'm pretty much responding to put it in my archive so I can try and figure out how to do this without the router (don't own one and don't really want one yet unless I can't do this without it or can't figure it out).

You could do it with a Dremel... Someone also suggested some sort of dentist saw.

I made a similar jig for something else I am working on and tried it with a Dremel a couple days ago. I got an unacceptable amount of flex out of the bit and found the dremel was just too under-powered. However, I was working with resin blanks not wood. I still have the dremel set up and will try it with wood and let you know how it goes. Probably won't be until tomorrow.

What I'd really like to do is to be able to make a cut as thin as a veneer. Not sure if or how that might be possible.

You can get end mills starting at 0.005" and going up from there. The depth of cut is 3X the diameter so you would have to have your blank basically turned to size before you inlaid the veneer. The shank diameter is 1/8" on them so they would fit a Dremel or you can get after market collets for routers that will hold 1/8" bits. I don't know how well they will work I just know you can buy them:
Carbide Micro End Mill, Carbide Micro End Mills, Micro EndMill
 

jttheclockman

Member
Joined
Feb 22, 2005
Messages
19,143
Location
NJ, USA.
I am amazed. I'm pretty much responding to put it in my archive so I can try and figure out how to do this without the router (don't own one and don't really want one yet unless I can't do this without it or can't figure it out).


Do what is my question to you??? Not sure what you want to do. If it is to put layers together you can do with a tablesaw or even a bandsaw. There was a person here that showed us basically the same patterns using stave cuts on his tablesaw. Do a google seach for that and he shows that system.

Other than that please state what you are looking to do and maybe more help can come your way.
 
Signed-In Members Don't See This Ad

jyreene

Member
Joined
Feb 17, 2009
Messages
1,476
Location
Overseas location
Do what is my question to you??? Not sure what you want to do. If it is to put layers together you can do with a tablesaw or even a bandsaw. There was a person here that showed us basically the same patterns using stave cuts on his tablesaw. Do a google seach for that and he shows that system.

Other than that please state what you are looking to do and maybe more help can come your way.

I like the design idea and wanted to put it in my to do list. I do want to see if I can get close with what I have and by myself first. Plus I don't have s table saw and the band saw my dad gave me just broke (I might be able to fix it but I'm not sure if a $100 dollar band saw is worth it) so I'm down to hand saws, my cheap miter box, a belt/disk sander, a dremel, and my general hulk smashness.

So I honestly was using my comment to bookmark it but I found the subscribe button like 3 hours later!

I do appreciate the offer and I'm sure ill be back on soon asking questions. I'm definitely still quite the novice.
 
Top Bottom