My Jig

Signed-In Members Don't See This Ad

jttheclockman

Member
Joined
Feb 22, 2005
Messages
19,132
Location
NJ, USA.
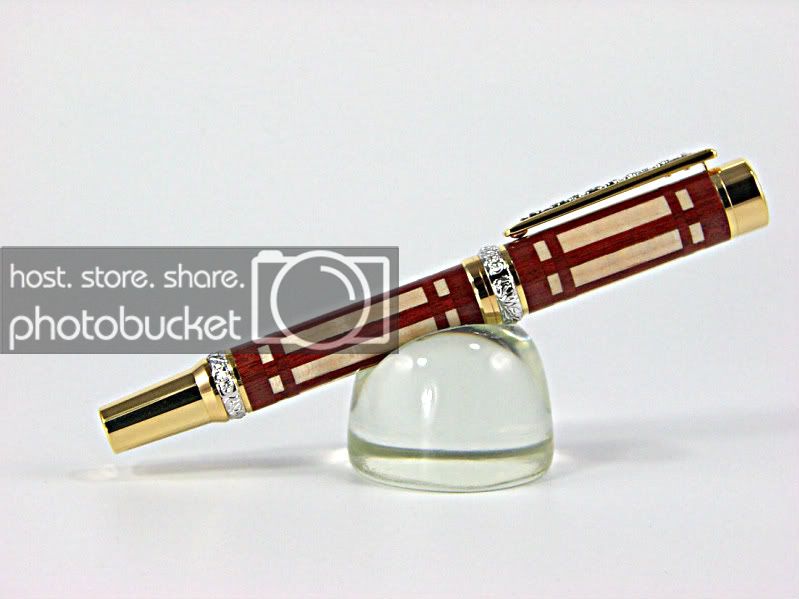
Remember these pens???

IMGP0881.jpg


CopyofIMGP0897-1.jpg


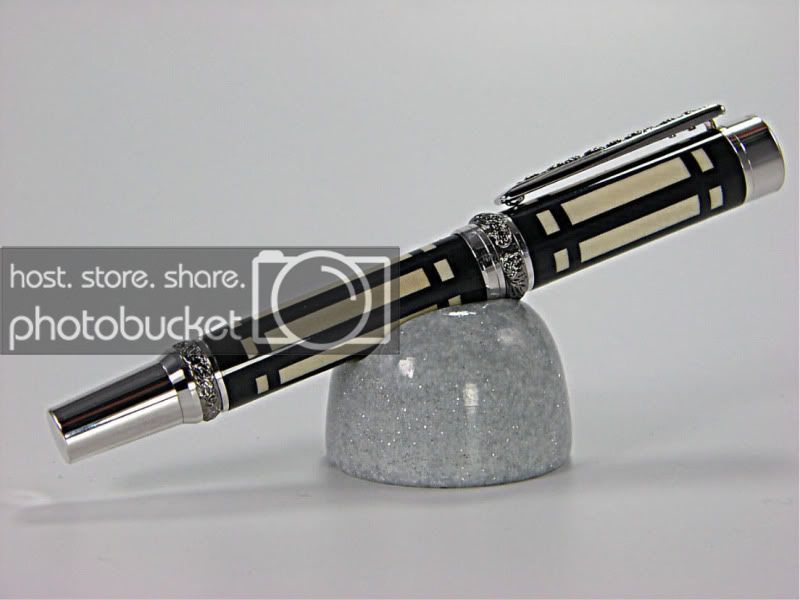
Well people have asked how I make them. Unfortunately I did not take alot of photos but will post some and you can get the basic idea and the tools I used to do these and the others that I used the dots on. When I do more like these I will take more photos. I will try to take more photos of any new design I come up with. Any questions I will be happy to address here.

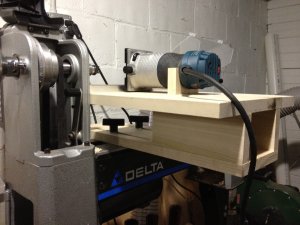
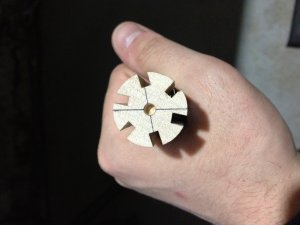
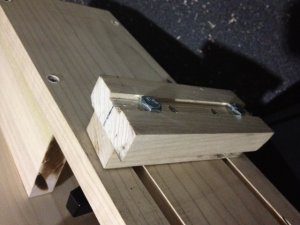
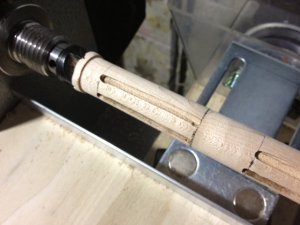
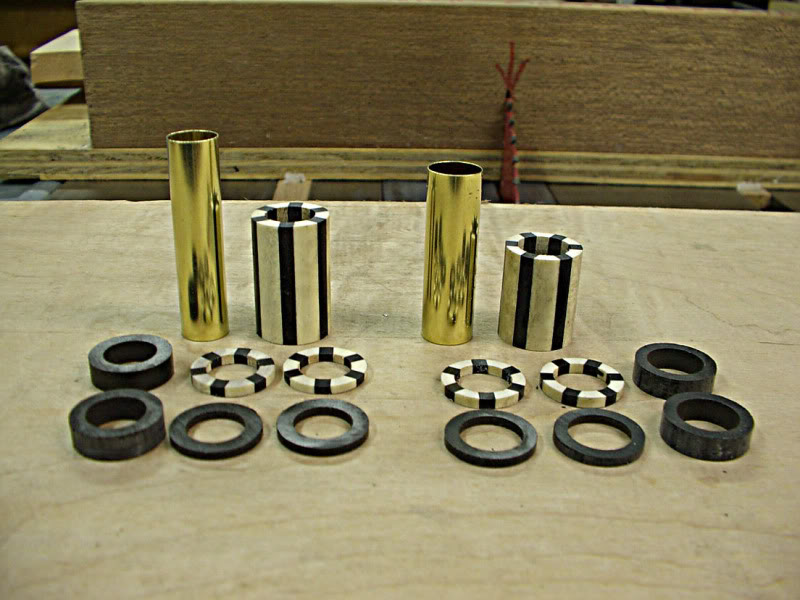
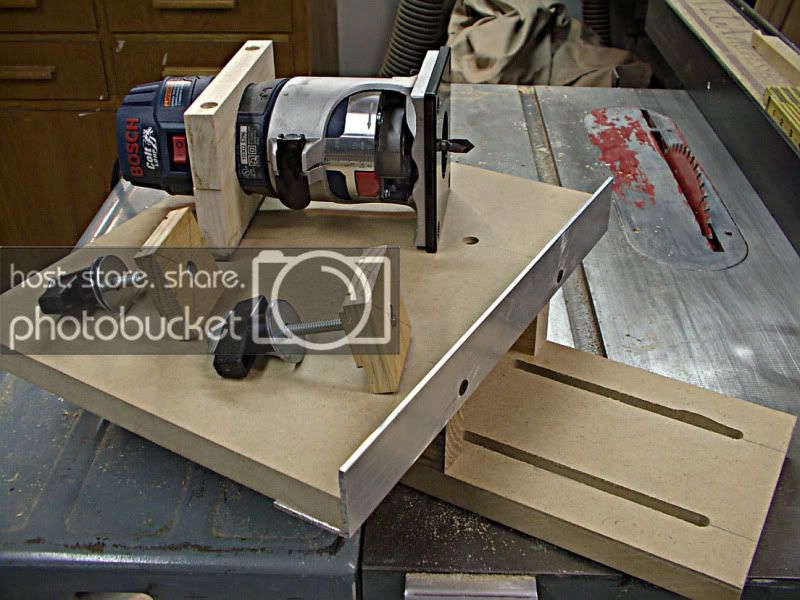
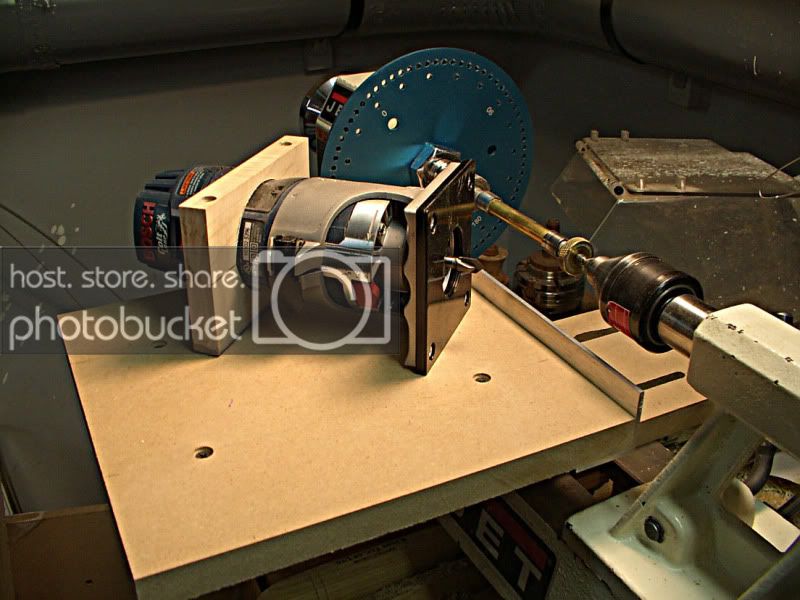
I made a platform for my trim router that allows me to cut slots, drill holes, and other functions which I intend to show at a later date. My shop time is still nonexistant for a couple more weeks. Along with this jig I used my indexing wheel which is an add-on. I will show this in a photo also.

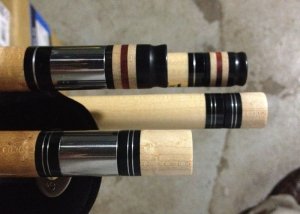
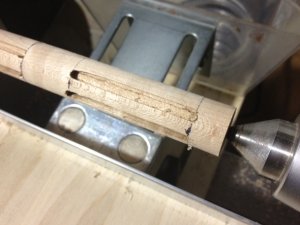
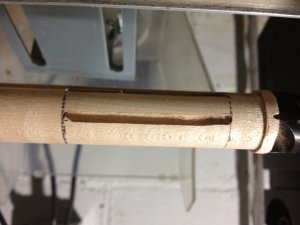
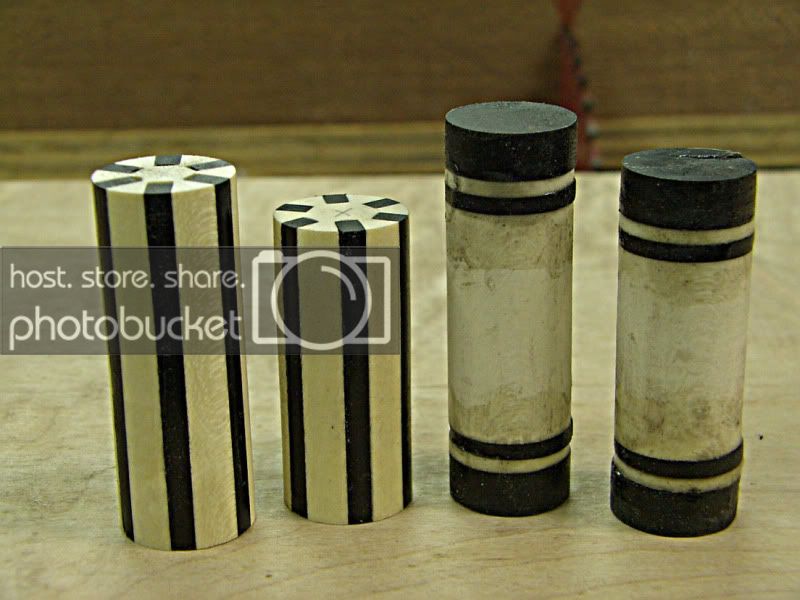
I will show the parts to make the black and white one and the red one was done the same way. As I said I do not have a metal lathe so I use whatever woodworking tools I have and you will be surprised at what you can do.

There are other ways of doing what I do as well as other jigs that can be made and hopefully others will show some of theirs too. But for now lets get things started as requested by Skiprat and others. Here is some photos.

Don't mind the blanks on the right. They were for another pen. The ones of interest are the strpe ones.

IMGP0842.jpg


IMGP0846.jpg


IMGP0818.jpg


IMGP0820.jpg
 
Signed-In Members Don't See This Ad

Lenny

Member
Joined
Jan 6, 2009
Messages
3,475
Location
Searsport, Maine
Very nice John! The Colt is a nice little router isn't it.

Is that some kind of a V bit? Did you use that just for setup?
 

jttheclockman

Member
Joined
Feb 22, 2005
Messages
19,132
Location
NJ, USA.
Very nice John! The Colt is a nice little router isn't it.

Is that some kind of a V bit? Did you use that just for setup?


Yes these routers are very good. I have a couple of them. I will leave this one dedicated to the lathe. Yes again on the vee bit being used to get me center line on my lathe so that I can get the correct height of the jig. The point on the bit makes it easy to see.
 

StephenM

Member
Joined
Apr 16, 2011
Messages
535
Location
Webster Groves, MO
. Yes again on the vee bit being used to get me center line on my lathe so that I can get the correct height of the jig. The point on the bit makes it easy to see.

Does it vary from pen to pen? The center of the lathe never changes so it seems that once set it should always be the same height.

Of course, my son has had Whooping Cough for almost a month and there has only been one night where we've gotten a full night's sleep so I could be missing something.

Also, as a relative newbie with the lathe, do you use your jig to get the blanks perfectly round after your rough them out or is it done by hand and just something that comes with experience? I can get close by hand but not as perfect as yours.
 

jttheclockman

Member
Joined
Feb 22, 2005
Messages
19,132
Location
NJ, USA.
. Yes again on the vee bit being used to get me center line on my lathe so that I can get the correct height of the jig. The point on the bit makes it easy to see.

Does it vary from pen to pen? The center of the lathe never changes so it seems that once set it should always be the same height.

Of course, my son has had Whooping Cough for almost a month and there has only been one night where we've gotten a full night's sleep so I could be missing something.

Also, as a relative newbie with the lathe, do you use your jig to get the blanks perfectly round after your rough them out or is it done by hand and just something that comes with experience? I can get close by hand but not as perfect as yours.


The Vee bit was used once to get center. I needed to find center to get the height of the platform. This is now set to that router which I now will designate for the lathe and doing work like I have shown. It does not matter what pen kit is used.

I could very easily use this set up to make a consistant round blank for sure. But I always do that by hand and a set of calipers. That comes with abit of experience but not at all hard to do. Just a little tip if you are doing a bushing to bushing blank like I always like to do on the higher end pens, take a straight edge and lay it across the blank it should touch both bushings flat and there should be no hills or valleys along the blank. If I need to leave the blank abit proud of the bushings due to wear, You can see the difference on each end should be the same.

I will be doing some work with this set up in the future and hope to take some more photos.
 

flyitfast

Member
Joined
Sep 3, 2009
Messages
1,690
Location
San Antonio, TX 78247
You have really started the juices flowing!! I had wondered from former pictures, but these really make it much clearer.

What I'm really worried about is my safety!! When I see pools of red around a saw blade -- :eek:! Hope all is well???? :confused:

Thanks again for beginning a possible useful tutorial.

gordon
 

EBorraga

Passed Away July 17, 2022
In Memoriam
Joined
Oct 19, 2009
Messages
4,049
Location
Louisville, KY
John, are you sure you've never made pool cue's before. This is how 95% of them make the ring's for their cue's.
 

jttheclockman

Member
Joined
Feb 22, 2005
Messages
19,132
Location
NJ, USA.
You have really started the juices flowing!! I had wondered from former pictures, but these really make it much clearer.

What I'm really worried about is my safety!! When I see pools of red around a saw blade -- :eek:! Hope all is well???? :confused:

Thanks again for beginning a possible useful tutorial.

gordon


:laugh::laugh::laugh: You made me look.

I was scratching my head here and trying to think what is he talking about. I then went back to the photos and saw the tablesaw photo. The red you see on the throat plate is reminents of whatever is left of the red paint that that plate started out with when it was new. The red paint was a warning sign by Delta for years. That saw is about 30 years old I would say and it has seen many hours of use and still going strong.

No fears I have all 11 digits:). Never a saw accident (knock on wood) I use jigs and fingerboards and pushsticks all the time. I am very consious of any tools ability to harm at any time. I am a construction Electrician by trade and every day I must be at my best and my awareness for safety is key. I carry this into my shop for sure.

This is why I posted those warnings in the very first post in this forum about knowing your tools and using them safely. When doing segmenting you will be using other tools besides a lathe. Be careful out there but have some creative fun.
 
Last edited:

jttheclockman

Member
Joined
Feb 22, 2005
Messages
19,132
Location
NJ, USA.
John, are you sure you've never made pool cue's before. This is how 95% of them make the ring's for their cue's.


I am sorry I did not see this post. No I have not made pool cues. But you bring up and I harken back to when I first joined I wanted to make a pool cue pen and saw one here with the tip on it and all and thought that was cool. It is still something I want to do because I want to offer them with my pool ball clocks that I make. Pool cue pens. I like it.
 

firewhatfire

Member
Joined
Mar 7, 2011
Messages
3,813
Location
Columbiana, Alabama
I remember seeing this on another site. I have been planning on building one ever since. Or something a little similar. I build mine differently but it's neat to see how others do theirs.

Phil
 

jttheclockman

Member
Joined
Feb 22, 2005
Messages
19,132
Location
NJ, USA.
John,

Any chance I could convince you to put together a tutorial for the Library. Then it will be available to all, much easier.


What kind of tutorial?? I am not much for writing details. I will be making other pens over the Christmas holiday and hope to take more photos.

If anyone has questions please feel free to ask.
 

alamocdc

Member
Joined
Apr 26, 2005
Messages
7,970
Location
San Antonio, Texas, USA.
Great post, John! Thanks for sharing. I do believe your method offers better accuracy than mine since I just use the table saw. This is also why I like the indexing feature of my new Comet. As soo as I saw that feature, I decided to build a sled for a trim router. Yours is different than what I drew up, but it doesn't matter what it looks like, as long as it provides repeatable results time after time.
 

orlandopens

Member
Joined
Oct 9, 2012
Messages
37
Location
Orlando, FL
Great post John. I had seen your pens a while back and tried to re-create the design. Not successfully! Qick question - where did you get the indexing plate that is attached to the lathe?
 

jttheclockman

Member
Joined
Feb 22, 2005
Messages
19,132
Location
NJ, USA.

jttheclockman

Member
Joined
Feb 22, 2005
Messages
19,132
Location
NJ, USA.
Great post, John! Thanks for sharing. I do believe your method offers better accuracy than mine since I just use the table saw. This is also why I like the indexing feature of my new Comet. As soo as I saw that feature, I decided to build a sled for a trim router. Yours is different than what I drew up, but it doesn't matter what it looks like, as long as it provides repeatable results time after time.


Repeatability is the key word. I have so many other ideas I want to try using this setup but need some shop time. I will be posting more pens here for sure. Hopefully soon. Maybe some of them will spark some interest and also some new designs. Just remember to work safe.
 

Russianwolf

Member
Joined
Jul 13, 2007
Messages
5,690
Location
Martinsburg, WV, USA.
No fears I have all 11 digits:). Never a saw accident (knock on wood) I use jigs and fingerboards and pushsticks all the time.

John T., I do hope you aren't using the 11th digit on your tablesaw :confused::eek::biggrin:


:biggrin::biggrin::biggrin: Maybe I counted wrong. Math was not my best subject. :befuddled:

(Looks at hands) 1, 2 , 3 , 4, 5...... 10, 9, 8, 7, 6.... 5+6=11... my math matches yours ;-)
 

jttheclockman

Member
Joined
Feb 22, 2005
Messages
19,132
Location
NJ, USA.
No fears I have all 11 digits:). Never a saw accident (knock on wood) I use jigs and fingerboards and pushsticks all the time.

John T., I do hope you aren't using the 11th digit on your tablesaw :confused::eek::biggrin:


:biggrin::biggrin::biggrin: Maybe I counted wrong. Math was not my best subject. :befuddled:

(Looks at hands) 1, 2 , 3 , 4, 5...... 10, 9, 8, 7, 6.... 5+6=11... my math matches yours ;-)


See there you go. We had the same teacher.
 

mpex

Member
Joined
Nov 18, 2012
Messages
152
Location
Columbus, Ohio
John,
I'm getting ready to build a router jig for my Delta Midi. Would it be possible to take a couple more photos of your jig? I woudl like to see a side (profile) and also one from the bottom.

Thanks!!!
 

jttheclockman

Member
Joined
Feb 22, 2005
Messages
19,132
Location
NJ, USA.
John,
I'm getting ready to build a router jig for my Delta Midi. Would it be possible to take a couple more photos of your jig? I woudl like to see a side (profile) and also one from the bottom.

Thanks!!!

I can do that. I will need to charge the camera battery tonight. It has been a long time since I had to take any photos because of no shop time. Hopefully that will change starting next week. 10 hour days 6 days aweek will come to an end finally. Man I don't even know what end is up any more. I jump on here to just get some sanity back into my life. What a 10 month job this has been that I have been on. 11 months to retirement and it can not come soon enough.:biggrin:

I will give you my measurements also. Just remember a couple things. You can make these adjustable but I find no need because I have dedicated one router size to my lathe. If you use different routers such as a palm router as this is or a dremel or both then you need adjustability. I do not need that.

Next the main concern and object of the jig is to line up the center of the router bit with the centers of the head and tailstock. Easily done and I used the Vee bit because it came to a point. Any bit I use after that will always have the center of the bit on line with the lathe center line.

One other thing I find necesary is to make the base small enough to fit between the head stock and tailstock. to easily work on pen blanks.

The platform needs to be level so however you construct the base the side need to be equal. Pretty much common sense there.

I will get another photo or two sometime tomorrow.


The one thing I would have done different is to make the Tee nut slots closer together. The reason is I had to cut the nut handle because it hit the side brace ( bad move) I did not realize it but the table goes under the blank further than I realized. I even had to lengthen the slots because I did not cut long enough. Thus the off cut on one of the slots but it has no effect on the jig. ( again bad move)
 
Last edited:

jttheclockman

Member
Joined
Feb 22, 2005
Messages
19,132
Location
NJ, USA.
Very Long with Photos

OK I am back.

I have been asked by a few members here for more details on my router jig so I will post some more photos here with some dimentions. I warn you this will be long winded and with lots more photos. The pictures are the best I can without too much effort. This jig is not hard to make at all. The measurements given are mine but you will have to adjust with each lathe type and size. Also the router in use will be a factor. So these are just guides and what I used. This jig can be used in various ways to perform various designs and again as I always say the mind is your limit. Have at it and if there are still questions after this feel free to ask. Good luck.


Lets start with the router. My router that I dedicated for this jig and this application is a Colt palm router. Any size router or dremel can be used. A jig to hold the router level and steady as you glide across the platform will be need to be constructed and I can not tell you how to do that. You will have to figure this part out for yourself. You will get an idea with mine. I chose this router because the base is square and it is a good starting point to level it. I should not have to mention this also about a router but i will. I dedicated a router to this jig because mainly I will not have to make any further adjustments if i keep taking the jig apart for other uses. A router does not always fit dead center on a base plate so when aligning center lines up you should mark the side of the router base that will ride on the platform and always set the router up this way to route your design. This is a given whenever you use a router in any position doing any task.

Now I should not have to mention this but I will before we start.again. Know your tools. Watch your safety. You will be using a dangerous tool in the router. You will be using it on a lathe that is NOT turning because you will be using an indexing wheel. Be very mindful of this part.

IMGP0980_zpsbc892970.jpg


This photo shows my router with a Vee bit used to line up the center points with the router. This is very important.


IMGP0979_zps0fab2674.jpg


Now for the jig. I labeled the parts with letters. I used 1/8" aluminum angle for the edge guide which I got from Home Depot. I used 3/4" MDF for the base, and platform. I used 3/4" oak for the sides and hold down brackets, so that I could easily screw into and these are all stable materials so as to not warp.

( A ) Platform is 3/4" thick 10" X10" square.


IMGP0983_zps3646a5e5.jpg


( C ) Base or bottom is 3/4" thick, 15" long, 5-1/4" wide. The slots are 3/8" X 5" long. This photo also gives you a view of the underside. As I mentioned in a previous posting here, I should have made the slots closer to the center of the base more because my Tee handles for the hold down clamps hit the side and I had to cut the handles down to make them work. Just something to be mindful of.


IMGP0981_zps231b679b.jpg


( B ) The side rails are 3/4" thick oak 1-5/8" wide, 9" long, with a notch at the front for the angle bracket.

IMGP0982_zpsc9f84767.jpg


This photo show the jig from the front. You will notice there is not much depth because this jig was made for a Jet 1014VS lathe which is a midi lathe.

IMGP0984_zps397fc374.jpg


The hold down clamps are 1-14" X 1-1/4" square with a depth of 3/8". The width of the top of the square will be determined by the slot on the lathe bed. You need to measure your own.


IMGP0985_zpsdcf93f13.jpg


In this photo I show the jig making some 1/8" slots in a blank I will use in the future. It shows the Indexing wheel which I gave the info for in a prior post here.

IMGP0986_zps86e84c48.jpg


Finally here is a quick shot of a blank cut with 8 slots and one with an infill of black ebony and aluminum in a Holly blank. Again for a future pen project that I need time to complete.

IMGP0988_zps1eb15450.jpg


That is all for now. As I mentioned if there are any other questions feel free to PM me or post them here. I will be more than happy to answer. I say again be careful and safe turning. Thanks for looking. Hope this helps any of you who want to try making this. Good luck.
 
Last edited:

jttheclockman

Member
Joined
Feb 22, 2005
Messages
19,132
Location
NJ, USA.
Thanks. Just arrived at Lowes. Time to get some stuuuf!


As you can see there is nothing fancy about this jig. It was made with scraps of material I have laying around. Hope you are successful in making one and as I said if you have other questions just shout.
 

mpex

Member
Joined
Nov 18, 2012
Messages
152
Location
Columbus, Ohio
Finished the jig last night. Made 2 modifications which you can't see in this photo. I will take some photos in the next couple days to show it. So far so good. I cut the risers just a hair short and used veneer between the risers and the platform to get the router to center.

1_routerlathe.JPG


I did my first test yesterday and am having mixed results and have several questions.

1.I notice that the cuts I made do not line up (point straight) to center. They are just slightly off.
-Why?
-Will this make a difference?

1_firstrouterpiece.JPG


2.I used a straight double fluted 1/8" bit.
-Is this the right bit?
-Any guidelines for how deep to cut?
-Do I need to make multiple passes? How many? I noticed the smell of burning wood when I was doing my cuts.

3.I inserted some 1/8" bloodwood that I cut in strips. The turned piece is Birds Eye Maple. The fit was extremely tight.
-I'm afraid the wood might crack when it expands/contracts. Should I have a fit not so tight?
-What would be the best/easiest/quickest (yes I know, pick 1 or 2.) way to make the fit not so tight?

4.If I just want to do a cut to insert a single piece of veneer, how would I do that? Is there a bit for that? I just went and bought a 1/16" bit, but I'm sure that is not going to be thin enough.

I know it's a lot of questions. Thanks in advance for any help!
 

jttheclockman

Member
Joined
Feb 22, 2005
Messages
19,132
Location
NJ, USA.
Well looky here. You did go ahead and make the jig. Good for you. It looks great and would love to hear the mods you did. We all can learn. I will try to answer some of your questions as time allows. I have to go out in a few minutes. You do have alot of them:biggrin: I will highlight your question in red and place my answer in blue. I like blue:)


Finished the jig last night. Made 2 modifications which you can't see in this photo. I will take some photos in the next couple days to show it. So far so good. I cut the risers just a hair short and used veneer between the risers and the platform to get the router to center.

1_routerlathe.JPG


I did my first test yesterday and am having mixed results and have several questions.

1.I notice that the cuts I made do not line up (point straight) to center. They are just slightly off.
-Why?
-Will this make a difference?

The slots do not line up from one another because the height is not set dead center. If it were, the slots opposite each other would be exact. Does it matter??? Not in this case because they are all off the same amount and after you infill with material no one will be able to see the end as you show it now. You are using an indexing wheel because I see the remaining material is equal so that is good.

1_firstrouterpiece.JPG


2.I used a straight double fluted 1/8" bit.
-Is this the right bit?
-Any guidelines for how deep to cut?
-Do I need to make multiple passes? How many? I noticed the smell of burning wood when I was doing my cuts.

The bit size is irrelevant. It depends on how thick you want your infill material. I used that same bit when I made the pens that started this thread. You can see them at the beggining.

The depth of cut is important because remember you will be cutting away much of the material when turned. I like to cut to a depth just a tad greater than the diameter of the tube I am using. When I go to drill for the tube later I actually drill through some of the infill. (by the way make up the blank before you drill for tube. Need the strength in the surrounding material)

You absolutely need to make several passses. You never route anything in one pass and that includes any woodworking. What happens is, especially a small bit like that you create so much vibration ( the harder the wood the more vibration) the bit will chatter and the cut will not be clean and the router may have a tendency to get away from you thus ruining your cut. Always take small cuts. Especially the initial cut. This gives you the feel of the router in your hand and that is important. Always keep the router pushed down on the platform as you make your pass. The more you do it the more you get to feel exactly what you need to do. It becomes hand eye memory thing.

3.I inserted some 1/8" bloodwood that I cut in strips. The turned piece is Birds Eye Maple. The fit was extremely tight.
-I'm afraid the wood might crack when it expands/contracts. Should I have a fit not so tight?
-What would be the best/easiest/quickest (yes I know, pick 1 or 2.) way to make the fit not so tight?

No the infill should not be so tight. Remember you have to glue this is unless you are using resin as your infill. Easiest way is to make your shims a tab smaller. I can not tell you how because I do not know how you make them and what tools you have available. You got this far I am sure you will work it out. Keep all grains running same direction and you will be fine.

4.If I just want to do a cut to insert a single piece of veneer, how would I do that? Is there a bit for that? I just went and bought a 1/16" bit, but I'm sure that is not going to be thin enough.

1/16" bit is about as small as that router will accept. You can go smaller by using a dremel or a dremel chuck adpter for that router than you can go as small as a dremel bit can go. But remember the smaller the bit the slower the cut.

I know it's a lot of questions. Thanks in advance for any help!


Boy I am exhausted. You are well on your way to making some real neat blanks now. You have the basics and the sky is the limit. Over the next few months I hope to show a few more things that can be done with this setup. I hoped I answered some of your questions and if you have more just shout. Good luck and remember safety. I have to go now.
 

Bigdaddy

Member
Joined
Feb 16, 2009
Messages
32
Location
Ottawa
Nice jig, as for the cuts not lining up... that would be due to your router not being level. I may be mistaken but your jig appears to slope away from the lathe. When the router is positioned 1/2" or 3/4" away from centre it is dropping ever so slightly..which is what you see in your cut. Will it make a difference... I don't think so, as long as all the cuts are made the same way. If you were to remove the blank, flip it and route more groves you would have a problem then.

As for a smaller bit as thin as veneer.... do you have a collet for your router that would accept a Dremel size bit?

..or use the Dremel the same way as your router

..or you could make a jig for a dremel or similar tool and use the saw blade which is very thin, have the dremel standing verticle with the blade at the height of the mandrel...and slide it along the blank.

..or instead of veneer... if you wanted black or white you could use styrene from a modelling shop. Comes in very thin sizes, easier to match to the size of your bit.. and it won't swell or change with humidity.

Just thinking out loud....
 

mpex

Member
Joined
Nov 18, 2012
Messages
152
Location
Columbus, Ohio
Excellent! Thanks so much for the answers! I'm headed out of town for a week but will update when I get some more work done.
BTW, besides pens, I'm working on some pool cue joint protectors. The segmenting here is thanks to John and the rest of the Segmenting forum.
Looking forward to using some of the routed pieces for ring work!

1_jointprotectorsws.jpg
 

mpex

Member
Joined
Nov 18, 2012
Messages
152
Location
Columbus, Ohio
Ok. So I'm having a pretty hard time with this setup now. Getting pretty frustrated.

First I wanted to show 1 of 2 mods I made to the setup. This doesn't have anything to do with the problem, just showing it for ideas if anyone else is building one. This is the sliding foot under the lathe rail.

1_routermod1.JPG


So my problem is that my cuts are pretty horrible as you can see from the photos below. They are sometimes jagged, sometimes they are 'stepped.' Don't know how else to phrase it. What I mean is on a second depth cut, they cut into a different spot. I'm trying my best to stay online,

1_routerproblem1.JPG


1_routerproblem2.JPG


1_routerproblem4.JPG


I'm wondering if the problem has anything to do with what appears to me to be a lot of 'play' in the Colt Router riser. When I am using the thumb wheel to wind it back down to Zero, it has a lot of trouble, most of the time it seems like it skips the thread all together. I have to switch it to unlock and push it down. But even in the lock position, there seems to be too much movement.

1_routerproblem3.JPG


Let me know what you guys think! Thanks as always!
 
Signed-In Members Don't See This Ad

jttheclockman

Member
Joined
Feb 22, 2005
Messages
19,132
Location
NJ, USA.
Moishe

I will respond to you and explain what is happening and try to tell you how I do this. You did a nice job with the jig and I see your mod. My comment to the mod is it is OK for what you are doing now. But you will find there is a ton of other things you can do with this jig and that mod will prohibit it. Will get into that at a later time when you master this setup.

From the last we spoke you had an issue of routing off center. Did you fix that???

Next to this problem. Having to adjust the bit in and out will cause misalignment. I mentioned sometime back that each and every router may not have the exact center to the base. So whenever you are routing anything weather it is freehand or table mounted or jig such as this, the presentation of the bit to the wood must stay constant. If you turn the router or the base the presentation can be off because the bit does not sit dead center of the base. There could be a multiple reasons for this which I will not bore you with.

To fix your problem is very simple. Don't move the router in the base. Set it and forget it. Here is what I do. I have the bit sticking out about 3/4" or less. Not critical. I determine my depth that I want to make my grooves. This is usually just shy of about 3/16" off center. This way I know I am deeper than the tube and there is max amount of material on the blank. I make a mark on the end of the blank and now measure from that mark to the outside face of the blank. This varies because of the OD you made the blank. I now either take a drill bit that matches the measurement I just got or I actually have been using and here is another use for the transfer punches. I find one that is closest to my measurement.

I set this bit against the fence. I now take the router and push it against the bit. So now you have the base of the router up against the bit which is against the fence. To set the correct depth you need to adjust the jig in or out. I do this in 2 places. On both ends of the blank. I push the jig in so that the bit in the router just touches the face of the blank. I carefull tighten the thumb screws but not too tight because I now slide the setup down the other end of the blank and do the same thing. I keep doing this untill I get equal spacing on both ends of the blank with the bit just kissing the face of your blank. It may take a few trys but it gets simple after a few of these. Then make sure the jig is tighten down.

Now you have your depth set. As I told you you need to take small cuts or else the router will climb on you. You advance the router making sure you hold it down square and that it slides evenly over the platform. You back off when you get to the end and again advance the router into the blank untill you finally now have the base riding against the rail on the jig. Your depth of cut is the same on all precedeing slots. See I told you it was easy. So now lets see something.

Hope this is pretty clear. If you still have questions feel free to ask.
 
Top Bottom