heres my celtic knot set up

Signed-In Members Don't See This Ad

dogrunner

Member
Joined
Mar 23, 2014
Messages
365
Location
mi
first make sure your blanks a square
DSCN0415_1_1.JPG

DSCN0414_2_1.JPG

cut your blank my jig is nothing fancy just some mdf and scrap wood.
DSCN0416_1_1.JPG

DSCN0417_2_1.JPG

don't cut all the way through the blank
DSCN0420_3_1.JPG

glue up your knot material I use ca
DSCN0419_2_1.JPG

when you cut all 4 sides they should look like this
DSCN0421_4_1.JPG

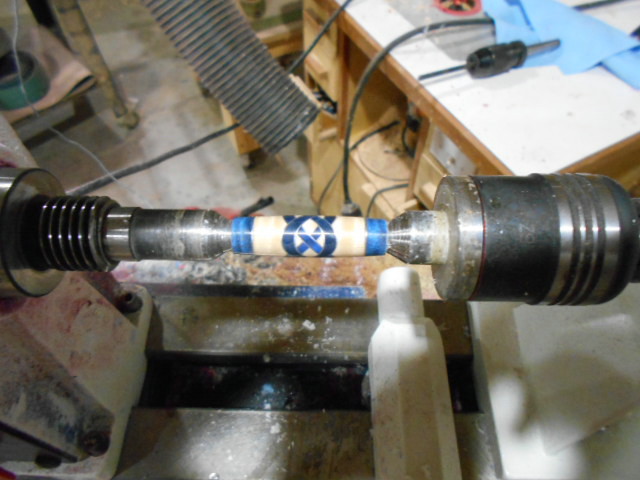
at this point I turn them round
DSCN0427_2_1.JPG

DSCN0429_1_1.JPG

i turn them to fit in my collet chuck and drill them I don't have a pic
 
Signed-In Members Don't See This Ad

plantman

Member
Joined
Jan 2, 2012
Messages
3,437
Location
Green Bay, Wi
Very nice !! I like the way the knots come together but do not completely cross over. The aluminum trim also sets them off nicely. Great work, and thanks for sharing how you went about achieving this look !! Jim S
 

jttheclockman

Member
Joined
Feb 22, 2005
Messages
19,143
Location
NJ, USA.
Hello Jeff

I see you got my message in the other thread. I thank you for doing this and have to say the photos are really great because it tells the story. It saves a lot of typing. This is a good short tutorial for those that want to try the Celtic knot. The color combinations are great looking.

Yes those cuts will close up as it is turned down. If you recall he said do not cut all the way thru the blank. This helps to keep the alignment spot on. The other factor is the fill material needs to match the saw kerf exactly. Jeff has done this well.

But looking at the blank, it does open a possibility. Wonder what it would look like if you kept the gap even wider and turned it down. It should be 4 sections not touching. That would look cool. This is what I mean about opening the mind and using a pen as inspiration.


Here is another one for you to try Jeff

1_yellowheartsierra-1.jpg


1_reheartsierra-1.jpg
 

dogrunner

Member
Joined
Mar 23, 2014
Messages
365
Location
mi
They'll cro s over when you turn them down further, I expect ... :)


They look very nice indeed!
they cross over when you turn them not cutting all the through lets you turn them round before drilling and glueing the tube in
 

magpens

Member
Joined
Feb 2, 2011
Messages
15,912
Location
Canada
Thanks for posting these pictures, Tony. . They will be very helpful when I get to doing Celtic knots.
 

dogrunner

Member
Joined
Mar 23, 2014
Messages
365
Location
mi
Hello Jeff

I see you got my message in the other thread. I thank you for doing this and have to say the photos are really great because it tells the story. It saves a lot of typing. This is a good short tutorial for those that want to try the Celtic knot. The color combinations are great looking.

Yes those cuts will close up as it is turned down. If you recall he said do not cut all the way thru the blank. This helps to keep the alignment spot on. The other factor is the fill material needs to match the saw kerf exactly. Jeff has done this well.

But looking at the blank, it does open a possibility. Wonder what it would look like if you kept the gap even wider and turned it down. It should be 4 sections not touching. That would look cool. This is what I mean about opening the mind and using a pen as inspiration.


Here is another one for you to try Jeff

1_yellowheartsierra-1.jpg


1_reheartsierra-1.jpg

I'm trying to figure out how You did that
 

TonyL

Member
Joined
Mar 9, 2014
Messages
8,915
Location
Georgia
Jeff, it looks like the cuts were made on a TS(?). How do handle the squared segment into a radius-ed slot? Thank you.
 

dogrunner

Member
Joined
Mar 23, 2014
Messages
365
Location
mi
I think I figured it out will have to wait for a rain day to.see Tony I'm not sure how to explain it
 

GaryMGg

Member
Joined
Nov 23, 2006
Messages
5,786
Location
McIntosh, Florida, USA.
Tony
If I understand your question: the slots aren't radiused; they're straight.
After turning, the appear radiused.
Same with "scallops"--they look radiused but they start with straight lines, albeit at an angle.
 

TonyL

Member
Joined
Mar 9, 2014
Messages
8,915
Location
Georgia
Thank you. Unless the blanks slots are cut using a band saw or the like, I don't see how a cut can be made partially through the blank. This is definitely a function of ignorance. I will watch some more videos. Thanks for the help and inspiration.
 

TonyL

Member
Joined
Mar 9, 2014
Messages
8,915
Location
Georgia
Thank you Gary. I didn't think to approach it that way. I can easily imagine that now.
 

TonyL

Member
Joined
Mar 9, 2014
Messages
8,915
Location
Georgia
Thank you Jeff. "Stupid Tony" wasn't thinking in terms of that orientation. My ignorance....thank you for your "troubles".
 

jttheclockman

Member
Joined
Feb 22, 2005
Messages
19,143
Location
NJ, USA.
I think I figured it out will have to wait for a rain day to.see Tony I'm not sure how to explain it


I have confidence you will. I have shown this here before. The possibilities of such a simple segmentation is many. You can take the same concept and have 4 different colors in the blank.
 

erika16

Member
Joined
Jul 16, 2014
Messages
4
Location
Centerville, Utah
Thank you for posting these. I have never seen a glue up like this before. The results are amazing! Is thick CA the standard way to join metal to wood? Kudos to you.
 
Top Bottom