Gluing aluminum to wood with epoxy

Signed-In Members Don't See This Ad

Ingo Schwartz

Member
Joined
Sep 16, 2015
Messages
24
Location
Iceland
Hi guys.

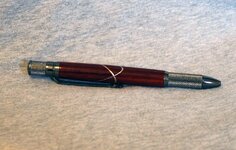
I'm on a sick leave from work for the next 3 weeks and I want to take the time and make a few blanks using a scroll saw (I can sit down while doing it and no heavy lifting required!) but I'm a bit short on CA glue and getting more is not really an option. Using RJB Woodturner's method of segmenting soda cans with wood, could I use epoxy to do it ?

I know the time taken for each side will be considerably more using Epoxy but I have loads of that stuff and I can make more blanks at once giving each glue-up a few hours before starting a new cut.

Could I color the epoxy to give a different look or would it just squeeze out ?

I'd be very greatful for any advice given.

Thanks in advance

Ingo
 
Signed-In Members Don't See This Ad

thewishman

Member
Joined
Mar 9, 2006
Messages
8,182
Location
Reynoldsburg, Ohio, USA.
Epoxy should work and you can add color to it. The more color you add though, the less strength the bond will have. It probably will be mostly squeezed out anyway.
 

conandy

Member
Joined
Feb 18, 2015
Messages
102
Location
Denver, CO
This is not really an answer but I think I have had a touch better luck with CA than epoxy. With my first few (just like RJB Woodturner's process) I tried with both epoxy and CA and had both blow up on me in the drill press. I since learned to wrap them with masking tape and drill SLOWLY and clear chips and let the blank and drill bit cool regularly. And don't use brad point bits, which can snag on the metal. Now my blanks they usually make to the lathe before blowing up. :)

I think the glue was just getting too hot and failing from the drilling. Whenever it would fail, the aluminum surface was always perfectly clean with no epoxy or CA sticking to it.

That isn't an answer, I know. I have stuck with CA because I can glue up blanks faster, especially with multiple cuts and glue-ups on the same blank. But 5 minute epoxy wouldn't be too bad to try again. By all information I was able to glean, the epoxy SHOULD work just as well. Rough the heck out of the aluminum surfaces with sand paper, though, to be sure you scrach it up enough to remove the anodizing.

With either glue, I have learned not to drill the blanks until the next day to be sure of a full cure. And drill slowly......
 

Rink

Member
Joined
May 12, 2013
Messages
327
Location
NW Arkansas
I use epoxy. Rough the surface of the metal before applying glue, so the glue will have something to "grip". When you drill, go very, very, very, very slow. Did I mention very slow? Good luck.
 
Joined
Apr 15, 2015
Messages
14
Location
wisconsin
I used epoxy and roughed the surface of the aluminum and clamped from side to side when drilling so the aluminum wouldn't push out. The red in the picture is epoxy only with paint added as coloring. It takes a lot longer to fully cure.

1915651_500428126807266_8879804534953128027_n[2].jpg
 

jttheclockman

Member
Joined
Feb 22, 2005
Messages
19,148
Location
NJ, USA.
If you are going to do segmenting and use aluminum with woods you can safely use epoxy but there are limitations. First not all epoxies are equal. I stay away from the 5 min cure types for things like that because their strength is compromised . I prefer to use a long standing proven epoxy. System III T88

System Three 1100K16 Amber T-88 Kit, 1 quart Bottle: Epoxy Adhesives: Amazon.com: Industrial & Scientific

Takes longer to cure but well worth the effort. Make sure you sand the aluminum and then do not touch with fingers or you will add the oils from your hands to it. Also I like to sand the wood to 220 grit. and wipe down with acetone. I do all I can to prevent hazards. If the blank is complex then I will encase in some sort of support such as popsicle sticks or even gauze soaked in CA. I add CA as I go when turning also to help keep thing together. I use the same epoxy to glue my tubes in which will help in wood movement and adhesion. Works well. Good luck.
 

conandy

Member
Joined
Feb 18, 2015
Messages
102
Location
Denver, CO
If you are going to do segmenting and use aluminum with woods you can safely use epoxy but there are limitations. First not all epoxies are equal. I stay away from the 5 min cure types for things like that because their strength is compromised . I prefer to use a long standing proven epoxy. System III T88

System Three 1100K16 Amber T-88 Kit, 1 quart Bottle: Epoxy Adhesives: Amazon.com: Industrial & Scientific

Takes longer to cure but well worth the effort. Make sure you sand the aluminum and then do not touch with fingers or you will add the oils from your hands to it. Also I like to sand the wood to 220 grit. and wipe down with acetone. I do all I can to prevent hazards. If the blank is complex then I will encase in some sort of support such as popsicle sticks or even gauze soaked in CA. I add CA as I go when turning also to help keep thing together. I use the same epoxy to glue my tubes in which will help in wood movement and adhesion. Works well. Good luck.

Good advice. I'm going to remember to keep my paws off the metal after I sand it and clean it up from now on.

Hard to justify buying the T88 when I have like a gallon size container of the West System epoxy. But the west system takes forever to cure, one reason I haven't gone back and tried using it again, and why I bought the 5 minute Loctite epoxy.

I may take some of the advice here on my next metal/wood glue up, and try to be more patient and go back to the West system. Unless anyone reading this can speak to the relative bonding capabilities of West vs System Three.

And again, I will drill very, very, slowly. :)
 

Ingo Schwartz

Member
Joined
Sep 16, 2015
Messages
24
Location
Iceland
Thanks for the reply's.

I've got Easy Cast resin that I'm planning on using, will take forever to cure but patience is easy for me having to spend 3 weeks at home.

I've been using steel drills to drill my blanks, the bradpoint drills always make a mess of things for me! The steel drills work a treat!

And slow is the key thanks :)
 

jttheclockman

Member
Joined
Feb 22, 2005
Messages
19,148
Location
NJ, USA.
If you are going to do segmenting and use aluminum with woods you can safely use epoxy but there are limitations. First not all epoxies are equal. I stay away from the 5 min cure types for things like that because their strength is compromised . I prefer to use a long standing proven epoxy. System III T88

System Three 1100K16 Amber T-88 Kit, 1 quart Bottle: Epoxy Adhesives: Amazon.com: Industrial & Scientific

Takes longer to cure but well worth the effort. Make sure you sand the aluminum and then do not touch with fingers or you will add the oils from your hands to it. Also I like to sand the wood to 220 grit. and wipe down with acetone. I do all I can to prevent hazards. If the blank is complex then I will encase in some sort of support such as popsicle sticks or even gauze soaked in CA. I add CA as I go when turning also to help keep thing together. I use the same epoxy to glue my tubes in which will help in wood movement and adhesion. Works well. Good luck.

Good advice. I'm going to remember to keep my paws off the metal after I sand it and clean it up from now on.

Hard to justify buying the T88 when I have like a gallon size container of the West System epoxy. But the west system takes forever to cure, one reason I haven't gone back and tried using it again, and why I bought the 5 minute Loctite epoxy.

I may take some of the advice here on my next metal/wood glue up, and try to be more patient and go back to the West system. Unless anyone reading this can speak to the relative bonding capabilities of West vs System Three.

And again, I will drill very, very, slowly. :)

I am going to say this to both of you because i am not sure you know the differences. Nothing wrong with the West system adhesives epoxies if you are using the correct epoxy. You want to use structural adhesive epoxy and not coating resins. Not all epoxies are the same within the brand and that is why they make so many varieties.


Thanks for the reply's.

I've got Easy Cast resin that I'm planning on using, will take forever to cure but patience is easy for me having to spend 3 weeks at home.

I've been using steel drills to drill my blanks, the bradpoint drills always make a mess of things for me! The steel drills work a treat!

And slow is the key thanks :)

Easy Cast is the same as Cast-N- Craft resin and it is just that a casting resin and not an adhesive for gluing parts together. If you are using that for segmenting you will have failures.

Also stay away from the brad point bits when doing segmenting work. Good luck to you.
 

Ingo Schwartz

Member
Joined
Sep 16, 2015
Messages
24
Location
Iceland
Good thing I said I was using that resin before starting! Will get some Epoxy Rapid (the only epoxy glue available to me) tomorrow :)
 

conandy

Member
Joined
Feb 18, 2015
Messages
102
Location
Denver, CO
Hmmm. I use the West system 105 resin/205 hardener. They claim this is good as an adhesive, but their system is definitely built around "coatings" for boat building. They don't really use the term "structural adhesive" for this system. Their website is not very specific.

It has always worked well for me in bigger woodworking needs, but now I am wondering if it is right for pen assembly. May be some T88 in my near future.
 

jttheclockman

Member
Joined
Feb 22, 2005
Messages
19,148
Location
NJ, USA.
Hmmm. I use the West system 105 resin/205 hardener. They claim this is good as an adhesive, but their system is definitely built around "coatings" for boat building. They don't really use the term "structural adhesive" for this system. Their website is not very specific.

It has always worked well for me in bigger woodworking needs, but now I am wondering if it is right for pen assembly. May be some T88 in my near future.

G Flex Liquid Epoxy Resin and Hardener


www.jamestowndistributors.com/userportal/document.do?docId=347&title=West+System+User+Manual


WEST SYSTEM Epoxy Hardener comes in 205 Fast, 206 Slow and 209 Extra-Slow and when mixed with WEST SYSTEM 105 Epoxy Resin it is an ultra-tough waterproof coating, a high-strength, gap filling adhesive or an easily sanded surface filler for wood, fiberglass, reinforcing fabrics, and a variety of metals.
 
Last edited:

Ingo Schwartz

Member
Joined
Sep 16, 2015
Messages
24
Location
Iceland
ok so I've got the first cut done and was going to put the aluminum from a beer can in between the 2 pieces of wood but I can't get it to fully close...

How the heck is this supposed to be done ?

I'm at the point of cutting the wood in 45° angles and gluing each piece seperatly rather than as a whole unless you guys can help... :(
 

conandy

Member
Joined
Feb 18, 2015
Messages
102
Location
Denver, CO
ok so I've got the first cut done and was going to put the aluminum from a beer can in between the 2 pieces of wood but I can't get it to fully close...

How the heck is this supposed to be done ?

I'm at the point of cutting the wood in 45° angles and gluing each piece seperatly rather than as a whole unless you guys can help... :(

When I did this with a soda can I pre-clamped the aluminum between the halves of the blank to pre-form it to the shape of the cut. then when you apply glue and clamp it again, it'll close up nicely. This usually requires fairly even clamping pressure down the length of the glue up to make it cure cap-free. A bench vise or a machinists vice works wonders. Just don't crank it so hard that all the glue is completely squeezed from the joint.
 

Ingo Schwartz

Member
Joined
Sep 16, 2015
Messages
24
Location
Iceland
I tried that but never got to the gluing part as I don't want to waste glue because the gaps are around 1mm on each side.

Going to try a different segmenting method tomorrow, not a celtic knot, maybe I just need more practice with easier segments :)
 

conandy

Member
Joined
Feb 18, 2015
Messages
102
Location
Denver, CO
I tried that but never got to the gluing part as I don't want to waste glue because the gaps are around 1mm on each side.

Going to try a different segmenting method tomorrow, not a celtic knot, maybe I just need more practice with easier segments :)

I found that a simpler curve or straight line and not trying to do the multiple back and forth zig zag that RJB does gets better results, just not as nifty as the one he did the video on. I also had a hard time getting it to clamp together well when doing the full length zig-zag.

Be sure the kerf of your scroll saw or band-saw blade is very close to the thickness of the metal. Cans are pretty dang thin, so you may have better luck doubling up the aluminum thickness if your kerf is too wide. It is hard to saw through a 3/4" thick blank with a scroll saw blade that has the kerf thin enough to match a can thickness.
 

jttheclockman

Member
Joined
Feb 22, 2005
Messages
19,148
Location
NJ, USA.
ok so I've got the first cut done and was going to put the aluminum from a beer can in between the 2 pieces of wood but I can't get it to fully close...

How the heck is this supposed to be done ?

I'm at the point of cutting the wood in 45° angles and gluing each piece seperatly rather than as a whole unless you guys can help... :(


We would be glad to help but we have no idea what you are trying to do. A photo or a better discription of what it is you are attempting. I can guess from this post that you are attempting a celtic knot. If you are not cutting all the way through the blank you need to match the material of the inlay to the thickness of the kerf of your blade. This is a must. Can material is very thin and the effect is not great. You would be better to use some flashing material which you can get in various size rolls at a home center. You will then have plenty of material for many projects. Matching that kerf is important. Good luck.
 
Last edited:

conandy

Member
Joined
Feb 18, 2015
Messages
102
Location
Denver, CO
+1 for straight or gentle curved cuts and using flashing material (0.012" thick or thicker). Attached pen was made using aluminum flashing and slightly thicker copper flashing material. Scroll blades are going to generally be in the 0.015" to 0.02" kerf.

FYI: when I have been doing these cuts via bandsaw (0.04" kerf), the grain lines up OK across the first cut when filling with aluminum flashing because it is still being glued back together "in line". But when gluing up the second cut, which slices across the first ring of aluminum, I found I had to add in the extra layer of copper (0.016" thick) in order to get the sliced aluminum pieces to line up across the second cut, due to the angle of the slice. Otherwise the aluminum "ring" doesn't look like it lines up as a continuous piece.

This process works because I am not trying to get something as precise as a celtic knot (which I have not tried yet), and I have materials to play with to fill the kerf appropriately. If you are doing a celtic knot, I understand it is essential that the knot material EXACTLY match the kerf thickness.

PS: this was a good excuse to show off my new favorite pen. :)
 

Attachments

  • IMG_6751 adj.jpg
    IMG_6751 adj.jpg
    254.3 KB · Views: 188

Ingo Schwartz

Member
Joined
Sep 16, 2015
Messages
24
Location
Iceland
I was trying to make a Celtic knot using RJB Woodworkers method of zikzaking with the scrollsaw, couple of issues there, primarily the fact that I could not turn the blank for the next cut, tried drilling a 3mm hole above each turning point but that proved to be a failure.

The method I went with is basically the same but more controlled, by cutting the blank at a 45° angle 5mm apart from each cut going all around the blank, have the first side curing now, using epoxy as the ca proved to be rather difficult although it's good for some patterns it's no good for this one.

I make sure to leave about 2-3mm of wood at the end of each cut so I can slide 2 pieces of aluminum can in between each cut and then clamp it using slight pressure, not too much but hopefully not too little. Will see tomorrow when I do the second cut if it's good or not.

Experimentation is key here I think, one method might work for one but not the other.

Thanks for all the help guys, I'll make sure to post pictures of the successful pens in the gallery :)
 

jttheclockman

Member
Joined
Feb 22, 2005
Messages
19,148
Location
NJ, USA.
I was trying to make a Celtic knot using RJB Woodworkers method of zikzaking (Have no idea what this means )with the scrollsaw, couple of issues there, primarily the fact that I could not turn the blank for the next cut, tried drilling a 3mm hole above each turning point but that proved to be a failure.

The method I went with is basically the same but more controlled, by cutting the blank at a 45° angle 5mm apart from each cut going all around the blank, have the first side curing now, using epoxy as the ca proved to be rather difficult although it's good for some patterns it's no good for this one.

I make sure to leave about 2-3mm of wood at the end of each cut so I can slide 2 pieces of aluminum can in between each cut and then clamp it using slight pressure, not too much but hopefully not too little. Will see tomorrow when I do the second cut if it's good or not.

Experimentation is key here I think, one method might work for one but not the other.

Thanks for all the help guys, I'll make sure to post pictures of the successful pens in the gallery :)

I really wish I can help but again I have no idea what you are doing. Maybe you can post some as build photos too. How many celtic knots are you attempting in this blank??? Is you blank left square or did you round it???
 

jttheclockman

Member
Joined
Feb 22, 2005
Messages
19,148
Location
NJ, USA.
JT, this is what I think he is trying to do:

https://www.youtube.com/watch?v=2xyp8seo-vg

RJB Woodturner is always doing funky things like this.

Ingo, is this the one you are trying to duplicate?

OK I got it. Never heard of this guy and frankly was not at all impressed with that design. You never will get true clean knot patterns using a scrollsaw. It is a different look.

I went back to see what the OP is asking then. As far as turning on a scrollsaw just take the blade and use a file to knock the back edges off so that it will turn easier. Whenever you turn back off the forward presssure and turn the piece and then proceed with your cut. Never try making 90 degree turns while feeding into the wood. You now need a blade that will cut metal as well as the wood. The thinner the blade the easier to turn. If doubling the can for thickness I really suggest getting some flashing and only need one layer then.
 

Ingo Schwartz

Member
Joined
Sep 16, 2015
Messages
24
Location
Iceland
That's the one I was going for but I abandoned the idea, I have no Idea how my current pen will turn out, guess I'll just have to wait and see!

And I don't have access to any metal other than soda cans :)
 
Top Bottom