
You are using an out of date browser. It may not display this or other websites correctly.
You should upgrade or use an alternative browser.
You should upgrade or use an alternative browser.
Failure to lanch
- Thread starter bluesman
- Start date
Signed-In Members Don't See This Ad
Signed-In Members Don't See This Ad
cal91666
Member
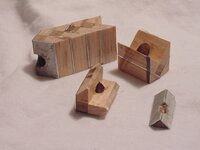
That was going to be a great blank! I'm experimenting and learning segmenting. Any idea what caused your failure?
sschering
Member
Glue it back together. Wrap it, coat it in epoxy or CA and keep drilling.
Nice segmenting.. don't let it go to waste.
Nice segmenting.. don't let it go to waste.
That is a highly repairable failure. Glue it back together. Add two popsicle sticks on the flat sides for extra support and finish drilling. I often use extra wood support sticks when making complex segmented blanks. Cheap extra support which turns off easily. If real weak use four sticks.
bluesman
Member
That was going to be a great blank! I'm experimenting and learning segmenting. Any idea what caused your failure?
My guess is the aluminum heated up and the epoxy failed.
I'll glue it back up, support it, and finish drilling it. But is was a disappointment. I think I'll wait till tomorrow and work on it then.
OZturner
Member
That was going to be a great blank! I'm experimenting and learning segmenting. Any idea what caused your failure?
My guess is the aluminum heated up and the epoxy failed.
I'll glue it back up, support it, and finish drilling it. But is was a disappointment. I think I'll wait till tomorrow and work on it then.
Hi Percy,
Too nice a Blank not to properly salvage.
As recommended glue side supports after you have epoxied the pieces back together and clamped.
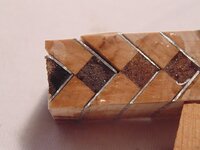
But before assembling have a close look at the Aluminium Seperator to make sure that there are no drill pickup edges, even if you have to grind them back with a Dremel tool to remove any. Leave it at smooth as a "Baby's U know What".
Make sure your drill bit is properly sharpened.
Then when drilling reduce your speed, to SLOW, don't take small bites - Just nibbles will do fine.
Withdraw the drill after a second or two, if you have compressed air give it a short blast of air, then repeat again slowly.
Trust this will assist.
Brian.
mikespenturningz
Member
Make sure you clean it well before you reglue it. Sharpen your drill before you try again. This will be a beautiful pen when you finish it. Don't be discouraged you can finish it. I have only given up on segmented blanks if parts get deformed or lost. I have always turned between centers the blank before I try to drill, this gives an even surface for the chuck to grip so you don't have high pressure spots and so I can get the exact center when I actually drill. Hope this helps.
bluesman
Member
Make sure you clean it well before you reglue it. Sharpen your drill before you try again. This will be a beautiful pen when you finish it. Don't be discouraged you can finish it. I have only given up on segmented blanks if parts get deformed or lost. I have always turned between centers the blank before I try to drill, this gives an even surface for the chuck to grip so you don't have high pressure spots and so I can get the exact center when I actually drill. Hope this helps.
Thanks Mike for the advice and encouragement.
I'm not giving up on it and I will finish it.
What are your suggestions for cleaning it? A file, sandpaper or a solvent?
Turning between centers would also solve the centering issue. Great Idea.
Thanks
bluesman
Member
That was going to be a great blank! I'm experimenting and learning segmenting. Any idea what caused your failure?
My guess is the aluminum heated up and the epoxy failed.
I'll glue it back up, support it, and finish drilling it. But is was a disappointment. I think I'll wait till tomorrow and work on it then.
Hi Percy,
Too nice a Blank not to properly salvage.
As recommended glue side supports after you have epoxied the pieces back together and clamped.
But before assembling have a close look at the Aluminium Seperator to make sure that there are no drill pickup edges, even if you have to grind them back with a Dremel tool to remove any. Leave it at smooth as a "Baby's U know What".
Make sure your drill bit is properly sharpened.
Then when drilling reduce your speed, to SLOW, don't take small bites - Just nibbles will do fine.
Withdraw the drill after a second or two, if you have compressed air give it a short blast of air, then repeat again slowly.
Trust this will assist.
Brian.
Brian
The aluminum does have some edges to clean up and I was drilling to fast.
The blank did heat up and I did stop and walked away for about 5 minutes but My guess is the dammage was done.
When I get it back together I post some pictures.
thanks
Donovan
Member
When I drill segmented blanks I always start with a smaller drill and work up to the correct size in as many steps as drills that I have. I have not had a problem jet. It also helps to have a soft touch LOL
Donovan
Donovan
bluesman
Member
When I drill segmented blanks I always start with a smaller drill and work up to the correct size in as many steps as drills that I have. I have not had a problem jet. It also helps to have a soft touch LOL
Donovan
Thanks Donovan,
That makes sense as it would reduce the heat.
I'm off to the shop to try to put it back together.
darrin1200
Member
Looks good Percy
I can't wait to see this at the clubs show and tell.
I see that you are drilling down onto the point of the aluminum "V". Would it make a difference to drill from the other direction, so that you are hitting the valley? I would think that this would give you a smoother, more balanced cutting action.
bluesman
Member
Looks good Percy
I can't wait to see this at the clubs show and tell.
I see that you are drilling down onto the point of the aluminum "V". Would it make a difference to drill from the other direction, so that you are hitting the valley? I would think that this would give you a smoother, more balanced cutting action.
Maybe, not so sure, if you drilled it with the V's down you would hit the widest part first, pushing the segment apart.
My thoughts were that by drilling with the point of the V up would be you could ease the drill into the aluminum. Taking small bites.
Of course it's just a theory. Reality is I pushed the blank past it's comfort zone.

glycerine
Member
I've done many segmented blanks with aluminum... and I'm pretty sure more came apart than didn't. That's just the way it is sometimes. Even when you take things slowly, it can happen, but that's the key. Take it slowly, maybe grab the shop-vac and keep the nozzle as close as possible to the blank to aid in "air cooling."
I've also done as others suggested and used a sander to round it out a bit before final turning. Taking those corners off helps.
I've also done as others suggested and used a sander to round it out a bit before final turning. Taking those corners off helps.
Hendu3270
Member
Glue it back together. Wrap it, coat it in epoxy or CA and keep drilling.
Nice segmenting.. don't let it go to waste.
Agree 100%. This blank is NOT trash.
bluesman
Member
So..... the saga continues
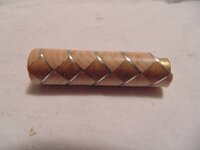
The blank is re-glued and all looks great until I turned it over and saw the gap. No problem. We'll make it for a Gatsby and not a Polaris. This will shorten the tube and we should be fine. It a different brass size but the blank survived the drilling process.
Then the fun started. I am getting it close to the bushings and I just need to take a bit more off and as if in slow motion I see the piece come off. It made a arc in slow motion and then disappeared into a pile of shavings. No I can not find it.
suggestions?? should I try to cut a new piece and fit it in? Or add a banding?
Attachments
Krash
Member
So..... the saga continues
Then the fun started. I am getting it close to the bushings and I just need to take a bit more off and as if in slow motion I see the piece come off. It made a arc in slow motion and then disappeared into a pile of shavings. No I can not find it.
suggestions?? should I try to cut a new piece and fit it in? Or add a banding?
Do you have that piece from the cutoff portion? Maybe you could pare it off and glue it onto your workpiece.
Just a thought.
Kelly
Hendu3270
Member
You can still salvage this blank. Take another piece of the lighter colored wood and drill the appropriate diameter hole for the kit. Then you need to cut that piece on the bandsaw at the correct angle thought the hole. You should be able to fit it back on. You may have to work at it to get it just right but it's do-able.
FYI - I always try to NOT have aluminum or brass segmenting run to the end of the tube. When you're squaring the ends, it seems to cause more problems than it's worth. the segment either comes off or is weakened and comes off on the lather. Or, the very end of the alum / brass has a very small turn to it in the direction the trimmer was cutting. Just my two cents.
FYI - I always try to NOT have aluminum or brass segmenting run to the end of the tube. When you're squaring the ends, it seems to cause more problems than it's worth. the segment either comes off or is weakened and comes off on the lather. Or, the very end of the alum / brass has a very small turn to it in the direction the trimmer was cutting. Just my two cents.
bluesman
Member
You can still salvage this blank. Take another piece of the lighter colored wood and drill the appropriate diameter hole for the kit. Then you need to cut that piece on the bandsaw at the correct angle thought the hole. You should be able to fit it back on. You may have to work at it to get it just right but it's do-able.
FYI - I always try to NOT have aluminum or brass segmenting run to the end of the tube. When you're squaring the ends, it seems to cause more problems than it's worth. the segment either comes off or is weakened and comes off on the lather. Or, the very end of the alum / brass has a very small turn to it in the direction the trimmer was cutting. Just my two cents.
Chris
Check out the 'Success ..... finally' to see the end result
Your comments about aluminum on the ends have me thinking or second guessing. I was thinking of using the aluminun on the ends of the blank.
I haven't made up the blank because it's to cold to cut it out.
Last edited:
Parshooter11
Member
Painful!! Hope you can save it! Looks like it will be a good one!
joefrog
Member
That is a highly repairable failure. Glue it back together. Add two popsicle sticks on the flat sides for extra support and finish drilling. I often use extra wood support sticks when making complex segmented blanks. Cheap extra support which turns off easily. If real weak use four sticks.
Now there's something I never, ever would have thought of. Great tip!