
You are using an out of date browser. It may not display this or other websites correctly.
You should upgrade or use an alternative browser.
You should upgrade or use an alternative browser.
Clamping segments cut out n an angle
- Thread starter Fyrpuppy
- Start date
Signed-In Members Don't See This Ad

Signed-In Members Don't See This Ad
plantman
Member
Use thick CA and an accelerator. Align your parts, glue, spray, and hold together with hand pressure for 15- 20 seconds on a flat surface. Jim S
Warren White
Member
A VERY simple jig...
...sorry about the quality of the staging of the picture, but I thought you might like a fast answer.
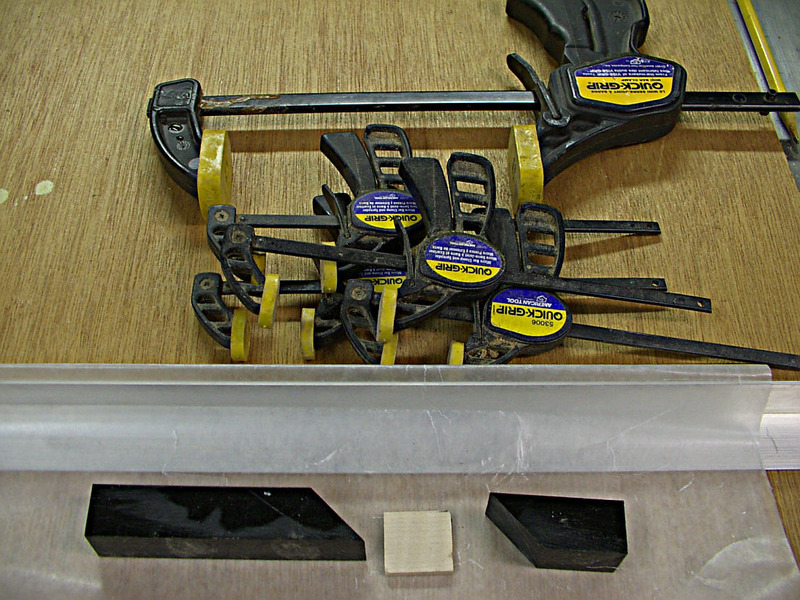
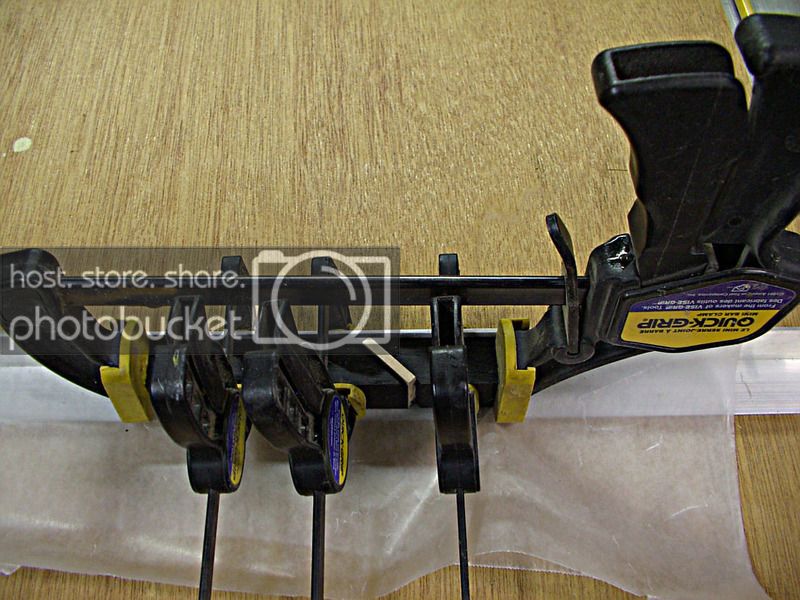
I use the jig pictured. I use wax paper to keep everything from sticking to the jig and to the pieces I use to ensure alignment. The right angles of the jig keep everything square. I sand any protrusions of the insert smooth after the first glue up with the edge of the blank to ensure a good fit and even pressure (it doesn't much matter with the first, because you can leave that edge up, and therefore it doesn't affect the alignment). The blank to be glued goes against the long side of the jig.
I put a piece of scrap that is 3/4" square about the same length as the blank I am gluing on the long side. I clamp that to the jig with the blank to be glued held up against the jig. I would probably use two of the small clamps. I then use the longer clamp to apply pressure from the end of the blank. You have to tweak it a bit to first get it all square and then tight to the jig.
I use regular wood glue on wood blanks, but would probably use epoxy on acrylic blanks (emphasis on 'probably' because I have never tried to make a Celtic knot on acrylic, so I bow to others who have actually done it.)
I hope this is clear. If it isn't post a comment and I will do a better job of putting a picture together.
...sorry about the quality of the staging of the picture, but I thought you might like a fast answer.
I use the jig pictured. I use wax paper to keep everything from sticking to the jig and to the pieces I use to ensure alignment. The right angles of the jig keep everything square. I sand any protrusions of the insert smooth after the first glue up with the edge of the blank to ensure a good fit and even pressure (it doesn't much matter with the first, because you can leave that edge up, and therefore it doesn't affect the alignment). The blank to be glued goes against the long side of the jig.
I put a piece of scrap that is 3/4" square about the same length as the blank I am gluing on the long side. I clamp that to the jig with the blank to be glued held up against the jig. I would probably use two of the small clamps. I then use the longer clamp to apply pressure from the end of the blank. You have to tweak it a bit to first get it all square and then tight to the jig.
I use regular wood glue on wood blanks, but would probably use epoxy on acrylic blanks (emphasis on 'probably' because I have never tried to make a Celtic knot on acrylic, so I bow to others who have actually done it.)
I hope this is clear. If it isn't post a comment and I will do a better job of putting a picture together.
Attachments

jttheclockman
Member
Here is the way I do all my segmented blanks. I adapt for whatever the shape of the blank round square or triangle but the principle is the same.
Material
A piece of angle you can get at Home Depot
Wax paper
Clamps of different size
Sometimes blocks for support.
Photos should show what the process is. This is just an example. Nothing to do with a project. Any questions, fire away.
Note: I use System III T88 epoxy for my acrylic or metal segments. I am never in a hurry when doing a segmented blank. When clamping the ends do not squeeze the living daylights out of it. You will starve the joint of glue. It comes with practice to know how to clamp a joint and that goes for any joint in the world of woodworking or other crafts. Good luck and look forward to your ideas. Bring them on.


Last edited:
jttheclockman
Member
Thanks guys, I don't know why I didn't think of that.
As I smack my foward.
This is why we are here to smack it for you:biggrin:
Segmenting is our game.
I don't cut all the way through the blank. If you leave a thin layer say 1/16 or 3/32 you can glue without the blank shifting and all your lines stay perfect. The layer turns off when the blank is turned round. I started this when doing Celtic blanks and just got into the habit. No glue up are easy and everything lines up every time. I just have to make my inserts the same width of the saw kerf. I have several different thickness of saw blades and have several different jigs to hold the blanks for sawing. The key to good segmenting is being able to reproduce cuts with precision every time and jigs are the way to go to me.
thrustmonkey
Member
System III T88
Where can I get some info on System III T88? I've been trying to find epoxy with a longer open time and haven't been able to find any. Where can I get it?
Thanks,
Ross
Where can I get some info on System III T88? I've been trying to find epoxy with a longer open time and haven't been able to find any. Where can I get it?
Thanks,
Ross
Warren White
Member
GO TO...
... systemthree.com
Everything you ever wanted to know. I recently switched just because of the reason you stated, a longer work time. It also gives you added strength.
... systemthree.com
Everything you ever wanted to know. I recently switched just because of the reason you stated, a longer work time. It also gives you added strength.
jttheclockman
Member
Where can I get some info on System III T88? I've been trying to find epoxy with a longer open time and haven't been able to find any. Where can I get it?
Thanks,
Ross
System III makes many products. T88 is just one epoxy glue they make. I use to have a tool place by me but they sold out and now I buy from Woodcraft.
www.systemthree.com
I don't cut all the way through the blank. If you leave a thin layer say 1/16 or 3/32 you can glue without the blank shifting and all your lines stay perfect. The layer turns off when the blank is turned round. I started this when doing Celtic blanks and just got into the habit. No glue up are easy and everything lines up every time. I just have to make my inserts the same width of the saw kerf. I have several different thickness of saw blades and have several different jigs to hold the blanks for sawing. The key to good segmenting is being able to reproduce cuts with precision every time and jigs are the way to go to me.
This system does not always work especially in the case of the OP. He is changing woods and not only adding thin strips. he needs to cut all the way through.
Last edited:

jttheclockman
Member
Thanks for the help got the clamping down now if it would just all stay together.
I am sensing we had a failure. Maybe we can help in that area also. Can you explain what it is you are gluing, what type glue you are using and maybe a little description of your method of prep work. You will get there.
Rosewood, maple, mahogany, pick guard material and aluminum can. I was using a 3 minute epoxy from woodcraft. They both failed in the pick guard area or the aluminum next to it. I am nit sure if I didn't rough the pick guard material enough or get the dust cleaned off good. They both failed while drilling. This was the material in a guitar that I was trying to match. I had made her a set with just the rosewood but was trying to give her another option. Thanks for any advice.

MTViper
Member
One technique I saw here is strapping pieces of tongue depressor to each side of the blank before you start to drill. If you use nylon strapping tape and tape it tightly, it will usually prevent the pieces from twisting when the drill bit enters a new type of material and grabs.
It also helps if you've let your epoxy cure and not just dry. It may be dry in 3 minutes, but you're better off if you wait 24 hours before you drill something glued up like that.
It also helps if you've let your epoxy cure and not just dry. It may be dry in 3 minutes, but you're better off if you wait 24 hours before you drill something glued up like that.
jttheclockman
Member
Rosewood, maple, mahogany, pick guard material and aluminum can. I was using a 3 minute epoxy from woodcraft. They both failed in the pick guard area or the aluminum next to it. I am nit sure if I didn't rough the pick guard material enough or get the dust cleaned off good. They both failed while drilling. This was the material in a guitar that I was trying to match. I had made her a set with just the rosewood but was trying to give her another option. Thanks for any advice.
Well you are throwing alot of different materials into the mix for sure. Each one has it own hardness value and also adhesive challenges. Are you making these blanks with angles or are they just stacked material blanks.??? Could mean a different approach for either one.
I will tell you my findings after doing this type of work for awhile now. Others may have better luck with other methods and let them explain theirs.
I never use any of those quick set epoxies for doing work like this. The holding strength is not the same as a true 24 hour epoxy. No matter what brand used. I use System III T88 epoxy. It is an adhesive epoxy and not a casting epoxy. Big difference.
When working with oily woods such as rosewood I would wipe the blank with acetone and let dry before gluing. You can do this with all the woods and other materials. The pickguard and the aluminum need to be roughed up with sandpaper and wiped down with acetone. Do not handle them again with your fingerprints on them. The oils from your hands will destroy the bond.
Glue all pieces and set aside to dry and cure. To me at least 24 hours in a dry cool place.
Now if you built this blank and want to drill it. You can reinforce it by a couple different ways. Coat the entire blank with thin CA and maybe a couple coats. Or you can do that and also wrap with some gauze such as that used for treating wounds. One other method would be to sure the blank up with popsicle sticks CA glued to the 4 sides.
If successful drilling I used the same epoxy to glue in the tube and again let sit for at least 24 hours.
Now for turning I would knock off all corners and also make sure there are no dips in the blank due to different sized materials used. I would sand these flat and being very careful as to not get the blank too hot. Heat is your enemy when working with any kind of segmented blanks. After this is done and ready to turn to size I would keep adding thin CA to the outside of the blank to keep it stabalized. I use a skew to do my turning of segmented blanks.
That is my methods and they vary as I mentioned depending how you cut your segments weather on an angle or straight across. Good luck.
That was alot of typing.
SteveG
Member
I use a wrap with CA. When the seg-blank is ready for drilling, I wrap it with 1 or 2 layers of the thin paper-type first aid tape. The tape coverage extends beyond the area of segments. Then soak it with a small amount of THIN CA. This forms a sheath that holds the whole assembly together during drilling. I like it 'cause it is quick, and works! The tape is my preferred material as it is self adhesive during wrapping phase, and allows the CA to penetrate down to the blank, forming a "cast" to hold everything together.
Some notes:
1. Tape must be type which allows CA to penetrate
2. If woods used are oily, wipe with solvent prior to taping. The CA bond to the blank must be strong
3. You can turn away some of the irregular CA/tape "cast" you have made prior to drilling. This might occur, if for example, you need a symmetrically aligned drilling and the cast is interfering with the grip of the jaws holding the blank to be drilled.
4. Prior to taping. it is helpful to trim away any pieces of the segmentation that extend out from the sides of the main blank, leaving a uniform blank for the tape to be applied and adhered to
There are a number of little details listed here, but you will find this method to be very quick, and provide a high degree of success. Have fun!
jimmyz
Member
Have to admit I have not tried this, but was watching a program on Create TV called Craftsmans Legacy. Host was interviewing John Wilson, woodworker, toolmaker, and, probably, best known for making Shaker boxes.
On this episode, they were making a shoulder plane. Plane had two solid outside panels and an inside one that was cut out for the throat, where the plane iron and wedge to hold it in go.
They were using Titebond to glue the pieces together in stages. John said, "You know how the two pieces always slip when you try to clamp them?" The host said "Yes". John said, "Here's a trick. Shake some salt on the glue, and the abrasive nature of the salt crystals will help hold the pieces together and help with the slipping".
As I said, haven't tried it, but plan to do so next time I run into that situation. I imagine the same thing would work with CA, along with the jigs for holding the pieces together temporarily while the CA sets. Can't hurt, so might as well see if it helps.
jttheclockman
Member
Have to admit I have not tried this, but was watching a program on Create TV called Craftsmans Legacy. Host was interviewing John Wilson, woodworker, toolmaker, and, probably, best known for making Shaker boxes.
On this episode, they were making a shoulder plane. Plane had two solid outside panels and an inside one that was cut out for the throat, where the plane iron and wedge to hold it in go.
They were using Titebond to glue the pieces together in stages. John said, "You know how the two pieces always slip when you try to clamp them?" The host said "Yes". John said, "Here's a trick. Shake some salt on the glue, and the abrasive nature of the salt crystals will help hold the pieces together and help with the slipping".
As I said, haven't tried it, but plan to do so next time I run into that situation. I imagine the same thing would work with CA, along with the jigs for holding the pieces together temporarily while the CA sets. Can't hurt, so might as well see if it helps.
Just a side note on that method. He was gluing wood to wood. With wood you have open grain patterns and the salt will have some place to embed into. When gluing solid objects like metal and plastics there is no open grain so that salt will build a separation between material and if you get too much it will not allow the parts to adhere well to each other. Would not be something I would try.
Easiest way to glue a segment in a blank with out major issues is to not cut the blank into two parts. I set my table saw so there is a very thin amount of wood left to connect the two parts. Then I make the insert exactly the thickness of the saw kerf. Use of CA or slower set Epoxy gives me the best bonds. I use light clamping so that I don't squeeze all the glue out of the joint. Let the glue cure completely. Trim blank back to a flat surface and keep the blank square. When I do a complex Celtic knot or multiple inlet blank the ability to keep the blank intact on one side prevents joint slippage and keeps all the lines lining up.
clamping
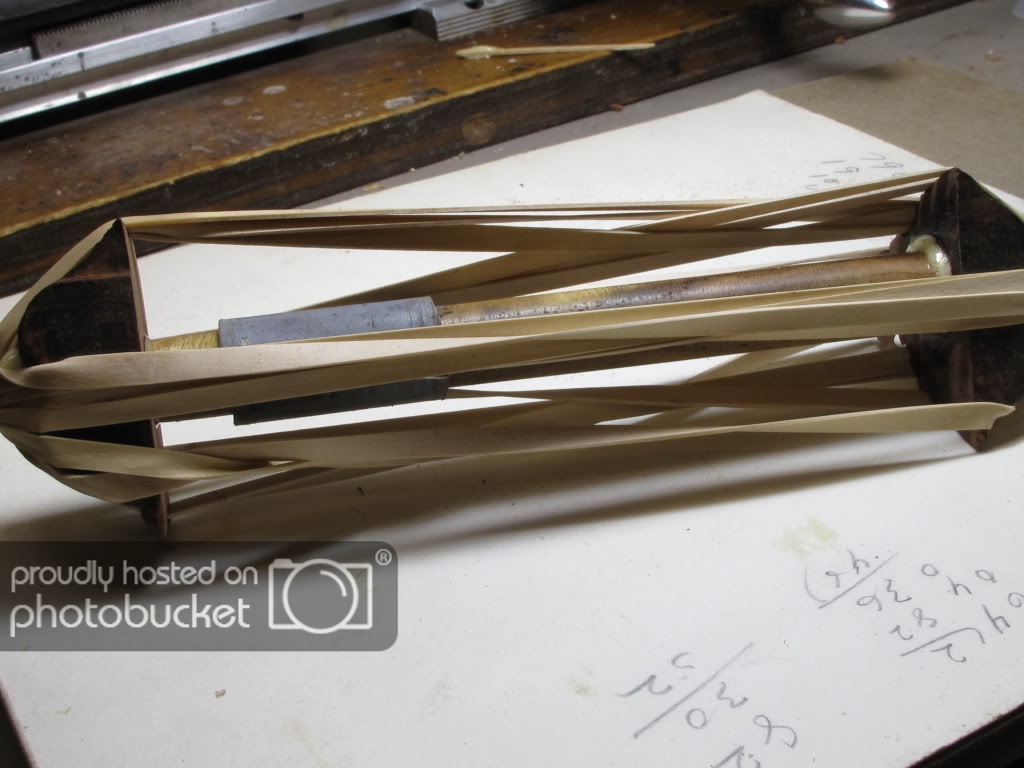
I use rubber surgical tubing like the stuff they tie around your arm at the hospital .
Most glues will not stick to the rubber .
I normally use slow drying glues or epoxy.
I will rubber band the pieces to a solid strip of wood then saw of the wood I used as support to keep the angled cut wood in the right positions .
Normally I always keep a bag of rubber bands around just for clamping stuff together '
I have some picture of things I glued together but it looks like a ball of rubber bands.
Last edited:
Woodchipper
Member
FWIW, again, I'm repeating myself here as in other posts. I built custom fishing rods. I put the cork ring in a press, using a piece of all thread to line up the rings. I used TB III and wrapped the all thread with plumber's Teflon tape to keep the glue from sticking to the all thread. Thought of this when I read the original thread. Hope this helps someone in the future.