Chevron Self-Critique

Signed-In Members Don't See This Ad

mark james

IAP Collection, Curator
Joined
Sep 6, 2012
Messages
12,750
Location
Medina, Ohio
Hi Segmenters!

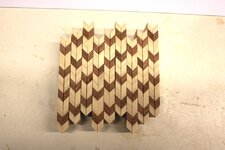
I previously posted the construction of this blank: http://www.penturners.org/forum/f179/different-chevron-method-finished-blank-only-155799/.

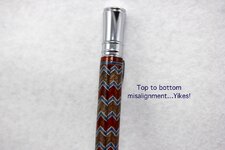
While it was fun to construct, overcame several obstacles, the final symmetry was poor. Nontheless, It escaped the scrap barrel and was final turned, finished and assembled (I had to be coerced...).

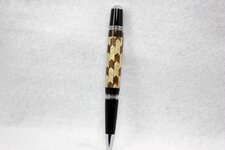
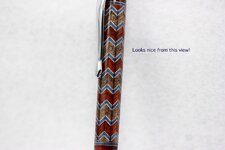
So... Its a very nice segmented pen, lots of complimentary colors, looks cool... (But to an eye for segmenting, not so fast on the compliments...).

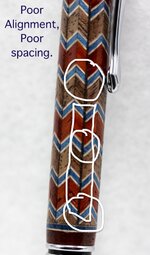
Lets use this thread to do a healthy critique! So often we see perfect, final products; no hint at the hrs, days, weeks that went into the final assembledge.

AND I'll start: My pickies need sorting, so look in the next thread.
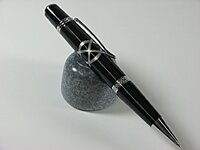
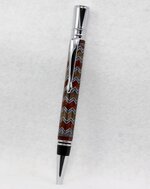
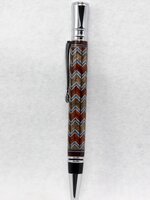
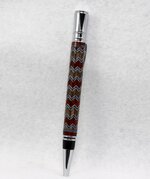
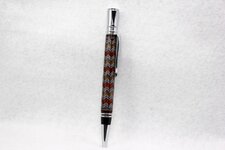
 

Attachments

  • IMG_0918.jpg
    IMG_0918.jpg
    139.4 KB · Views: 349
  • IMG_0919.jpg
    IMG_0919.jpg
    140.6 KB · Views: 406
  • IMG_0920.jpg
    IMG_0920.jpg
    159.8 KB · Views: 342
  • IMG_0921.jpg
    IMG_0921.jpg
    126.2 KB · Views: 326
Signed-In Members Don't See This Ad

Skie_M

Member
Joined
Aug 7, 2015
Messages
2,737
Location
Lawton, Ok
I see where the segments didn't line up properly in the 2nd, 3rd and the 4th picture ... yeah, that would drive me nuts too, man ...

Barrel Stave construction style? Aside from the mismatched alignment I think that the colors generally match up quite well and look good together.

Did you use some kind of jig to get proper alignment? How would you feel about making some minor adjustments and trying it again? Do you think it would have been better to arrange it in segments and then put the segments together in order after re-squaring for alignment before you drill for the barrel tube?

Do you think it may also be better to do all that work and arrange it to look perfect from the outside as an angled barrrel and then cast it and turn a crystal clear exterior barrel around it?
 

Cwalker935

Member
Joined
May 18, 2014
Messages
3,506
Location
Richmond, Va
The mismatched alignment sort of jumps out at you. Aside from that, I think it is just too busy. Too much going on for my eye. I cannot imagine the work and hours that went into that pen and give you an A+ for effort. Breaking up the chevron sections and placing some solid strips between the sections might help.
 

mark james

IAP Collection, Curator
Joined
Sep 6, 2012
Messages
12,750
Location
Medina, Ohio
One view may look GREAT! But look carefully. Yes, I do know that many family, friends, customers, etc may not notice, these issues really bug me!
 

Attachments

  • IMG_0918.jpg
    IMG_0918.jpg
    149.4 KB · Views: 283
  • IMG_0928.jpg
    IMG_0928.jpg
    100.9 KB · Views: 290
  • IMG_0926.jpg
    IMG_0926.jpg
    123 KB · Views: 302
  • IMG_0923.jpg
    IMG_0923.jpg
    150 KB · Views: 330

leehljp

Member Liaison
Joined
Feb 6, 2005
Messages
9,326
Location
Tunica, Mississippi,
IT looks like a labor of love of pen making for sure. And, You sure are brave to work on something that tedious!

Still, Great work!

Now to my questions if it were me: Do you "know" where the misalignment came from? That is what drives me nuts. Alignment issue? Thickness issue? measurement in cutting issue? These are the things that I contemplate over and over until I find out where it was off that I didn't see when I was doing it. I am more obsessed with finding out WHAT I missed doing and why I missed it than anything else.
 

mark james

IAP Collection, Curator
Joined
Sep 6, 2012
Messages
12,750
Location
Medina, Ohio
Will try to continue.

I see where the segments didn't line up properly in the 2nd, 3rd and the 4th picture ... yeah, that would drive me nuts too, man ...

Barrel Stave construction style? Yes, this was my first attempt at a stave construction. Aside from the mismatched alignment I think that the colors generally match up quite well and look good together. Yes, the colors are fine.

Did you use some kind of jig to get proper alignment? I got the angles (posted previously) with a belt sander. SteveJ has done a better/more precise effort with a Byrnes saw (which I have). How would you feel about making some minor adjustments and trying it again? (No problem tweaking this!) Do you think it would have been better to arrange it in segments and then put the segments together in order after re-squaring for alignment before you drill for the barrel tube? (Ya lost me here!)

Do you think it may also be better to do all that work and arrange it to look perfect from the outside as an angled barrrel and then cast it and turn a crystal clear exterior barrel around it? We've been tossing that idea around (Segmenters). Only issue as I see it, the OD at 3/4" may not match the OD at .520" for a finished blank. The symmetry outside may not be a good view of the symmetry inside.


Please continue these thoughts. This was NOT a "Look at a fantastic pen! Thread." It was a "Let's tear this apart and have some fun improving!! Thread.
 

SteveJ

Member
Joined
Jul 11, 2012
Messages
3,374
Location
Grand Junction, Colorado
I think that if you started out with slightly wider chevrons you might be able to make better joints. Also, you are using the sander to make the angles, when I tried that I found the staves to be inconsistent. Using double sided tape and cutting the staves on the Byrnes saw kept them more consistent. Of course I did 8 staves (which also simplified the angle measurement).
 

mark james

IAP Collection, Curator
Joined
Sep 6, 2012
Messages
12,750
Location
Medina, Ohio
IT looks like a labor of love of pen making for sure. And, You sure are brave to work on something that tedious!

Still, Great work!

Now to my questions if it were me: Do you "know" where the misalignment came from? That is what drives me nuts. Alignment issue? Thickness issue? measurement in cutting issue? These are the things that I contemplate over and over until I find out where it was off that I didn't see when I was doing it. I am more obsessed with finding out WHAT I missed doing and why I missed it than anything else.

Sheesh Hank, yes. I need to ponder each of these! On to next week!
 

mark james

IAP Collection, Curator
Joined
Sep 6, 2012
Messages
12,750
Location
Medina, Ohio
I think that if you started out with slightly wider chevrons you might be able to make better joints. Also, you are using the sander to make the angles, when I tried that I found the staves to be inconsistent. Using double sided tape and cutting the staves on the Byrnes saw kept them more consistent. Of course I did 8 staves (which also simplified the angle measurement).

Yes, the sander did not give the best angles.
 

Skie_M

Member
Joined
Aug 7, 2015
Messages
2,737
Location
Lawton, Ok
"Do you think it would have been better to arrange it in segments and then put the segments together in order after re-squaring for alignment before you drill for the barrel tube?" .... didn't mean to try to lose you, there ... :)


The sequence is pretty busy-making, but easy enough to follow and follow through on. You'll need a flat surface with some 220 - 400 grit sandpaper glued flat on it, as a "bench flat" to work with.

You take 2 staves and line then up ... glue and clamp. Or you can take more staves if you are feeling brave ... you don't take all of them, though, at most half. In this way you work your way up to having 2 half barrel sections. In between each gluing, you sand the flats to true them up dry before you glue them together. In the final stage you sand the flats that will be glued together to form the final barrel and true them up dry as well before gluing. This process ensures that you get a barrel that matches all the way around, much like putting wood rings on an alabaster vessel. They do it with 6 or 8 part segments in a flat wood framed hexagon or octagon, but they do it in halves at a time before truing up the mating surfaces and gluing/clamping.


Whether using a saw of some sort for your angles or a sander, you'll want to make use of a jig that will give you consistent and repeatable results. I have no idea if I could pull something like this off ... I'ld love to give it a go, someday! :)
 

mark james

IAP Collection, Curator
Joined
Sep 6, 2012
Messages
12,750
Location
Medina, Ohio
The mismatched alignment sort of jumps out at you. Aside from that, I think it is just too busy. Too much going on for my eye. I cannot imagine the work and hours that went into that pen and give you an A+ for effort. Breaking up the chevron sections and placing some solid strips between the sections might help.

Constructing Chevrons with wider sections is easy. This is a variable that can easily be incorporated. TY.
 

mark james

IAP Collection, Curator
Joined
Sep 6, 2012
Messages
12,750
Location
Medina, Ohio
IT looks like a labor of love of pen making for sure. And, You sure are brave to work on something that tedious!

Still, Great work!

Now to my questions if it were me: Do you "know" where the misalignment came from? That is what drives me nuts. Alignment issue? Thickness issue? measurement in cutting issue? These are the things that I contemplate over and over until I find out where it was off that I didn't see when I was doing it. I am more obsessed with finding out WHAT I missed doing and why I missed it than anything else.

Hi Hank.. OK, so for the "misalignment", I suspect that when I assembled the "star formation" several of the points were too far in, and others were too far out. This would result in the final width of the chevrons being too wide or thin, or in several of mine, 1/2 of the chevron was too thin.

SteveJ has a more precise method of getting the angles cut. His concept may be the best ava way to get a center-point with very precise angles.

Happy segmenting!
 

mark james

IAP Collection, Curator
Joined
Sep 6, 2012
Messages
12,750
Location
Medina, Ohio
I think you did an excellent job with the concept. But for eye appeal, it as CWalker said, "too busy", it doesn't seem to meet the high standards you have continuously been showing us.

I agree, a different method to construct the blank, but little thought was given to the dimensions of the chevron. A critique well deserved! :)
 

GaryMGg

Member
Joined
Nov 23, 2006
Messages
5,786
Location
McIntosh, Florida, USA.
I believe it wouldn't be too busy if the alignment was perfect; I believe it would be magical!
The colors and pattern would be like a kaleidoscope—I've never heard anyone complain a K is too busy.
IMHO, it's 'busy' because of the misalignment.

You might get better alignment using painters tape during the glue up once you work out perfect consistency for each stave.

Even with the issues, the work is quite wonderful.
 

jttheclockman

Member
Joined
Feb 22, 2005
Messages
19,132
Location
NJ, USA.
I know I will get the peanut gallery telling me if you can do better do it yourself and lets see what you got. I would but I have no time right now. After New Years I will do alot of new pen designs or at least I want to if I do not need surgery.

But my thoughts and I mentioned this to you before so it probably falling on deaf ears. When you are trying new ideas like this start with basics and do not make the design so complicated till you get the steps down easily and learn what needs to be done. Too much of a pattern for me to grasp. I discussed this with Steve before. In order and it is the only way to get any pattern to circle a tube is with stave construction ( there is another way but require exact slots) I also agree with Steve J on cutting the staves and not sanding to dimensions. Cutting gives you exact all the time. Adding a black line to break up the eye will also help. When you make your starting block, cut square slices the size you will need to make staves. Now make a jig to cut both sides of the staves. (whatever angle needed) All cuts will be equal and when layed out you can turn every other one upside down to give you the chevron pattern. The total number of staves will be determined by how wide you make the pattern. Your the math guy so leave that to you. I wish I could show an example but not at this time. Keep at it.

Now this is where Ernie and others step in and tell me to shove it. :):)

By the way SteveJ gave good examples in his illusion pen. Talking about staves.
 
Last edited:

EBorraga

Passed Away July 17, 2022
In Memoriam
Joined
Oct 19, 2009
Messages
4,049
Location
Louisville, KY
I know I will get the peanut gallery telling me if you can do better do it yourself and lets see what you got. I would but I have no time right now. After New Years I will do alot of new pen designs or at least I want to if I do not need surgery.

But my thoughts and I mentioned this to you before so it probably falling on deaf ears. When you are trying new ideas like this start with basics and do not make the design so complicated till you get the steps down easily and learn what needs to be done. Too much of a pattern for me to grasp. I discussed this with Steve before. In order and it is the only way to get any pattern to circle a tube is with stave construction ( there is another way but require exact slots) I also agree with Steve J on cutting the staves and not sanding to dimensions. Cutting gives you exact all the time. Adding a black line to break up the eye will also help. When you make your starting block, cut square slices the size you will need to make staves. Now make a jig to cut both sides of the staves. (whatever angle needed) All cuts will be equal and when layed out you can turn every other one upside down to give you the chevron pattern. The total number of staves will be determined by how wide you make the pattern. Your the math guy so leave that to you. I wish I could show an example but not at this time. Keep at it.

Now this is where Ernie and others step in and tell me to shove it. :):)

By the way SteveJ gave good examples in his illusion pen. Talking about staves.

Not from me. I'm just gonna say i've heard you've been gonna make a pen for 2 years. I'm waiting JT!!! If I get out to my shop!! One Day, We may see a JT pen.
 

jttheclockman

Member
Joined
Feb 22, 2005
Messages
19,132
Location
NJ, USA.
I know I will get the peanut gallery telling me if you can do better do it yourself and lets see what you got. I would but I have no time right now. After New Years I will do alot of new pen designs or at least I want to if I do not need surgery.

But my thoughts and I mentioned this to you before so it probably falling on deaf ears. When you are trying new ideas like this start with basics and do not make the design so complicated till you get the steps down easily and learn what needs to be done. Too much of a pattern for me to grasp. I discussed this with Steve before. In order and it is the only way to get any pattern to circle a tube is with stave construction ( there is another way but require exact slots) I also agree with Steve J on cutting the staves and not sanding to dimensions. Cutting gives you exact all the time. Adding a black line to break up the eye will also help. When you make your starting block, cut square slices the size you will need to make staves. Now make a jig to cut both sides of the staves. (whatever angle needed) All cuts will be equal and when layed out you can turn every other one upside down to give you the chevron pattern. The total number of staves will be determined by how wide you make the pattern. Your the math guy so leave that to you. I wish I could show an example but not at this time. Keep at it.

Now this is where Ernie and others step in and tell me to shove it. :):)

By the way SteveJ gave good examples in his illusion pen. Talking about staves.

Not from me. I'm just gonna say i've heard you've been gonna make a pen for 2 years. I'm waiting JT!!! If I get out to my shop!! One Day, We may see a JT pen.


Well Ernie lets muddy this thread up too. This is for you. The very latest of my pens that came out of my shop.

First one Celtic Knot in aluminum and black acrylic made and shown 3/21/17

Second is 2 Fireman pens, one is a laser cut inlay and the other is a thin red line which I cast on my own and shown 11/19/17 These I made a few of for some fireman friends I have.

The scrollsaw blade one was made by me and cast for the casting contest for the Bash of 2018

The last one was for the Pretty Wood contest for the Bash of 2018

Also worked on a Pen box that was labor intensive and a pen stand for that same Bash of 2018.

Now since then I have had knee surgery Got back in my shop 2 months ago and am currently trying to get some inventory stocked up for my shows in November and Dec. I do other woodworking such as scrolling for which I have shown numerous projects over the years that I have done. I really do not have to answer to you but to shut you up there are some projects. I do not make many pens and the ones I do are one of a kind. When I do get some done I will add to my album and not put them in the thread of SOYP If you want me to send you a PM when I get any done just let me know so that you can degrade them.

I do have about 4 pens in various states sitting on the workbench. They may come into play for this years Bash.

Again not sure what I ever did to you for you to take this attitude but so be it and have at it.
 

Attachments

  • Copy of IMGP0144.jpg
    Copy of IMGP0144.jpg
    160.5 KB · Views: 231
  • Copy of IMGP0157.jpg
    Copy of IMGP0157.jpg
    153.2 KB · Views: 249
  • Copy of IMGP0154.jpg
    Copy of IMGP0154.jpg
    186.9 KB · Views: 235
  • Copy of IMGP0188.jpg
    Copy of IMGP0188.jpg
    122.9 KB · Views: 228
  • Copy of IMGP0139.jpg
    Copy of IMGP0139.jpg
    181 KB · Views: 221
Last edited:

jttheclockman

Member
Joined
Feb 22, 2005
Messages
19,132
Location
NJ, USA.
Mark, sorry for the misdirection and sidetrack nonsense. I do hope there is some valuable info in this but I feel you have a handle on what needs to be done as you move forward on the design concept. Do not be so critical of yourself. You are doing things others have not even tried here. Your progress is showing through. Tighten up on some procedures and you are there. You are working with thin and small stock so this makes it more difficult. The use of many layers to make up your blank adds to accuracy problems. You are relying on the sander to thin all woods the exact same thickness. When you go to align layers to form the chevron just one layer being of a different thickness can throw the entire pattern off. Those drum sanders can not produce that kind of accuracy. As mentioned if you do not use so many layers and maybe also add the black line to break up the pattern to trick the eye. Other than that good luck and again sorry for the nonsense. It is uncalled for. :)

PS I love segmenting. Adding this concept to a small work surface such as a pen blank is cool and the design possibilities are endless and I believe the next great design is right around the corner and who shows it is anybodies guess. I do hope some of these new members jump on board and maybe add some of their fresh ideas. Doing these things with tools that are controlled by hand is showing excellent skills. Keep up this great work. Happy turning.
 
Last edited:

Dehn0045

Member
Joined
Mar 19, 2017
Messages
1,533
Location
US
Back to the critique: Mark, I very much admire your segmenting and chevrons. I think my personal record is 10 pieces in a single segmented pen, this one of yours looks to have upwards of 500 (or maybe more). Anyway, you are clearly overly critical of your segmenting, that's why you can do what you can do. With my personal penmaking I am overly critical of my finish (I know others out there can produce much better finishes, but it is what I spend my time on). When I look at my pens I can quickly point out flaws in the finish that no average observer would notice. It is difficult to tell from photos alone, but it looks to me like many of the pores in this pen are not filled and smooth (pore pits are pretty noticeable even to average folks). I personally think that this pen would get more from improvement in the finish than it would from improvements in the segmenting. Just an observation from a guy that is overly critical of CA finishes... Like I said at the outset, your segmenting is phenomenal, the color choices and design are fantastic. I really enjoy seeing what you come up with.
 

mark james

IAP Collection, Curator
Joined
Sep 6, 2012
Messages
12,750
Location
Medina, Ohio
Back to the critique: Mark, I very much admire your segmenting and chevrons. I think my personal record is 10 pieces in a single segmented pen, this one of yours looks to have upwards of 500 (or maybe more). Anyway, you are clearly overly critical of your segmenting, that's why you can do what you can do. With my personal penmaking I am overly critical of my finish (I know others out there can produce much better finishes, but it is what I spend my time on). When I look at my pens I can quickly point out flaws in the finish that no average observer would notice. It is difficult to tell from photos alone, but it looks to me like many of the pores in this pen are not filled and smooth (pore pits are pretty noticeable even to average folks). I personally think that this pen would get more from improvement in the finish than it would from improvements in the segmenting. Just an observation from a guy that is overly critical of CA finishes... Like I said at the outset, your segmenting is phenomenal, the color choices and design are fantastic. I really enjoy seeing what you come up with.

Hi Sam. The observation of the open wood grain is absolutely correct. However that is intentional, so no worries. I stink at CA finishes, and use a simple Wipe on Poly finish 3-4 coats. This was a flawed blank, and I made no attempt to do a final finish.

The entire reason for the thread was to display some typical segmenting imperfections and generate discussion for others to consider. The comments on design, colors, "busy-ness", finish, construction techniques, staves vs inlays vs whatever... are all great for folks to consider.

But, as we are all aware of, wood will expand and contract due to various influences. A single wood blank may crack; burls increase the possibility; and for a segmented blank with many joints - (this one has 452 joints :eek:), the potential is compounded. This is one reason I prefer WOP; a bit more flexibility. Anyone wishing to perfect using WOP can easily find resources such as Les Elm's and others.

I don't sell pens, usually give them away or store in a box. So my interest is in the challenge of constructing the blank. Once that is done, my attention span begins to wander. I have finished a few nice ones though!
 
Last edited:

Dehn0045

Member
Joined
Mar 19, 2017
Messages
1,533
Location
US
However that is intentional, so no worries. I stink at CA finishes, and use a simple Wipe on Poly finish 3-4 coats. This was a flawed blank, and I made no attempt to do a final finish.

I totally get it, but nobody in their right mind considers this one a 'flawed blank'!
 

Skie_M

Member
Joined
Aug 7, 2015
Messages
2,737
Location
Lawton, Ok
Well, I've never been accused of being in my right mind, and I saw the flaws in it right away .... not glaringly obvious flaws that would make the pen non-functional or flaws that are degrading to the work, like chips that flew out on the ends or gross mis-alignment of the chevrons or even chunks that got torn out during the turning process, but there were minor flaws nonetheless in the blank that are not from the turning process itself.


Back to the original topic on hand .... CHEVRONS IN A SPIRAL PATTERN down the length of the blank .... This could be possible with the use of your chosen patterning and the barrel stave method to assemble. You'ld need to construct a longer stave pattern, with an additional variation in the colors that you'll have to match up and arrange into your spiral pattern.

It would have to be a set pattern so that you can reverse it and have it match up to itself. Perhaps have this "special spiral chevron color" every 5th or 6th one in the arrangement, so that you can move it's position as you go around the barrel blank. The number doesn't matter, just that the pattern is even. The more you have, the more spirals will be going down the barrel.

As you set your paired chevrons, one set will be pointing down the barrel, the other side of it will always be unpaired with the proper color. You may be able to call attention to this as part of the design by having the chevrons themselves form a chevron going the other way back up the blank instead of spiraling down the blank.
 

BRobbins629

Passed Away Dec 28, 2021
In Memoriam
Joined
Mar 8, 2006
Messages
4,037
Location
Richmond, VA, USA.
If you want to have fun, keep on with your approach. Each one will likely get better though perfection is a tough bar. Doing this type of stuff is relaxing. If you want more perfect segments, buy a laser:)
 

mark james

IAP Collection, Curator
Joined
Sep 6, 2012
Messages
12,750
Location
Medina, Ohio
If you want to have fun, keep on with your approach. Each one will likely get better though perfection is a tough bar. Doing this type of stuff is relaxing. If you want more perfect segments, buy a laser:)

Oh I'll certainly keep at it. Yes, to me this is a lot of fun, and the fact that it will take 4,5, ? number of attempts does not bother me at all.

Laser :eek:? Shoot Bruce, then I'd miss out on all this lively banter.
 

mark james

IAP Collection, Curator
Joined
Sep 6, 2012
Messages
12,750
Location
Medina, Ohio
Back to the original topic on hand .... CHEVRONS IN A SPIRAL PATTERN down the length of the blank .... This could be possible with the use of your chosen patterning and the barrel stave method to assemble. You'ld need to construct a longer stave pattern, with an additional variation in the colors that you'll have to match up and arrange into your spiral pattern.

It would have to be a set pattern so that you can reverse it and have it match up to itself. Perhaps have this "special spiral chevron color" every 5th or 6th one in the arrangement, so that you can move it's position as you go around the barrel blank. The number doesn't matter, just that the pattern is even. The more you have, the more spirals will be going down the barrel.

As you set your paired chevrons, one set will be pointing down the barrel, the other side of it will always be unpaired with the proper color. You may be able to call attention to this as part of the design by having the chevrons themselves form a chevron going the other way back up the blank instead of spiraling down the blank.

Like this ?:
 

Attachments

  • IMG_0896.jpg
    IMG_0896.jpg
    181.3 KB · Views: 256
  • IMG_0909.jpg
    IMG_0909.jpg
    131.9 KB · Views: 251
  • IMG_0894.jpg
    IMG_0894.jpg
    178.7 KB · Views: 236
Last edited:

Skie_M

Member
Joined
Aug 7, 2015
Messages
2,737
Location
Lawton, Ok
lol ... so, you already had the spiraling chevron pattern he asked to see next squirreled away somewheres ... :)
 

mark james

IAP Collection, Curator
Joined
Sep 6, 2012
Messages
12,750
Location
Medina, Ohio
lol ... so, you already had the spiraling chevron pattern he asked to see next squirreled away somewheres ... :)

G'Day Greg... Sorry, I believe this posted a day before/after you came back from your hiatus (Feb-Aug). It was part of a process, but all your comments still apply, and are appreciated!

http://www.penturners.org/forum/f13/360-degree-nanogon-chevron-pen-155985/

Nothing hidden, just not evident after your walk-about (You got back on 8/9; this posted on 8/7). :wink::redface::wink:
 
Last edited:
Top Bottom