
You are using an out of date browser. It may not display this or other websites correctly.
You should upgrade or use an alternative browser.
You should upgrade or use an alternative browser.
Blank complete
- Thread starter Dale Lynch
- Start date
Signed-In Members Don't See This Ad
Signed-In Members Don't See This Ad
walshjp17
Member
A) Do you still have all your fingers, and
B) Did you damage your eyes trying to make sure you got all the cuts and inlays correct?
Marvelous!!
B) Did you damage your eyes trying to make sure you got all the cuts and inlays correct?
Marvelous!!
BW Design Works
Member
Holy Cow 
That's a lot of cuttin an gluing right there! Can't wait to see it turned.
That's a lot of cuttin an gluing right there! Can't wait to see it turned.
jttheclockman
Member
That should really look sharp. I believe the work was in the laying out. Not the cutting or the inlaying but laying out and whatever jig you used to hold the blank in the right orentation when cutting was the brilliant part of this project. I look forward to seeing the completed pen.
ChrisN
Member
Wow! I can hardly wait to see that in a pen!
Jim15
Member
That pen will look great.
Justturnin
Member
I can't even wrap my poor simple mind around what you had to do to get here.
mikebpeters
Member
what amazing work! as you seem to have used all wood and no metal my guess is that the drilling and turning won't be hugely challenging assuming of course all best practices (sharp tools, etc) are followed. I can hardly wait to see your results!
mikespenturningz
Member
Wow I cannot wait to see that on a pen. Make sure you put that one on a quality hardware set it is going to be beautiful. many of those rays are going to appear to bend and it is going to be spectacular.
BeSquare
Member
This one is going to be special when you finish it, can't wait to see it!
Dale Lynch
Member
Drilled,cornered,and glueing.Will turn tomorrow.
Thanks fellas I'm glad you like it so far.I'm leaving out the details on the woods till I post it finished,but I can tell you that no power tools were used to make the blank.
All the cuts and inlay woods were done on a vintage Millers Falls mitrebox.
Thickness and squareing were done with a vintage 2x12 rasp/bastard file.
Trying to hand craft this one as much as I can.
Now that the hard part is done(drilling).I can relax a little bit.
User tip:wax your drillbits,it reduces friction and heat on the inside walls.
pensbydesign
Member
cant wait to see what turns out lot of work going with hand tools what does wax do to the bond when you glue would think it would interfere
Dale Lynch
Member
I don't use wax while I drill.I just waxed the bit so that itrotates more freely in the hole.Never had any trouble glueing the tubes.If your bits squeak while drilling,wax it like you do with the ways on a lathe and try drilling again.Much quieter.
jyreene
Member
Looking forward to it. How much did that mitre box set you back? I'm trying to get the wife to get me one.
Dale Lynch
Member
$3.00
jyreene
Member
Dale Lynch
Member
Don't get your hopes up.I've looked on ebay to see how much they go for.Over $100.00.I got lucky at auction,nobody else interested.Funny thing is the saw was bundled with a dovetail jig and holder,all for 3 dollars so I guess it actually was $1.50
jyreene
Member
So now that you've done this blank you don't need it anymore right? And since its even more used you'd sell it for cheaper than 1.50 right?
Dale Lynch
Member
It was almost a pen
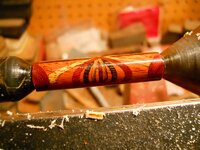
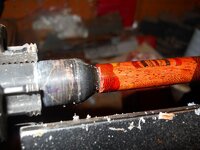
Well I almost made it.I got a catch trueing up the ends.90% loss,I can't call it a total loss because I still have an example of how the pattern turns out.
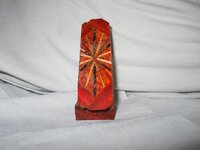
I made this blank using 4 different woods.Those are tulipwood for the main body.Wenge,zebrawood,paduk for the accents.Scallops are paduk.
The slots wer cut 4/8" deep with angles of 0,22.5,45,60,75,and 90 degrees
Gonna have to do this one again,this time while crossing my fingers and holding my tounge the right way.
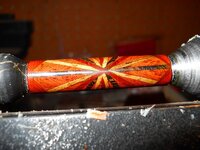
Here are pics of the blank.No good to use on a pen but you can see how it turned out anyway.
Well I almost made it.I got a catch trueing up the ends.90% loss,I can't call it a total loss because I still have an example of how the pattern turns out.
I made this blank using 4 different woods.Those are tulipwood for the main body.Wenge,zebrawood,paduk for the accents.Scallops are paduk.
The slots wer cut 4/8" deep with angles of 0,22.5,45,60,75,and 90 degrees
Gonna have to do this one again,this time while crossing my fingers and holding my tounge the right way.
Here are pics of the blank.No good to use on a pen but you can see how it turned out anyway.
Attachments
That is extremely impressive and I reckon it's worth saving even if you need to make some 'Oops bands'
Well done, it looks superb!!:biggrin:
Well done, it looks superb!!:biggrin:
Jim15
Member
That's a shame. Would have been a great pen. Good luck on the next one.
76winger
Member
I really like the pattern on that and hope to see you try it again.
Dan Masshardt
Member
Could it be trimmed shorter for a different pen style? I know it wouldn't be ideal but the beautiful center design would still show.
Dale Lynch
Member
No It can't be made shorter because it was intended for a rose gold aero.I'm thinking about Skiprats idea of making an oops band for both ends.Not sure how it's gonna work out but what else have I got to lose.
airborne_r6
Member
- Joined
- Oct 28, 2008
- Messages
- 279
In my opinion, a dark oops band on each end, you could use the wenge to tie it in, would frame the design really nicely and look intentional.
mikespenturningz
Member
Skiprat is absolutely right you should put oops bands on this pen and finish it. Use the same wood as is torn out. It will look like you added a 90 degree piece at each end.
thewishman
Member
That is too cool to pitch! Good luck with the accent bands.
...looks like you had a no hitter til the bottom of the ninth! Looking at post #19 in this thread, unless the pic is not showing it, there are not any centers ( bushings ) in the end of the pens? Maybe with a bit more support it may not have blown up?, if that were the case. Were you turning w/a skew or ?? Sorry you couldn't finish it up, looks like a blossom all set to bloom! Be well.......Jan
Last edited:
Dale Lynch
Member
Janster, there are no bushings because I don't use them.The damage happed cause I was holding the skew too light on the rest while truing.
I did take Skips Idea and oopsed the ends with ebony.I am starting to believe that the catch was supposed to happen.I am building a new finish and if all goes well I'll have something to show tomorrow.
Thanks for the encouragement fellas the rescue operation is looking good.
I did take Skips Idea and oopsed the ends with ebony.I am starting to believe that the catch was supposed to happen.I am building a new finish and if all goes well I'll have something to show tomorrow.
Thanks for the encouragement fellas the rescue operation is looking good.