360 Herringbone Trouble

Signed-In Members Don't See This Ad

smokinghole

Member
Joined
May 4, 2013
Messages
24
Location
Kansas City
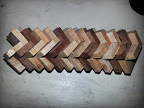
Here's my first try at making the 360 herringbone pattern. Turns out it is as hard as it looks.

20130525_004900.jpg


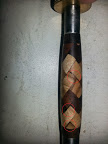
Here's what it looks like on the mandrel.

20130528_074205.jpg


The problem is, to my everlasting shame, I am apparently not able to create dozens of perfectly square, 3/16" thick segments. I have several voids in the final product.

Errors.jpg


The method I used was to create several 3/4" square blanks about 12" long. I then put some painters tape on my bandsaw table with a line indicating how think to cut them.

20130528_074401.jpg


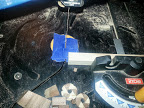
Because my bandsaw doesn't leave very smooth cuts, I re-squared the ends of my blank after each piece was cut off using my disk sander / lathe jig.

20130528_074332.jpg


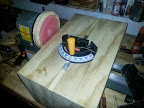
After cutting a few dozen squares of each color (walnut, crabapple, crabapple sapwood) I assembled the blank as described in several tutorials.

I think the problem is that my squares were not perfectly even thickness because of the inaccuracy inherent in both my crappy bandsaw and the technique of eyeballing the line on the painter's tape. I was thinking about trying it again, but this time planing my pieces down to 3/16" and then cutting the squares off of that.

Has anybody had better luck with these than I have? Which method did you use?
 
Signed-In Members Don't See This Ad

jttheclockman

Member
Joined
Feb 22, 2005
Messages
19,139
Location
NJ, USA.
You are the one that has to find the best method to cut your blanks. You found out right away accuracy is key. You have the basic principles outlined in the articles in the library as you already know. You now have to find a way to true up the material. Good luck. There are tons of examples of people doing these throughout the forum.
 

Marc

Member
Joined
Jul 31, 2009
Messages
349
Location
3355 Lookout Pl Reno NV 89503
If you are sanding them afterwards to true them up, each segment must be also sanded to the same thickness or you are going to have similar problems. The bandsaw jig is a great idea and using a thickness marking when (if) you sand them will help dial in the consistency.

Herringbone pens are fun and they just don't look like they should turn out so cool when you are glueing up the turning blank. But all worth it.
 

jyreene

Member
Joined
Feb 17, 2009
Messages
1,476
Location
Overseas location
If you are sanding them afterwards to true them up, each segment must be also sanded to the same thickness or you are going to have similar problems. The bandsaw jig is a great idea and using a thickness marking when (if) you sand them will help dial in the consistency.

Herringbone pens are fun and they just don't look like they should turn out so cool when you are glueing up the turning blank. But all worth it.

Calipers. Calipers. Calipers. I still only sort of believe in them but I've used them to verify my blanks and bushings (and to find an almost right sized drill bit for a post graduate).
 

darrin1200

Member
Joined
Mar 17, 2010
Messages
1,854
Location
Lyn, Ontario, Canada
Thats a pretty good first try. I have found that the critical points are
1 - every edge and corner must be 90 deg.
2 - all pieces must be identical thickness
3 - the very first base row must be perfect with each piece 90 deg to the next

That being said. Your bandsaw should be adequate to the task. The face may not perfectly smooth but it should not leave an unsightly glue line. If the pieces are not 90 deg to each other, that is when you will get voids.

Your best bet is to build a small crosscut sled for your bandsaw. Tweek it and adjust it until you get a straight and square cut. Then set up a stop block to give you consistant thickness of slices.

If you want to get really picky, and you have access to a drum sander, place all of the pieces edge to edge on a piece of tape and run them through until perfectly smooth and exactly the same thickness. I have done this and it works.

Now for your question about changing the way you cut the pieces.
In the first method, you cut a piece of wood perfectly square and say 12" long. You take this stick and slice your pieces off the end. The hardest part of this is ensuring each piece is the same thickness. When you glue them together in the pattern, the outside visible edges will all be edge grain.

In the second method, you will cut a long piece of wood at a given thickness, then you will chop each of your squares off the end. Here the hardest part is making sure that each piece is perfectly square and the same size. With these pieces, 2 edges are edge grain and 2 edges are end grain. This means that when you glue up the blank you will have alternating end/edge grain.

While neither of these methods are wrong, each has there own difficulties depending on your equipment and each will give you a very different different look.

I hope this helps a bit and I look forward to seeing your next try.
 

wood128

Member
Joined
Sep 16, 2006
Messages
1,533
Location
Cocoa Beach, Fl, USA.
I use a modelmakers small table saw with VERY SHARP blade and a sled with stop gage for cutting the pieces. NO sanding required. Start with accurately cut 3/4 " SQUARE stock. All corners must be 90 degrees.
 

smokinghole

Member
Joined
May 4, 2013
Messages
24
Location
Kansas City
Thanks for all the advice everyone. Last question. Do you guys create each level and then glue the levels together, or do you just make the first level and then glue the squares on one at a time?
 
Joined
Feb 24, 2012
Messages
4,368
Location
Claremont NH
A sliding table will help you greatly but I think what John T. said is right on. Along with that you have to practice, practice, practice. I can't get these cuts for that well either but I have not been doing that. The more you do anything the better you get at it. Make sure you have your band saw really dialed in too. There are articles all over the internet about setting things up right.
 
Top Bottom