1st try at segmenting

Signed-In Members Don't See This Ad

Krash

Member
Joined
Feb 10, 2014
Messages
1,259
Location
Albuquerque, NM
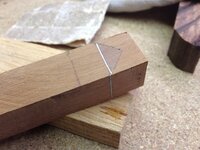
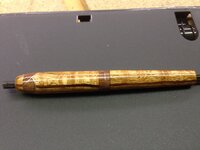
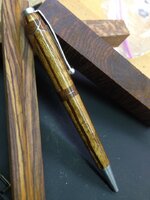
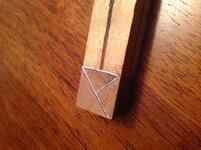
So, I wanted to try segmenting. I've only turned 2 pens and immediately wanted to start doing something original. I got frustrated with the slimline center band, being constrained to the diameter, so I want to try turning my own center band. The Celtic knot piece is for this center band.

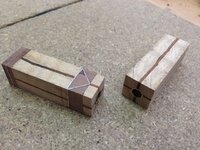
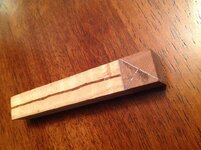
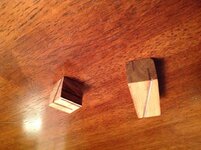
The first thing I learned was to make sure I had the correct blade on my bandsaw. I cut lengthwise on one side fine and glued up some thin sliced rosewood. I squared it up and tried to do the other side and the wavy oak steered my bandsaw blade around making it a mess. I glued it up anyway and have been trying some other cuts for practice.

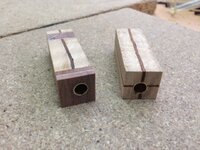
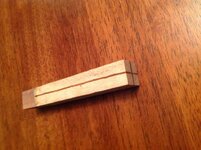
I wanted to try scallops. I read up on the procedure (I thought) and started cutting. I think I did it wrong but who knows, maybe it will come out OK.

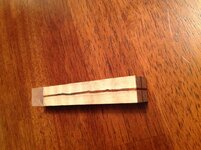
The other piece is some old cedar I had laying around. I wanted to try some long linear twists and tried segmenting some aluminum also.

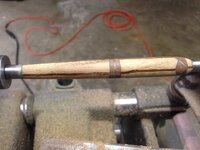
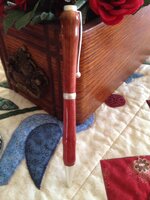
I have the mandrel and live center on order so I will have to wait to turn them. I'll post the results.

This is fun fun fun!

Kelly
 

Attachments

  • image-1.jpg
    image-1.jpg
    285.2 KB · Views: 316
  • image-2.jpg
    image-2.jpg
    315.8 KB · Views: 255
  • image-4.jpg
    image-4.jpg
    270.1 KB · Views: 363
  • image.jpg
    image.jpg
    300.5 KB · Views: 352
  • image-5.jpg
    image-5.jpg
    310.7 KB · Views: 317
Signed-In Members Don't See This Ad

plantman

Member
Joined
Jan 2, 2012
Messages
3,437
Location
Green Bay, Wi
You will only get better as you go. Unless a proper jig is set up and your bandsaw is trued and tuned, a table saw and miter saw might be better choices for straighter cuts. Look in the library under segmenting on ways to cut your pieces on the bandsaw. There are also several jigs shown for this purpose. The secrets to good segmenting are straght and repeetable cuts and acurate drilling. Practice, practice, practice !!!!! Jim S
 
Joined
Feb 24, 2012
Messages
4,368
Location
Claremont NH
Very nice. Now you have to get it drilled right down the center. Then turn it so we can see the finish product. You should end up with a very nice looking scallop and segmented body.. Great start.
 

Krash

Member
Joined
Feb 10, 2014
Messages
1,259
Location
Albuquerque, NM
Thanks guys. This will be fun to practice and hone my technique. I used my chop saw on the scallop part and the precision is obvious. I guess I have learned that the bandsaw is a great free form tool but it is difficult to produce the quality of cuts that ultimately say "classy" or "perfect" to the eye when examined at such high resolution. I think of Mike's work here because my first reaction to his product is "nicely designed and well executed". That is what I am shooting for right now. It is nice to have some examples to push me to greater heights and I thank IAP for that!

Kelly
 

Attachments

  • image.jpg
    image.jpg
    171.8 KB · Views: 274

Krash

Member
Joined
Feb 10, 2014
Messages
1,259
Location
Albuquerque, NM
My previous post showed my second pen. This is my first one in case you hadn't seen them on a different forum.
 

Attachments

  • image.jpg
    image.jpg
    232.1 KB · Views: 314

Krash

Member
Joined
Feb 10, 2014
Messages
1,259
Location
Albuquerque, NM
Very nice. Now you have to get it drilled right down the center.

Prophetic, Mke!

First I cut the scallop side down to the aluminum point. Then, I sliced a section of the opposite end of the blank and glued it on top of the scallop just to finish off the top with the same material as the rest of the pen. Just playing around with different ideas here.

I cut the blank to size on the lower half then added a walnut-aluminum-walnut segmented section to the bottom side of the top half that will replace the kit center ring. Everything was going so well ...... then

(cue the onmimous music) :musical-note:

I went to drill the blanks. Since this is my first pen at my house (my others were at my brother in law's house), I was using a new drill bit and didn't have a centering jig (... onmimous music gaining amplitude). :musical-note::musical-note:

I clamped the top blank, scalloped side first, to the table and chucked up the bit. I used a smaller bit first to initially get thru the aluminum as suggested on this site. It worked fine. Then I chucked up the new bit (getting a clue here? Music growing crescendo ... :musical-note::musical-note::musical-note::musical-note:). I started drilling and it was looking weird, not making a clean hole. So, wisely, before I got to the scallop segment, I inspected the bit closer. The end was wobbling and the brad point seemed not centered. Drat! Whoda thought? I've never seen a bit do this.

I pulled it out and got a different bit (non-metric) and completed the hole without changing the setup seemingly without problem. But when I pulled the blank off, the hole was not centered. I'm not sure where or when it got messed up. Even tho this is a practice blank, disappointment set in. I'll still turn it to see how the segmenting worked out and maybe practice Mikes finish at the end. So many steps, so many glue joints, so much planning .... dashed in a single stroke! :crying:

Oh well, I am learning and that was the purpose, right? On the bright side, I guess I will have a GREAT example to go back to in the months and years to come showing my progress!

I know this hasn't ever happened to any of you guys, right? ha ha, I can already hear the stories of past failures! :eek:

Thanks for listening,

Kelly
 

BSea

Member
Joined
Dec 28, 2009
Messages
4,628
Location
Little Rock, Arkansas
Don't be discouraged. If I can offer I suggestion. Practice 1 thing at a time. That was 2 different kinds of segmenting. Both of them are pretty difficult.

As far as drilling straight. There is a method a guy uses to drill antler on the lathe. I'll see if I can find it. But it's been the only method I've found to drill a perfectly centered hole.

EDIT: Found it. Here's the video. I used this method on the pen shown in my avatar. It worked perfectly.
 
Last edited:

Krash

Member
Joined
Feb 10, 2014
Messages
1,259
Location
Albuquerque, NM
Don't be discouraged. If I can offer I suggestion. Practice 1 thing at a time. That was 2 different kinds of segmenting. Both of them are pretty difficult.

As far as drilling straight. There is a method a guy uses to drill antler on the lathe. I'll see if I can find it. But it's been the only method I've found to drill a perfectly centered hole.

EDIT: Found it. Here's the video. I used this method on the pen shown in my avatar. It worked perfectly.

Thanks BSea! Yea, I figured that I'd try a few different segements since this was just practice. I didn't expect the hole drill would be my downfall. I more expected to blow it up as others have described. Oh well, it's been fun and I learned how to slice and scallop. Hopefully I'll be able to post some results in the future.

Kelly
 

Hendu3270

Member
Joined
Mar 13, 2012
Messages
919
Location
Pearland, Texas
Very nice. Now you have to get it drilled right down the center.

Prophetic, Mke!

First I cut the scallop side down to the aluminum point. Then, I sliced a section of the opposite end of the blank and glued it on top of the scallop just to finish off the top with the same material as the rest of the pen. Just playing around with different ideas here.

I cut the blank to size on the lower half then added a walnut-aluminum-walnut segmented section to the bottom side of the top half that will replace the kit center ring. Everything was going so well ...... then

(cue the onmimous music) :musical-note:

I went to drill the blanks. Since this is my first pen at my house (my others were at my brother in law's house), I was using a new drill bit and didn't have a centering jig (... onmimous music gaining amplitude). :musical-note::musical-note:

I clamped the top blank, scalloped side first, to the table and chucked up the bit. I used a smaller bit first to initially get thru the aluminum as suggested on this site. It worked fine. Then I chucked up the new bit (getting a clue here? Music growing crescendo ... :musical-note::musical-note::musical-note::musical-note:). I started drilling and it was looking weird, not making a clean hole. So, wisely, before I got to the scallop segment, I inspected the bit closer. The end was wobbling and the brad point seemed not centered. Drat! Whoda thought? I've never seen a bit do this.

I pulled it out and got a different bit (non-metric) and completed the hole without changing the setup seemingly without problem. But when I pulled the blank off, the hole was not centered. I'm not sure where or when it got messed up. Even tho this is a practice blank, disappointment set in. I'll still turn it to see how the segmenting worked out and maybe practice Mikes finish at the end. So many steps, so many glue joints, so much planning .... dashed in a single stroke! :crying:

Oh well, I am learning and that was the purpose, right? On the bright side, I guess I will have a GREAT example to go back to in the months and years to come showing my progress!

I know this hasn't ever happened to any of you guys, right? ha ha, I can already hear the stories of past failures! :eek:

Thanks for listening,

Kelly

You're definitely off to a good start. I use my cheap benchtop bandsaw and cuts just fine. I had to spend some time adjusting things and really take my time when cutting, but it works well for me.

One suggestion....forget the brad point bit. You'll spend all the time getting a nice segmented blank all glued up and that brad point bit will end up eating it before it even gets to the lathe. Good luck and keep posting up what you're working on. :)
 

Krash

Member
Joined
Feb 10, 2014
Messages
1,259
Location
Albuquerque, NM
[/quote]You're definitely off to a good start. I use my cheap benchtop bandsaw and cuts just fine. I had to spend some time adjusting things and really take my time when cutting, but it works well for me.

One suggestion....forget the brad point bit. You'll spend all the time getting a nice segmented blank all glued up and that brad point bit will end up eating it before it even gets to the lathe. Good luck and keep posting up what you're working on. :)[/quote]

Good suggestion on the brad point bit Chris. I think I will go get some normal metric bits to work with.

I have been playing with my bandsaw with a thicker blade and you're right, it seems to work fine for segmenting. I do need to design and build a nice sliding variable fence though. I have seen a picture of Mikes and a couple others so I have a good idea what I need to do.

I am still waiting for my mandrel and saver to arrive from PSI. It should arrive this week then maybe I can get one turned. In the mean time, I am playing around with an idea I came up with for segmenting. Still practicing!

Here are the crappy holes I drilled.
 

Attachments

  • photo 1.JPG
    photo 1.JPG
    141 KB · Views: 165
  • photo 2.JPG
    photo 2.JPG
    127.5 KB · Views: 151

Hendu3270

Member
Joined
Mar 13, 2012
Messages
919
Location
Pearland, Texas
You're definitely off to a good start. I use my cheap benchtop bandsaw and cuts just fine. I had to spend some time adjusting things and really take my time when cutting, but it works well for me.

One suggestion....forget the brad point bit. You'll spend all the time getting a nice segmented blank all glued up and that brad point bit will end up eating it before it even gets to the lathe. Good luck and keep posting up what you're working on. :)[/quote]

Good suggestion on the brad point bit Chris. I think I will go get some normal metric bits to work with.

I have been playing with my bandsaw with a thicker blade and you're right, it seems to work fine for segmenting. I do need to design and build a nice sliding variable fence though. I have seen a picture of Mikes and a couple others so I have a good idea what I need to do.

I am still waiting for my mandrel and saver to arrive from PSI. It should arrive this week then maybe I can get one turned. In the mean time, I am playing around with an idea I came up with for segmenting. Still practicing!

Here are the crappy holes I drilled.[/quote]

My original drilling method would sometimes produce results like this. I would secure the blank in my drill press vise, make sure it was plum, ensure the bit was centered and then drill very slow. They didn't always come out perfect. With long segments running the length of the pen body, they will stand out bigtime in the finished pen. Once I got my pin jaws for my chuck, drilling became sooo much easier, (and accurate).
 

Krash

Member
Joined
Feb 10, 2014
Messages
1,259
Location
Albuquerque, NM
My original drilling method would sometimes produce results like this. I would secure the blank in my drill press vise, make sure it was plum, ensure the bit was centered and then drill very slow. They didn't always come out perfect. With long segments running the length of the pen body, they will stand out bigtime in the finished pen. Once I got my pin jaws for my chuck, drilling became sooo much easier, (and accurate).


Pin jaws .... is that a collett chuck?
 

Krash

Member
Joined
Feb 10, 2014
Messages
1,259
Location
Albuquerque, NM
Here's my segmenting practice pen turned down to shape. No finish yet. I forgot to wear my mask this week when I was working on another segmenting idea and the CA got to my lungs. I need to let it work it's way out of my system before putting the finish on, this time with a mask.

The lengthwise sandwich is really bad. I learned my lesson there. The scallops turned out OK though. Live and learn!
 

Attachments

  • image.jpg
    image.jpg
    181.7 KB · Views: 188

plano_harry

Member
Joined
Jan 12, 2012
Messages
1,959
Location
Plano, TX 75093
That is a lot of work invested! Trying to figure out your lengthwise issue. Did you sand the faces nice and flat before glueing?

I use the technique BSea pointed out for antler and curved pieces. Drilling is a very critical step. On a drill press, get a top quality self-centering vise, or drill in a pen chuck on your lathe if you have everything nice and square and straight. A friend's poor pen vise cost me some quality results when I first started.

Harry
 

Tom T

Member
Joined
May 12, 2012
Messages
1,883
Location
Sanford Florida
Very cool looking so far. Great job. And this is like your third pen. I was looking at segmenting may be in this life. But most likely the nex
 

Krash

Member
Joined
Feb 10, 2014
Messages
1,259
Location
Albuquerque, NM
That is a lot of work invested! Trying to figure out your lengthwise issue. Did you sand the faces nice and flat before glueing?

I use the technique BSea pointed out for antler and curved pieces. Drilling is a very critical step. On a drill press, get a top quality self-centering vise, or drill in a pen chuck on your lathe if you have everything nice and square and straight. A friend's poor pen vise cost me some quality results when I first started.

Harry

I used my bandsaw on the lengthwise cuts. But, the blade was too thin so it wandered around. I have since replaced it with a thicker one. Next time I will also run it on a sander to get the lines straight. Once the cuts were so bad, I just started trying different ideas to practice. The scallops were my first try and turned out OK I think.
I have another segmenting practice blank I am working. Here's an advance picture ....
 

Attachments

  • image.jpg
    image.jpg
    198.7 KB · Views: 155

eranox

Member
Joined
Sep 12, 2012
Messages
322
Location
Killeen, TX
Drilling is my weak point also. I got PSI's x-large blank drilling chuck, and it made a huge difference. However, my cheapo HF lathe isn't super accurate, and I was having issues drilling, especially with brad points.

I got a set of 135° bits from HF that are in increments of 1/64th of an inch. I use them exclusively now, whether for metric or standard tubes. I caliper the tubes and find the appropriately sized bit, which has worked fine for the most part...

I say "most part" because my lathe has some run-out, so the first hole isn't always dead center. So, I use a small bit (1/8"-ish) to drill a starter hole, then I back off the tailstock and use my skew to make a small taper around the hole I drilled. This "funnel hole" IS perfectly centered, and I use it to line up the larger bit before locking down the tailstock. I bought a center drill recently, and that should streamline the process some.

Once I'm centered up, I like to use a bit that's 1/64 less than my target diameter. That way if I'm not quite centered up and the bit wobbles and makes an oversized hole, I'm still safe. If the tube fits the hole from the undersized bit, then drilling is complete, otherwise I repeat the process with the proper size and I'm done. It's a bit more effort, but I haven't botched a blank since I started using this strategy.

I can't view BSea's video on this internet, but hopefully it offers a better and easier way.
 

Krash

Member
Joined
Feb 10, 2014
Messages
1,259
Location
Albuquerque, NM
That is a lot of work invested! Trying to figure out your lengthwise issue. Did you sand the faces nice and flat before glueing?

I use the technique BSea pointed out for antler and curved pieces. Drilling is a very critical step. On a drill press, get a top quality self-centering vise, or drill in a pen chuck on your lathe if you have everything nice and square and straight. A friend's poor pen vise cost me some quality results when I first started.

Harry

I tried BSea's drilling video and it worked pretty good. When I did it today, the lathe point side ended up a little off. I think it was that I didn't set the point well. Otherwise I think it will work well.
 

Krash

Member
Joined
Feb 10, 2014
Messages
1,259
Location
Albuquerque, NM
Got the finish on. I need to go get a pen kit tomorrow to complete it.
Pretty wood. Crappy execution. Lots of learning!
 

Attachments

  • image.jpg
    image.jpg
    199.5 KB · Views: 225

Hendu3270

Member
Joined
Mar 13, 2012
Messages
919
Location
Pearland, Texas
Got the finish on. I need to go get a pen kit tomorrow to complete it.
Pretty wood. Crappy execution. Lots of learning!

Interesting. It looks like you may have skipped a step along the way :eek: In the cutting, drilling, gluing in tubes, etc., your finish will most likely be compromised. Are you not planning on turning this down to the appropriate diameter to match the kit?

The segmenting does look great btw. Just need to get the smooth straight cuts on the bandsaw and you're set.
 
Last edited:

Krash

Member
Joined
Feb 10, 2014
Messages
1,259
Location
Albuquerque, NM
Interesting. It looks like you may have skipped a step along the way :eek: In the cutting, drilling, gluing in tubes, etc., your finish will most likely be compromised. Are you not planning on turning this down to the appropriate diameter to match the kit?

The segmenting does look great btw. Just need to get the smooth straight cuts on the bandsaw and you're set.

I am not a fan of the thin waist on the slimline and wanted to leave out the band so I could turn my own diameter. Just practicing!
 

Hendu3270

Member
Joined
Mar 13, 2012
Messages
919
Location
Pearland, Texas
Interesting. It looks like you may have skipped a step along the way :eek: In the cutting, drilling, gluing in tubes, etc., your finish will most likely be compromised. Are you not planning on turning this down to the appropriate diameter to match the kit?

The segmenting does look great btw. Just need to get the smooth straight cuts on the bandsaw and you're set.

I am not a fan of the thin waist on the slimline and wanted to leave out the band so I could turn my own diameter. Just practicing!

Didn't realize I had missed the second page of this thread. I see some other pics of this blank in action now.

Oh and your question about pin jaws earlier...no it's not a collet chuck. If you have a 4-jaw chuck, you can buy pin jaws for it that have a "gripping" area that is an inch and a half long or so. Makes drilling on the lathe much easier. I have the Wood River one from Woodcraft and haven't had any issues so far.
 

bluesman

Member
Joined
Nov 9, 2009
Messages
61
Location
Kingston, Ontario
Got the finish on. I need to go get a pen kit tomorrow to complete it.
Pretty wood. Crappy execution. Lots of learning!

Kelly
Looks like you have learned a lot. Yes you have a few problems with this blank but for your first segmented pen, you did great.
It didn't exlpode.
Keep at it, your second one will be better if you apply the lessons learned.
 

Hendu3270

Member
Joined
Mar 13, 2012
Messages
919
Location
Pearland, Texas
Turned out really good. Once you get your process for the cut lines down, you're in the running for top spot in the BASH next year with this design. Looking forward to seeing your next efforts. :good:
 
Top Bottom