Labels & Decals What am I doing wrong here?

Signed-In Members Don't See This Ad

Edgar

New Member Advocate
Staff member
Joined
Feb 6, 2013
Messages
6,897
Location
Alvin, TX 77511
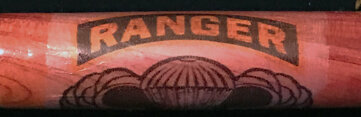
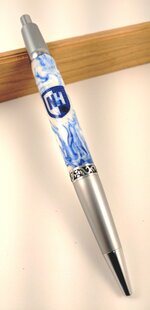
This was my first attempt at a water slide decal. I followed John Austin's excellent tutorial in our library & I used Blinggasm clear decal paper & sealed the decals with Krylon clear gloss spray.

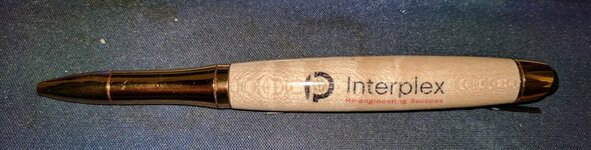
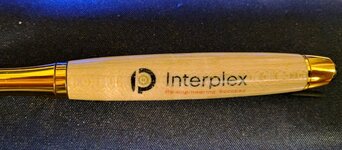
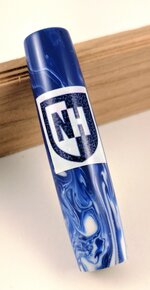
Everything went well, except for the fact that it is obvious that the image is a decal. I was expecting & hoping that the clear decal paper would be completely transparent, but it isn't.

So, what did I do wrong? and what do I need to do to improve my technique?

Trim closer to the image, use lighter wood (this is ERC), use different paper or something else?

Thanks for any suggestions.

Edgar
 

Attachments

  • RangerDecalProblem.jpg
    RangerDecalProblem.jpg
    59.4 KB · Views: 460
Last edited:
Signed-In Members Don't See This Ad

JohnU

Member
Joined
Jan 31, 2008
Messages
4,951
Location
Ottawa, Illinois
I apply a complete CA finish on the wood first to get a smooth glass like finish that you need under a decal. You want a finished CA layer to apply the decal so the decal edges disappear when you apply the second CA finish over it. Just think of it this way, any surface you put the decal on will be trapped under the decal and show its flaws so make sure you are happy with your first finish. Also, I like to trim the decal as close to the image as possible so you don't have as much clear decal paper to hide. Don't give up, your close!
 
Last edited:

Edgar

New Member Advocate
Staff member
Joined
Feb 6, 2013
Messages
6,897
Location
Alvin, TX 77511
Thanks guys, I did first sand the turned blank through all grits of MM, then applied at least 3 (maybe 4, can't remember for sure) coats of thin CA, let it cure overnight, then sanded from 3200-12000 MM before applying the decal. It seemed nice and smooth, but perhaps my CA coats were too thin. I'll try applying it a little thicker or using more coats next time.

I use 2P10 CA which is a little more "watery" than some other brands, so perhaps I need more build-up with that brand.
 

leehljp

Member Liaison
Joined
Feb 6, 2005
Messages
9,326
Location
Tunica, Mississippi,
It amazes me how meticulous one must be to get a finely finished pen with so little CA - i.e. 3, 4 or 6 thin coats of CA. If I use thin and I do, I don't use paper towel as 80% goes into the PT instead of on the blank. I am not that meticulous. I want to get it finished, so I use applicators or medium CA to build up a finish.

Now as to the decal, as others have said, you need a very good solid base of CA, extra smooth and polished to add the decals to or it will show up.

Our current front page pen by BeanCounter shows a fine finish on each of his pens in the post that his Frt Pg pen is on: http://www.penturners.org/forum/attachments/f13/163827d1494815262-cinco-pro-x-img_0524.jpg

Look at the picture and notice the light reflection band; it is not a thin narrow line of light but looks to be about 3/16 to 1/4 inch wide. Much of that depends on the lighting set up for sure, but that does show the kind and quality of finish. (It is also the kind of finish that some say looks plastic. I personally like it.) But the point is, it should be fine finished like that with a good solid layer of CA, then the decal will usually fit on it well.

The one question I have is - is the decal paper you used the right one?
 
Last edited:

CREID

Member
Joined
Jul 23, 2008
Messages
3,009
Location
Vancouver, wa
Yea, it looks like you didn't get a good seal under the decal. Whether it wasn't smooth enough or just air, it is hard to say. But keep it up and if you send me a Pecan Pie it will greatly improve your process.
 

Edgar

New Member Advocate
Staff member
Joined
Feb 6, 2013
Messages
6,897
Location
Alvin, TX 77511
It amazes me how meticulous one must be to get a finely finished pen with so little CA - i.e. 3, 4 or 6 thin coats of CA. If I use thin and I do, I don't use paper towel as 80% goes into the PT instead of on the blank. I am not that meticulous. I want to get it finished, so I use applicators or medium CA to build up a finish.

Now as to the decal, as others have said, you need a very good solid base of CA, extra smooth and polished to add the decals to or it will show up.

Our current front page pen by BeanCounter shows a fine finish on each of his pens in the post that his Frt Pg pen is on: http://www.penturners.org/forum/attachments/f13/163827d1494815262-cinco-pro-x-img_0524.jpg

Look at the picture and notice the light reflection band; it is not a thin narrow line of light but looks to be about 3/16 to 1/4 inch wide. Much of that depends on the lighting set up for sure, but that does show the kind and quality of finish. (It is also the kind of finish that some say looks plastic. I personally like it.) But the point is, it should be fine finished like that with a good solid layer of CA, then the decal will usually fit on it well.

The one question I have is - is the decal paper you used the right one?

Thanks Hank,
I did use paper towels to apply the CA, so that may have been part of my problem in getting too thin of a layer.

I usually like the result when I'm applying CA to a plain blank because I just want a smooth, shiny finish but one that still looks like wood. I see now, where I need a heavier build-up for decals.

The paper that I used was recommended by someone in a previous decal thread. There may be better ones, but I'll try a better CA base first & maybe a different brand of paper later.
 

Edgar

New Member Advocate
Staff member
Joined
Feb 6, 2013
Messages
6,897
Location
Alvin, TX 77511
Yea, it looks like you didn't get a good seal under the decal. Whether it wasn't smooth enough or just air, it is hard to say. But keep it up and if you send me a Pecan Pie it will greatly improve your process.

No pecan pie today, Curt, but I will give you my wife's pecan pie and pie crust recipes & see if that will "slightly" improve my process. :)

This makes the best pecan pie I've ever tasted - not overly sweet and syrupy like some and it has a beautiful, golden color. Looks & tastes great!

It's important to layer the pecan in the pie shell before pouring in the ingredients - they will rise up through the pie during baking, resulting in an attractive, thin layer of pecans on top of the pie as well as pecan pieces all throughout the pie - makes it nice & crunchy.
===============
Janis' Pecan Pie

INGREDIENTS:

- 2 each eggs slightly beaten
- 1 cup light corn syrup
- 1 1/4 cups pecans broken
- 1/4 cup sugar
- 2 tablespoons flour
- 1/4 teaspoon salt
- 1 teaspoon vanilla


METHOD:

Mix ingredients and pour into unbaked 9-inch pie shell in which the pecans have been spread. Bake slowly at 375° F until done, about 1 hour.
SERVINGS: 8
SOURCE: Janis Dohmann

NOTE: Cover the edges of the crust with aluminum foil during the first half of the baking time to avoid excessive browning of the crust.

===============

Pie Crust

INGREDIENTS:

- 1 cup flour
- 1/2 teaspoon salt
- 1/3 cup shortening
- 2 tablespoons water


METHOD:

Mix the flour, salt, and shortening. Sprinkle in the 2 tablespoons of water. Bake at 450°F for 10 min or until lightly brown.
SOURCE: Janis Dohmann


===============
 

leehljp

Member Liaison
Joined
Feb 6, 2005
Messages
9,326
Location
Tunica, Mississippi,
That is my wife's pecan pie recipe! (It was my mom's and she passed it along.) The crust is almost exactly like my mom's was too; but LOML purchases ready made crust and places it in the pie pan. Close but not quite like home made!

You made me hungry for pecan pie! WOW! I am craving it now!
 

Edgar

New Member Advocate
Staff member
Joined
Feb 6, 2013
Messages
6,897
Location
Alvin, TX 77511
That is my wife's pecan pie recipe! (It was my mom's and she passed it along.) The crust is almost exactly like my mom's was too; but LOML purchases ready made crust and places it in the pie pan. Close but not quite like home made!

You made me hungry for pecan pie! WOW! I am craving it now!

My wife got it from her mom too - probably from the same original source as your MIL :)
 

leehljp

Member Liaison
Joined
Feb 6, 2005
Messages
9,326
Location
Tunica, Mississippi,
Thanks Hank,
I did use paper towels to apply the CA, so that may have been part of my problem in getting too thin of a layer.

I usually like the result when I'm applying CA to a plain blank because I just want a smooth, shiny finish but one that still looks like wood. I see now, where I need a heavier build-up for decals.

The paper that I used was recommended by someone in a previous decal thread. There may be better ones, but I'll try a better CA base first & maybe a different brand of paper later.

Edgar,

I am not suggesting you change finishes at all. And there is a place for lightly finished pens and a place for thicker finishes too.

There are far more available finishes today than when I started and each one has its own learning curve and benefits. Once one is learned and mastered, it sure is an added bonus to know that in some cases, one can use a different method of finish to achieve the wanted results.

That said, I once finished two identical pens (and wood) with CA and buffed the CA finish down, to the point it had a flat/matt finish. It certainly looked more like wood and the tactile feel was that of wood. There are other finishes that do that also.

I guess you can tell that I love experimentation and trying new things than turning out pens themselves! Lots of failures, but a few happy surprises in the trying. :)
 

Mortalis

Member
Joined
Aug 19, 2013
Messages
660
Location
Bardstown, Ky
I tried a decal paper from Lazertran and ended up with the same issue. The background was milky. The finishing directions even state the decal will will dry with a white background and to make it clear you had to apply 2 or 3 coats any oil/spirit based varnish. I switched to Testor's clear decal paper and I didnt have that issue anymore. I also use Micro-Sol and Micro-Set which help prepare the surface for the decal and then also help the decal form to the round surface of a pen.
I've make several decal pens since switching to Testor's and all have come out flawlessly.
The Interplex pen was the first decal I did with the Testor's. I applied too much lacquer to seal the decal and it eroded the ink from my printer.
The two UNH pens were the last one I did. One of the decals is on white Testor's paper and the other is on clear.
 

Attachments

  • IMG_20170523_210139.jpg
    IMG_20170523_210139.jpg
    127.2 KB · Views: 166
  • IMG_20170523_210153.jpg
    IMG_20170523_210153.jpg
    128.5 KB · Views: 149
  • IMG_20170226_122451.jpg
    IMG_20170226_122451.jpg
    123.2 KB · Views: 163
  • IMG_20170225_171729.jpg
    IMG_20170225_171729.jpg
    90.7 KB · Views: 140

Edgar

New Member Advocate
Staff member
Joined
Feb 6, 2013
Messages
6,897
Location
Alvin, TX 77511
Thanks for all the suggestions folks, I really appreciate it.
I printed a sheet full of decals while I was at it, so I have a number of others to practice with. I'll post a follow up when I get a chance to give it another go.

Edgar
 
Top Bottom