"preferred" method for Harbor Freight pressure pot?

Signed-In Members Don't See This Ad

Quality Pen

Member
Joined
Feb 2, 2014
Messages
1,403
Location
Lumberton, Texas
I bought the pot and Im trying to find out the best way to turn it into a pressure pot without maiming myself... or generally doing things wrong.

I found some PDF's but they are many years old, and I know from reading many posts that there are some deep opinions on the matter.

But, is there a more recent walk-through to setting up?

For what its worth, I dont plan to go over 40 PSI...

Thanks.
 
Signed-In Members Don't See This Ad

Cmiles1985

Member
Joined
Nov 12, 2013
Messages
1,611
Location
Aransas Pass, TX
I followed the library article in building a pressure/vacuum pot, and it has worked very well. I will see if I can link it shortly.

Edit: Here it is. It is definitely an older article, but the pot works very well (for me) with this setup. With enough effort, the paint suction tube will unscrew from the lid. Also, Curtis Seebeck has some plans for a pressure pot rack that works very well.
 
Last edited:

sbell111

Member
Joined
Jan 16, 2008
Messages
3,465
Location
Franklin, TN
I followed the library article in building a pressure/vacuum pot, and it has worked very well. I will see if I can link it shortly.

Edit: Here it is. It is definitely an older article, but the pot works very well (for me) with this setup. With enough effort, the paint suction tube will unscrew from the lid. Also, Curtis Seebeck has some plans for a pressure pot rack that works very well.

Agreed with all but I'll add that if you aren't planning to do vacuum with your pot, you can greatly simplify the fittings.

Also, if you are going to do vacuum, leave the vacuum block off and get yourself a vacuum pump.

As stated above, don't cut off the suction tube. It will unscrew.
 

BJohn

Member
Joined
Feb 13, 2014
Messages
820
Location
Cabot, Arkansas
This is weird but I agree with Steve, I just built my HF Pot. Was not going to use it as a vacuum chamber. So I followed the article but just did not add the fittings or the gauge for the vacuum.

But still be prepared the new brass fitting and ball valves are not cheap. Just grin and bare it, the HF fitting are cheap. Change them out.
 

Cmiles1985

Member
Joined
Nov 12, 2013
Messages
1,611
Location
Aransas Pass, TX
I'll admit that the stuff in mine is 316SS as most of the fittings were rolling around in my company vehicle making it much cheaper :)
 

BJohn

Member
Joined
Feb 13, 2014
Messages
820
Location
Cabot, Arkansas
Good deal, I was able to get some here at work too so that helped some, but with a couple fittings I did have to purchase a couple ball valves.

Glad it worked out.
 

OOPS

Member
Joined
Feb 6, 2010
Messages
674
Location
Spokane, WA
I think the number one way to make sure you don't have problems with a HF pot is to keep the pressure down. You should have no problems with the pot if you keep it to 40 lbs. So many people think that if 40 is good, then 85 would be better....this is just not so. If the material you plan to use suggests 40 lbs, then 40 will be fine, and sometimes more than adequate.

In our local pen club, several of us have purchased HF pots which we use for Alumilite casting. None of these pots has given us any problems.
 

preacherman

Member
Joined
Jun 12, 2013
Messages
264
Location
Crossville, TN 38572
Simple is key for success. I have a simple brass fitting with a gauge and pressure relief valve in one of the inlets and the other inlet has a ball valve and air fitting for pressurizing the tank.

When you get your pot strip everything of the lid. Including the paint pickup tube on the underside. The more things that are on it the more possibilities you have for leaks. Many people leave the pressure regulator on the pot. There is no need for that to be left on it. Remember this is a modification from original intended purpose. You are not trying to regulate the flow of air. You can "regulate" the amount of air introduced into the pot by the valve. You are trying to pressurize the tank and sustain that pressure. That regulator allows several points that can and will eventually leak. So get rid of it.

What you do NEED: a safety release or a pressure relief valve or pop off valve, what ever you want to call it. Get a good one not just a cheap one. Make sure that it is adjusted properly. You also need a good gauge. You must know how much pressure you have in the tank.

I have a HF pot and I cast at 45psi. I have never had any problem with air bubbles in any of my cast. I see no need to pressurize it to the very max capacity. I only use poly resin but do not anticipate any problems when I use other resins.
 

seamus7227

Member
Joined
Mar 18, 2009
Messages
6,220
Location
Wichita Falls, TX
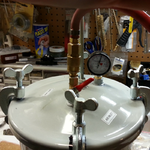
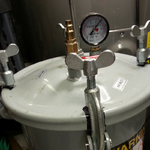
Keep it simple. The less fittings you have, the less opportunities for loss of air. Many on here may contradict what I say, but I have been using this method for 4 years now and I cast at 65psi, but the tank is rated for 80psi. I also lubed the black seal with silicone grease on the inside and out and I might be lucky if I lose 1-2 pounds of pressure in a 24hr period.

ForumRunner_20140730_141007.png


ForumRunner_20140730_141033.png
 

Quality Pen

Member
Joined
Feb 2, 2014
Messages
1,403
Location
Lumberton, Texas
Keep it simple. The less fittings you have, the less opportunities for loss of air. Many on here may contradict what I say, but I have been using this method for 4 years now and I cast at 65psi, but the tank is rated for 80psi. I also lubed the black seal with silicone grease on the inside and out and I might be lucky if I lose 1-2 pounds of pressure in a 24hr period.

View attachment 119877


View attachment 119878


Hi Seamus, you seem to do really well with limiting air loss. How many times do you wrap those threads with sealing tape? Thanks.
 

Signguy

Member
Joined
Apr 20, 2014
Messages
161
Location
Northern VA
Take a look at my post from a couple days ago. Tells you exactly how to do it the simple way and lists all parts from Amazon at $34 total
 

Quality Pen

Member
Joined
Feb 2, 2014
Messages
1,403
Location
Lumberton, Texas
Wrap enough to seal, but not so much that the threads won't "seat." If that makes any sense... Or, wrap it about three or four times.
That's what I thought... that you would only need to wrap a few times. But I probably did 5 or maybe even more. It screwed in so easily I felt like it was the gap.
 

BSea

Member
Joined
Dec 28, 2009
Messages
4,628
Location
Little Rock, Arkansas
Keep it simple. The less fittings you have, the less opportunities for loss of air. Many on here may contradict what I say, but I have been using this method for 4 years now and I cast at 65psi, but the tank is rated for 80psi. I also lubed the black seal with silicone grease on the inside and out and I might be lucky if I lose 1-2 pounds of pressure in a 24hr period.

View attachment 119877


View attachment 119878
About the only thing I don't see is a pressure relief valve. I didn't use one for a few years on mine either, but I had a fitting start to leak, so I replaced it, and when I redid it, I got a pressure relief valve too. My pot is rated for 80 pounds & my relief valve is 75 pounds. I tested it, and it worked perfectly. And I also cast at about 65 pounds.
 

Signguy

Member
Joined
Apr 20, 2014
Messages
161
Location
Northern VA
I did include a pressure relief valve, it's listed on the parts list and also is in the photos attached sideways to the T on the "paint" side.
 

kingkeyman

Member
Joined
Dec 8, 2013
Messages
228
Location
Akron
Buy as many fittings as you can from home depots air compressor aisle, it will save you a few dollars compared to the plumbing dept. Especially the ball valves.
 
Top Bottom