Laser Cut Sierra Inlay Blanks

Signed-In Members Don't See This Ad

Ken Wines

Member
Joined
Feb 7, 2013
Messages
277
Location
Charleston, WV
Here's a couple of patterns I did this week. The first photo is my take on a Sierra scales pattern the woods are walnut and maple and there are 54 inlays in each blank. The second photo is a tri-colored round Celtic weave. The woods are walnut, maple, cherry and padauk. There are 39 inlays in this blank.
 

Attachments

  • IMG_3746.JPG
    IMG_3746.JPG
    453.1 KB · Views: 227
  • IMG_3754.JPG
    IMG_3754.JPG
    333.2 KB · Views: 227
Signed-In Members Don't See This Ad

jttheclockman

Member
Joined
Feb 22, 2005
Messages
19,132
Location
NJ, USA.
Hello Ken. Being you will be showing us many more of your designs and now selling them, how about a little tutorial on how these are accomplished. It is not like you are giving away any secrets because we all do not have access to lasers. Do you have to size each colored wood exactly as the others used in the blank.Are the woods rounded first or are they cut from flat form. Do you have to cut each colored wood the same so that basically you could mix and match any combo you want. Would like to see some of the steps needed to make these. Would make the blanks more interesting.
 

Ken Wines

Member
Joined
Feb 7, 2013
Messages
277
Location
Charleston, WV
Hello Ken. Being you will be showing us many more of your designs and now selling them, how about a little tutorial on how these are accomplished. It is not like you are giving away any secrets because we all do not have access to lasers. Do you have to size each colored wood exactly as the others used in the blank.Are the woods rounded first or are they cut from flat form. Do you have to cut each colored wood the same so that basically you could mix and match any combo you want. Would like to see some of the steps needed to make these. Would make the blanks more interesting.
John, I really have no trade secrets to hide concerning the way I make blanks. I've been doing this work long enough to know that everybody doesn't really appreciate it. I can understand that. I'm not here to change the way people feel about technologically processed blanks. My objective is to show what is possible using technology and a little imagination. I am open to questions on my processes and the tools that I use, with the exception of some of the aspects of the laser rotary that I built to do this type work. I would hope I could peacefully coexist with others in forums like this and have a mutual appreciation of the way we make blanks. The next blank I post to this forum I will try to photo document the steps if there is truly an interest in what I do. Having said that here is the step by step procedure in a nutshell. If you have questions, please do ask.

Step 1. Start with square blanks and cut to a standard length
(on the bandsaw). For Sierras and most blanks this is 2 1/2". I
will batch anywhere from 20 to 100 blanks at a time.

Step 2. Drill all the blanks on the drill press to tube size.

Step 3. Using bushings that are sized to the hole size in the
blank, the blanks are rounded down on the metal lathe to
standard diameters. This requires about 4 passes when taking
off 50 thousandths per pass from the radius. 5/8" is used for
most pens such as Sierras, Cigar and the lower section of the Jr
Series. 3/4" is used for the cap section of the Jr series.

Accounting for the through hole this leaves 1/8" or less of wood
to be cut through.

Step 4. The blanks are mounted on the laser rotary using center
drilled aluminum rods that are sized to the through holes. The
headstock end of the rod is knurled to give a little extra byte
to hold the blank. The aluminum rod is secured to the mandrel
using spacer bushings and a nut on the tailstock end of the
mandrel. Any cuts that are done all the way around the blank are
done from the tailstock end and progress towards the headstock.

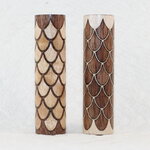
Step 5. The blanks are cut on the rotary with the laser. There
are two types of blanks. The first is the skeleton blank, its
purpose is to hold the inlays. The second type of blank is the
inlays themselves. For inlay blanks I don't use the same
artwork to cut both types of blanks. The artwork for the inlays
is laser kerf compensated so to give a friction fit of the
inlays into the skeleton blank. Laser kerf compensation is done
by offsetting the skeleton drawings by 0.007" in the outward
direction. This makes them large enough to fit snugly into the cutouts
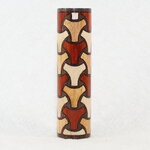
in the skeleton blanks. The only exception to this would be
puzzle piece blanks. The same cuts are used on all of the
puzzle blanks to allow for a little "wiggle" to get them apart
and back together in their mixed color format.

Because I compensate for the laser kerf, I have to cut two blanks for every one finished blank. Some may think that is a waste, I think it's worth the cost and time to have inlays that actually more closely fit the cutouts. I hope that this has answered most of your questions.
 
Last edited:

jttheclockman

Member
Joined
Feb 22, 2005
Messages
19,132
Location
NJ, USA.
If you are going to show some photos I hope you add this portion to that thread if you start a new one. This way it can be kept together and understood better. There are many people doing laser blanks so why should you feel not welcome to show?? It would give everyone a better understanding what goes into those blanks. I know I would be interested and that is why I ask the question. :)
 

Ken Wines

Member
Joined
Feb 7, 2013
Messages
277
Location
Charleston, WV
If you are going to show some photos I hope you add this portion to that thread if you start a new one. This way it can be kept together and understood better. There are many people doing laser blanks so why should you feel not welcome to show?? It would give everyone a better understanding what goes into those blanks. I know I would be interested and that is why I ask the question. :)
John, I will bear this is mind if I decide to post any more photos of blanks in this forum. As stated before I am and have always been open to questions about my methods. I will take that a step further and state for those laser users that might be in the group that I am willing to share the use of most of my design drawings if they are using them for their own personal use.
 

Dalecamino

Local Chapter Leader
Joined
Jan 2, 2008
Messages
14,572
Location
Indianapolis, In.
These are more cool blanks Ken. I would be interested in buying, and making a pen. Nice to know how you make them, but not necessary for me to know. Thanks for the explanation.
 

eharri446

Member
Joined
Mar 17, 2016
Messages
1,036
Location
Marietta, GA
Ken,

I have one of the 40 watt lasers and am just getting started with it. I enjoy seeing your blanks and will admit to being just a tad envious of your ability and skill to create such beautiful blanks.

My reason for buying the laser was to be able to do engraving on the pens that I create as well as other types of engraving. I do not have the time or the skill to make the kind of blanks that you are creating.

Please keep up the good work and show them to us.
 

jimmyz

Member
Joined
Apr 10, 2011
Messages
161
Location
Providence Forge VA
Very nice blanks! I know you're using technology to "segment", but can appreciate that it still takes a lot of work to make a blank. Looking forward to seeing more of your work!
 

Ken Wines

Member
Joined
Feb 7, 2013
Messages
277
Location
Charleston, WV
These are more cool blanks Ken. I would be interested in buying, and making a pen. Nice to know how you make them, but not necessary for me to know. Thanks for the explanation.
Thanks, Chuck. I apologize for jumping in on your posting of the very nice pen that you made from Mark James' blank the other day. I admire the work that Mark does. I got to see some pictures of Frankie.

As you stated most people that I've sold pens to couldn't care less how they made. It's actually pretty simple, they see the pen, like the design and buy it. I've never had to talk down someone else's pen or pen making methods to sell a pen. If they can't sell on their own merits then I probably need to find another line of work. As much as I like making pens, I believe I like making blanks for other pen makers. I can send two almost identical blanks out to two different pen artists, and once they add their own personal spin to it the results can be quite different. I'm generally not self promoting as far as selling blanks, but since you asked. I've teamed up with Angie and Jim Pratt at Signature Pen Supply and they will be carrying my blanks. Thanks.
 

Ken Wines

Member
Joined
Feb 7, 2013
Messages
277
Location
Charleston, WV
Ken,

I have one of the 40 watt lasers and am just getting started with it. I enjoy seeing your blanks and will admit to being just a tad envious of your ability and skill to create such beautiful blanks.

My reason for buying the laser was to be able to do engraving on the pens that I create as well as other types of engraving. I do not have the time or the skill to make the kind of blanks that you are creating.

Please keep up the good work and show them to us.
Eharri446, A laser engrave is a nice addition to most any shop. The more you use it the more possibilities and "what ifs" will come to mind. I've used mine for a wide variety of things, from cutting out paper boxes to panel cuts for custom made night lights that the drawings were made to use a scroll saw. The thickest thing I every cutout was a state outline of the state of West Virginia, it was cut from approx 5/8" thick rustic barnwood. It did take several passes to cut through and the the edges where very blackened when finished. But that was what the customer wanted, and we know the customer is always right.
 

Ken Wines

Member
Joined
Feb 7, 2013
Messages
277
Location
Charleston, WV
Very nice blanks! I know you're using technology to "segment", but can appreciate that it still takes a lot of work to make a blank. Looking forward to seeing more of your work!
Thanks, jimmyz. I could probably write a book about things that don't work. I've been trying to do an ancient Egyptian design I saw and really like. However, when cutting things in the round using a laser it is possible to cut things that just won't physically come apart without breaking something or purposely cutting an element in half to aid in disassembly.
 

Ken Wines

Member
Joined
Feb 7, 2013
Messages
277
Location
Charleston, WV
Thanks, Mark. I really don't mind sharing, no secrets here to conceal. I would think that people would grow weary of seeing the step by step process if I posted it every time, but I can "cut and paste" with the best of them. All the laser blanks have pretty much the same chord progressions the only thing that changes is the lyrics.
 
Top Bottom