How To Set Up Your HF Pressure Pot For $35 Without Leaving Home!

Signed-In Members Don't See This Ad

Signguy

Member
Joined
Apr 20, 2014
Messages
161
Location
Northern VA
Hi All,

I thought it might be helpful to post my simplified version of how to plumb the HF pressure pot if you only need pressure (not vacuum).

I also have put together a parts list with the exact components I used all of which were ordered from Amazon and showed up at my door the next day with no running around trying to find them, and a total cost of less then $35.

It's really a pretty easy job:

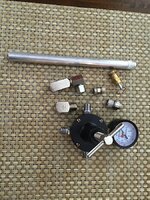
1) Take everything supplied off the pressure pot lid. They are all low grade components so I felt much better not using any of them and instead using solid brass american made stuff. Contrary to popular belief - you can unscrew the inside paint tube and just get rid of it. Be prepared though - this stuff was put on TIGHT and with LOTS of pipe dope. You will need some big wrenches, strong arms and a bit of luck to strip them all off.

You can see everything I removed in the component picture.

All of it I trashed. The only thing I reused was the small silver air distribution unit on the inside of the lid under the "air in" side (since it is not pressurized I didn't see any reason to replace it) and the handle for the lid.

2) Then, order the following parts from Amazon.

For The Air In Side Of Pot:

Anderson Metals 56122 Brass Pipe Fitting, Hex Nipple, 1/4" x 1/4" NPT Male Pipe ($2.94)
Anderson Metals 56122 Brass Pipe Fitting, Hex Nipple, 1/4" x 1/4" NPT Male Pipe: Industrial Pipe Fittings: Amazon.com: Industrial & Scientific

Smith-Cooper International 8140 Series Brass Mini Ball Valve, Inline, Lever Handle, 1/4" NPT Female ($3.81)
Smith-Cooper International 8140 Series Brass Mini Ball Valve, Inline, Lever Handle, 1/4" NPT Female: Industrial Ball Valves: Amazon.com: Industrial & Scientific

Dixon Valve DCP21 Steel Air Chief Industrial Interchange Air Fitting, Quick-Connect Plug, 1/4" Coupling x 1/4" NPT Male Thread, 37 CFM Flow Rating ($2.27)
Dixon Valve DCP21 Steel Air Chief Industrial Interchange Air Fitting, Quick-Connect Plug, 1/4" Coupling x 1/4" NPT Male Thread, 37 CFM Flow Rating: Air Tool Fittings: Amazon.com: Industrial & Scientific


For The Paint Out Side Of Pot:

Gold Tone Brass 3/8" PT to 1/4" PT Male Hex Nipple Reducing Connector Fitting ($5.24)
http://www.amazon.com/gp/product/B00A0FU8Z2/ref=oh_aui_detailpage_o01_s00?ie=UTF8&psc=1

Anderson Metals 56101 Brass Pipe Fitting, Barstock Tee, 1/4" x 1/4" x 1/4" NPT Female Pipe ($7.10)
http://www.amazon.com/gp/product/B000BQUTBS/ref=oh_aui_detailpage_o01_s03?ie=UTF8&psc=1

Control Devices ST Series Brass ASME Safety Valve, 60 psi Set Pressure, 1/4" Male NPT ($5.79)
Control Devices ST Series Brass ASME Safety Valve, 60 psi Set Pressure, 1/4" Male NPT: Industrial Relief Valves: Amazon.com: Industrial & Scientific

Winters PEM Series Steel Dual Scale Economical All Purpose Pressure Gauge with Brass Internals, 0-100 psi/kpa, 2" Dial Display, +/-3-2-3% Accuracy, 1/4" NPT Bottom Mount ($6.97)
Winters PEM Series Steel Dual Scale Economical All Purpose Pressure Gauge with Brass Internals, 0-100 psi/kpa, 2" Dial Display, +/-3-2-3% Accuracy, 1/4" NPT Bottom Mount: Industrial Pressure Gauges: Amazon.com: Industrial & Scientific

Total cost of all parts is $34.11 with free shipping. The only other thing you will need is a roll of teflon pipe tape.

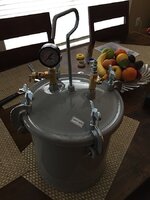
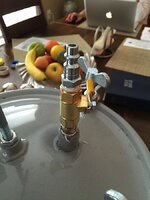
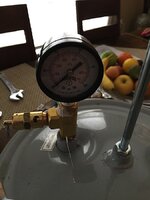
Once the parts arrive they just get threaded together and onto the pot as is shown on the pot pictures. I have taken one view of the air side, one of the paint side, and one of the whole thing.

All together took me about 45 minutes to get everything off (plus some cussin'); and then about 15 minutes to put it all together with new parts.

3) Once it is assembled be sure to test it using a low pressure and checking for leaks, then gradually trying higher pressures while continuing to check for leaks. Soapy water will show any leaks right away.

In my case I had two initial issues: First, the seal was compressed and bent right out of the box so i needed to pry it loose, clean it and reinsert evenly. Second, I had some leaking around the lowest piece on the paint side (where the 1/8" to 1/4" adaptor threads into the lid) and had to add more tape.

Now, for very little money and almost no running around or stress - I've got a new pot ready to go!
 

Attachments

  • IMG_2318.jpg
    IMG_2318.jpg
    172 KB · Views: 582
  • IMG_2319.jpg
    IMG_2319.jpg
    145.9 KB · Views: 496
  • IMG_2320.jpg
    IMG_2320.jpg
    124.8 KB · Views: 432
  • IMG_2321.jpg
    IMG_2321.jpg
    333.6 KB · Views: 485
Last edited:
Signed-In Members Don't See This Ad

randyrls

Member
Joined
Feb 2, 2006
Messages
4,829
Location
Harrisburg, PA 17112
Contrary to popular belief - you can unscrew the inside paint tube and just get rid of it. Be prepared though - this stuff was put on TIGHT and with LOTS of pipe dope. You will need some big wrenches, strong arms and a bit of luck to strip them all off.

Erik; I used a propane torch to loosen the paint tube.
 

wyone

Member
Joined
Jul 16, 2014
Messages
1,764
Location
15314 Grasslands, Parker, CO 80134
I made a pressure pot in much the same way, then made a vacuum pot using the same pot.. a sheet of 1/2 plexi, a couple fittings, a guage (which in reality is sort of pointless). I just used door rubber weatherstripping in two concentric circles as a seal and it works great
 

MesquiteMan

Retired Head Moderator
Joined
Oct 18, 2005
Messages
5,678
Location
San Marcos, TX, USA.
I made a pressure pot in much the same way, then made a vacuum pot using the same pot.. a sheet of 1/2 plexi, a couple fittings, a guage (which in reality is sort of pointless). I just used door rubber weatherstripping in two concentric circles as a seal and it works great

Please be careful with that 1/2" acrylic lid. Half inch is likely to implode under full vacuum as it is just not thick enough and will be over stressed at that diameter. I recommend 3/4" at a minimum. BTW, this is based on experience, been there, done that sort of thing! :)
 

wyone

Member
Joined
Jul 16, 2014
Messages
1,764
Location
15314 Grasslands, Parker, CO 80134
Actually... I will have to verify the thickness. I know it is at least 1/2 thick, but I honestly never measured it. I appreciate the warning and honestly I do have it in an area where it is somewhat out of my.. line of interaction so to speak. :)
 

wyone

Member
Joined
Jul 16, 2014
Messages
1,764
Location
15314 Grasslands, Parker, CO 80134
Now that you have brought it up.. I will measure.. and think it might also be a good idea to lay a straight edge across the width before and after I start the vacuum and see if there is any change
 

MyKidsDad

Member
Joined
Nov 27, 2008
Messages
146
Location
Edmond OK
I made a pressure pot in much the same way, then made a vacuum pot using the same pot.. a sheet of 1/2 plexi, a couple fittings, a guage (which in reality is sort of pointless). I just used door rubber weatherstripping in two concentric circles as a seal and it works great

Please be careful with that 1/2" acrylic lid. Half inch is likely to implode under full vacuum as it is just not thick enough and will be over stressed at that diameter. I recommend 3/4" at a minimum. BTW, this is based on experience, been there, done that sort of thing! :)

Curtis, what about using polycarbonate (lexan) instead of acrylic? From what I've read polycarbonate is stronger than acrylic, it just scratches easier. Is there a drawback to using polycarbonate? If not, would you recommend the same thickness of polycarbonate as you would acrylic?
 

Jim Burr

Banned
Joined
Feb 23, 2010
Messages
3,060
Location
Reno, Nv
I made a pressure pot in much the same way, then made a vacuum pot using the same pot.. a sheet of 1/2 plexi, a couple fittings, a guage (which in reality is sort of pointless). I just used door rubber weatherstripping in two concentric circles as a seal and it works great

Please be careful with that 1/2" acrylic lid. Half inch is likely to implode under full vacuum as it is just not thick enough and will be over stressed at that diameter. I recommend 3/4" at a minimum. BTW, this is based on experience, been there, done that sort of thing! :)

Curtis, what about using polycarbonate (lexan) instead of acrylic? From what I've read polycarbonate is stronger than acrylic, it just scratches easier. Is there a drawback to using polycarbonate? If not, would you recommend the same thickness of polycarbonate as you would acrylic?

I can't speak for Curtis, Eric...but polycarbonate will degrade over time with any exposure to sunlight. Vehicles with polycarbonate windows have them replaced every year due to degredation of the "stopping power"...not an issue with a pressure pot, but important none the less.
Gauges are important to determine if the system is reaching maximum vaccum for your given location.
 

wyone

Member
Joined
Jul 16, 2014
Messages
1,764
Location
15314 Grasslands, Parker, CO 80134
well in all honesty I am not sure if what I have is plexi or lexan.. and I do know one thing about vacuum gauges. You need to cut the tip of the atmospheric tube if you want to get an accurate reading. I neglected to do that when I first got it set up, mostly because I did not know I had to, and the vacuum was always showing 100%, which I know from reading the library articles is not possible since I am in Denver at 5280 feet above sea level. After cutting the tube open it reads just about right for the elevation I am at
 

MesquiteMan

Retired Head Moderator
Joined
Oct 18, 2005
Messages
5,678
Location
San Marcos, TX, USA.
Curtis, what about using polycarbonate (lexan) instead of acrylic? From what I've read polycarbonate is stronger than acrylic, it just scratches easier. Is there a drawback to using polycarbonate? If not, would you recommend the same thickness of polycarbonate as you would acrylic?

Polycarbonate is not necessarily stronger than acrylic, it depends on the intended purpose. It has higher modulus of elasticity meaning it will deform more before it fails. In other words, polycarbonate is more flexible while acrylic is more stiff. If you have a thick enough piece of either one, neither will fail. If your piece is too thin, both will fail.

The issue with thinner material that is flexible is you will get to the point where the deformation under full vacuum is so much that it will cause you to loose vac. As the material deforms inward, it is lifting on the edges.

I built a very large chamber and used what i thought was thick enough material. It was thick enough in that it did not crack or implode but I could not get full vacuum. After testing with shaving cream for leaks, I discovered the deflection and lifting as mentioned above. After I stiffened up the lid, it worked just fine.

In my opinion, the diameter of a typical HF pressure pot is just too large for 1/2" material in either type.
 
Last edited:

wyone

Member
Joined
Jul 16, 2014
Messages
1,764
Location
15314 Grasslands, Parker, CO 80134
How did you stiffen up the top of the one you made? See now you have me worried, and my first thought was to find a way to make the top stiffer, either with glued on strips (if I can figure out what kind of glue to use) or a second layer laminated onto the first.
 

MesquiteMan

Retired Head Moderator
Joined
Oct 18, 2005
Messages
5,678
Location
San Marcos, TX, USA.
How did you stiffen up the top of the one you made? See now you have me worried, and my first thought was to find a way to make the top stiffer, either with glued on strips (if I can figure out what kind of glue to use) or a second layer laminated onto the first.

I don't make lids out of acrylic or polycarbonate! I think a stabilizing chamber needs to be able to be seen through in order to better understand what is going on. With a clear chamber, I do not need a clear lid so I can use what I want.

For the lid of the extra large chamber where I had too much deflection, the base material was 1" MDF. I ended up gluing up two 3/4" pieces to get 1.5" and it worked fine.

In your instance, if your lid is indeed acrylic, you can use Weldon #3 or #4 to solvent weld battens across the lid if you think it needs it. DO NOT try to use any type of epoxy or any other glue. It will not hold! Honestly, you would be better off just getting some thicker material. Laminating two pieces is going to be difficult since it will need to be done with the same solvent weld material mentioned above and will try to evaporate before you can get it together. You could try Weldon #16 which is a thicker material but again, it will be a pain.
 

wyone

Member
Joined
Jul 16, 2014
Messages
1,764
Location
15314 Grasslands, Parker, CO 80134
Well I am going to verify what I have.. use caution when using it.. and then see about making a dedicated chamber. I have a lot of the material, and if I can make the clear box, I can then use your suggestion to make a MDF top. I honestly am so new at this, that I am not ready to spend a lot of money on this, but then again, I can hear your concerns and thoughts about the right materials. If I find I like this, I can then make a true investment in some of your products. I really do appreciate your thoughts and concerns
 

MesquiteMan

Retired Head Moderator
Joined
Oct 18, 2005
Messages
5,678
Location
San Marcos, TX, USA.
Well I am going to verify what I have.. use caution when using it.. and then see about making a dedicated chamber. I have a lot of the material, and if I can make the clear box, I can then use your suggestion to make a MDF top. I honestly am so new at this, that I am not ready to spend a lot of money on this, but then again, I can hear your concerns and thoughts about the right materials. If I find I like this, I can then make a true investment in some of your products. I really do appreciate your thoughts and concerns

You are welcome on the info!

One note, though...be aware that when I did use to build my lids with MDF, they were not just MDF. I would drill a 1.25" diameter hole at each location where a through fitting would go. I would then cast that with Alumilite and sand everything smooth and flat on my drum sander. I would then apply plastic laminate with contact cement, wood trim around the edges, and plastic laminate to the top. I would drill the right size hole in the large oversize re-cast areas and top them for the fittings. MDF by itself is way too porous and you will just suck air right through it.

I now have a CNC router and machine all my lids out of one piece 1/2" Type I PVC for my JuiceProof chambers and 3/4" Type I PVC for my acrylic chambers.
 

wyone

Member
Joined
Jul 16, 2014
Messages
1,764
Location
15314 Grasslands, Parker, CO 80134
CNC router.. now I am jealous.. but since you actually have a use on a regular basis it makes sense. :) I would love to have the time and money to explore all the avenues I have in this craft. Normally I lose interest in things after a while, but this craft has so many different avenues to go that I doubt I will ever tire of it, or be satisfied with my knowledge or skills. And that is a very good thing
 

JoelAlbert

Member
Joined
Mar 2, 2016
Messages
24
Location
Concord, CA
Erik,

Let me add my thanks for this idea. I used this post to help me order the items via Amazon--might have cost a bit more but it certainly has reduced the headaches!

A number of things have changed since your original, I thought I would post an updated list that matches what is available via Prime (as of today anyway).

Paint Side of the Pot:
Guage - https://www.amazon.com/dp/B0087UBOE...UTF8&colid=JJ8H84D8PRYA&coliid=I1XBR70NZG87GQ
Tee Connector - https://www.amazon.com/dp/B000BQUTB...olid=JJ8H84D8PRYA&coliid=I2IQLVQOVCQ7AP&psc=1
Safety Valve - https://www.amazon.com/dp/B0081TJHX...UTF8&colid=JJ8H84D8PRYA&coliid=I11WN54FP6R8GC
Male/Male Connector - https://www.amazon.com/dp/B003NXYB5...UTF8&colid=JJ8H84D8PRYA&coliid=I1XPNBEGWD3CLR

Air Side of the Pot
Male/Male connector - https://www.amazon.com/dp/B003X5VKP...=UTF8&colid=JJ8H84D8PRYA&coliid=IWQCRIVXY0JRD
Ball Valve - https://www.amazon.com/dp/B00835X4N...=UTF8&colid=JJ8H84D8PRYA&coliid=IFRRZ30ZOSQX9
Quick Connect (I am setup for 3/8" connectors) - https://www.amazon.com/dp/B0037QFJD...UTF8&colid=JJ8H84D8PRYA&coliid=I222DGI7M4U4PL

Everything should arrive via Prime Shipping and I will update post if there are any issues.

Thanks

Joel
 

Quality Pen

Member
Joined
Feb 2, 2014
Messages
1,403
Location
Lumberton, Texas
Better late than never.... I've been meaning to add a safety valve to my pot but was wanting a high quality valve. Does anyone know the company that makes the "best" valves? I could grab any random one, of course, but quality seems like it's important for a safety valve! Plus I want to avoid leaks...
 

JoelAlbert

Member
Joined
Mar 2, 2016
Messages
24
Location
Concord, CA
This is designed for the Harbor Freight Paint Pot -- so I would find your closed Harbor Freight location and wait for a good coupon (they just had a 25% off).

Hope that helps
 
Top Bottom