Do you need to stabilize burl

Signed-In Members Don't See This Ad

kentonjm

Member
Joined
Jul 12, 2016
Messages
149
Location
Phoenix, AZ
I just obtained a large piece of maple burl. It seems pretty heavy and solid and I am not yet sure exactly how to start cutting it up to maximize a mixture of turning and pen blanks. However I did wonder if stabilization was required for burls as I see so many blanks that have been treated before using.
 
Signed-In Members Don't See This Ad

Skie_M

Member
Joined
Aug 7, 2015
Messages
2,737
Location
Lawton, Ok
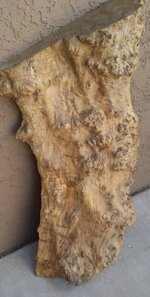
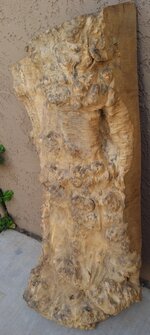
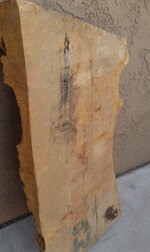
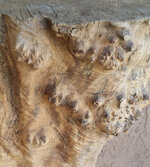
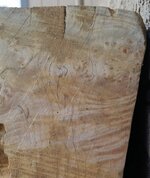
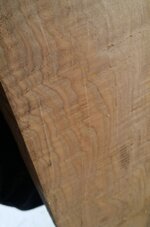
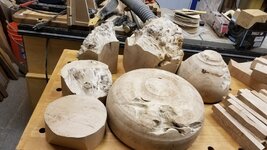
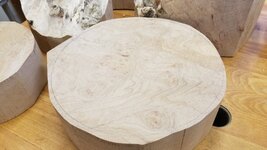
Burls are a formation in the wood that is similar to a warty growth in the skin ... The grain is not uniform or straight, curling in and around itself, many times trapping bark and sapwood within the folds of the burl itself as it's formed and continues to grow over the life of the tree.

This "wild grain" pattern is unique to each burl ... literally, the "fingerprints of god", as some people put it. Due to the fact that the grain is not unified and can contain inclusions of bark and sapwood, it can be very weak and brittle, especially as those elements also dry at different rates, which will warp the burl. Stabilization is the best way to go to avoid a disappointment, when working with such an unstable and delicate material.

That having been said .... You said that it's "heavy" ... get a moisture meter and check the moisture content. If it's higher than 12%, don't mess with it ... let it continue to try naturally (air dry) or kiln dry it if you want to take the chance of large cracks.

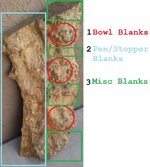
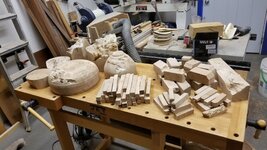
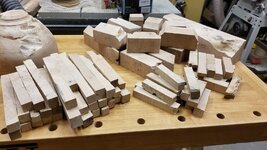
Once it's dry enough to work down into reasonable blank sizes, snap a few pictures and get back to us with them for more advice! :)

I would avoid slicing the burl up at this time, as the cracking WILL happen and in unpredictable places and patterns due to the interior stresses built up as the wood dries out.

Now ... for already-dried wood (moisture content between 5% and 12% ... if lower than 5%, let it acclimate to your shop's moisture content till it stabilizes around 10 - 12% or so). I am sure we would all love to see some pictures of the burl alongside a ruler of some sort for measurement ... top, bottom, sides, and we could give you some idea of how to proceed.
 

kentonjm

Member
Joined
Jul 12, 2016
Messages
149
Location
Phoenix, AZ
Thanks Greg, good advice. I will take some pics and post them. It is pretty big at approx 40" long by about 18-20 at its widest and maybe as much as 8" at the thickest point. I will get a moisture meter on it but I think its pretty old and dry.

I live in Arizona and most of our year the air moisture is less than 12% ;-)
 

Skie_M

Member
Joined
Aug 7, 2015
Messages
2,737
Location
Lawton, Ok
Wow ... that's a nice big burl ... how do you plan to machine it down into usable blanks?


You have a buddy with a mill of some sort? Or perhaps a chainsaw with a milling attachment?
 

kentonjm

Member
Joined
Jul 12, 2016
Messages
149
Location
Phoenix, AZ
Here are some pics of the burl log. I took a block plane to some of the flat sections and you can start to see some of the grain. Harder to see exactly what might be under the actual burl sections until you cut into them.

My first thoughts are to get at least a couple of good sized, deep, bowl blanks from the top and bottom which are the widest sections. The middle should yield one or two shallower bowls or platters. I would love to see if I can find a few blanks big enough for a few peppermills.

Once I mark off these larger areas there will be plenty of space to create a good lot of pen and stopper blanks.

All other thoughts welcome.
 

Attachments

  • 2017-03-27 15.46.48.jpg
    2017-03-27 15.46.48.jpg
    177 KB · Views: 597
  • 2017-03-27 15.46.57.jpg
    2017-03-27 15.46.57.jpg
    152.5 KB · Views: 473
  • 2017-03-27 15.47.18.jpg
    2017-03-27 15.47.18.jpg
    155.9 KB · Views: 481
  • 2017-03-27 15.58.27.jpg
    2017-03-27 15.58.27.jpg
    279.9 KB · Views: 497
  • 2017-03-27 15.57.55.jpg
    2017-03-27 15.57.55.jpg
    305.5 KB · Views: 478
  • 2017-03-27 15.58.11.jpg
    2017-03-27 15.58.11.jpg
    129.1 KB · Views: 484

duncsuss

Member
Joined
Jun 29, 2012
Messages
2,160
Location
Wilmington, MA
Oh. nice ... what you've got there is something I'd call "curl and burl" -- even the parts that don't have much in the way of burl eyes and/or swirly grain have got that curly maple thing going on.
 

Skie_M

Member
Joined
Aug 7, 2015
Messages
2,737
Location
Lawton, Ok
I'd try to section it out sort of like this ....

As you wish to prioritize bowl blanks, you'll want to cut them first:

attachment.php


Next, I'ld see about getting the stopper blanks out of the remainder, and ending with salvaging your pen blanks and offcuts for casting.


If you have a system set up to hollow your bowls and save the bowl core, that would be the most efficient use for your wood, as you will get multiple bowl blanks from each of the three bulging sections of burl.

The long thinner section to the left would be ideal for pen and stopper blanks ... if the stopper blank doesn't look to be spot-on, merely split it into quarters and use the good parts for pen blanks. As such, your stopper blanks will likely be best set up as 1.5" square, 5 - 6 inches long (or longer) ... so that if you decide to make them pen blanks, you have the length on them to accommodate your needs. As you make stoppers, just cut the desired length off of the larger blanks as needed rather than cutting them all at once.

The spaces between the bowls in the thick sections will make for some highly prized pen blanks, stopper blanks, and turning spindle projects.

I wish you the best of luck in portioning this thing out, and don't forget to wait for others to chime in on what they think would be the best ways to section your burl up ... mine might not be the best idea on the cutting block! :)
 

Attachments

  • mapleburl.jpg
    mapleburl.jpg
    133.4 KB · Views: 3,022

leehljp

Member Liaison
Joined
Feb 6, 2005
Messages
9,326
Location
Tunica, Mississippi,
Jon,
BEGGING: I want a piece, I want a piece! Please Please! (Just kidding)But if groveling would help . . . :biggrin:
Eye Candy ALL the way!
 

robutacion

Member
Joined
Aug 6, 2009
Messages
6,514
Location
Australia - SA Adelaide Hills
Well firstly, I wish I was the one with the job to cut it up, it may require one chainsaw cut if you only have a small bandsaw but to me, most bandsaws would be sufficient to dice and slice that "chunck" of burl wood.

It seems fairly solid but if is old, it may have developed softer spots that you will notice if inspecting it correctly before cutting it up.

I'm not saying that I would cut it exactly like Skie_M suggests but, it's a fair solution and a good start, the more important thing to consider is, think and measure what you would like out of that piece, rounds, squares, etc., get some blackboard chalk and mark as you go, you can always clean and change it, when satisfied go ahead and start working on it, the best way your conditions allow.

Let us know how you decided to go about it, pics please...!:biggrin:

Cheers
George
 

kentonjm

Member
Joined
Jul 12, 2016
Messages
149
Location
Phoenix, AZ
Thanks guys, lots of food for thought.

George - feel free to hop on a plane from Aus. and give me a hand :) I do have a pretty good size bandsaw so I thing it wont be too much of a problem.

Hank - Once I have cut it up I think I will have more pen blanks than I can use so will probably make up some batches and offer to the members here. DOnt know if I will have any bowl blanks to spare but I will keep you in mind.
 

leehljp

Member Liaison
Joined
Feb 6, 2005
Messages
9,326
Location
Tunica, Mississippi,
Thanks guys, lots of food for thought.

George - feel free to hop on a plane from Aus. and give me a hand :) I do have a pretty good size bandsaw so I thing it wont be too much of a problem.

Hank - Once I have cut it up I think I will have more pen blanks than I can use so will probably make up some batches and offer to the members here. DOnt know if I will have any bowl blanks to spare but I will keep you in mind.

John, I was just kidding with you! When you start cutting that for bowls, don't let go of it. That kind of wood is hard to come by. I want to see what YOU make with it! :)
 

kentonjm

Member
Joined
Jul 12, 2016
Messages
149
Location
Phoenix, AZ
So things got crazy busy in the middle of this year. Had lots of day job getting in the way, LOML broke her ankle and we recently got back from a 5 week 5500 mile workation RV trip. Just about caught up now and am planning for a few good art and crafts fairs in the run up to the holidays.

I finally managed to get this large chunk of maple onto the bandsaw and here is what I yielded.

6-7 bowl blanks including a nice 12" one
1 3x3 that should become one or two pepper mills
A bunch of 2x2s that will turn into bottle stoppers or condiment shakers
Approx 36 long pen blanks - These are 7"-9" so might even yield 2 pens from some.
Approx 30 short pen blanks.

Here are some pics. You can see I roughed the outside of a couple of the bowl blanks. Not sure whether to leave the imperfections or turn them out. Similarly the 8.5" bowl (back right) is rather tall so not sure if I should make one very deep bowl or cut it in half and make 2 shallower bowls. All thoughts welcome.
 

Attachments

  • 2017-09-16 18.27.39.jpg
    2017-09-16 18.27.39.jpg
    213.5 KB · Views: 352
  • 2017-09-16 18.27.50.jpg
    2017-09-16 18.27.50.jpg
    224.6 KB · Views: 299
  • 2017-09-16 18.27.58.jpg
    2017-09-16 18.27.58.jpg
    197.3 KB · Views: 297
  • 2017-09-17 10.49.49.jpg
    2017-09-17 10.49.49.jpg
    173.2 KB · Views: 300

leehljp

Member Liaison
Joined
Feb 6, 2005
Messages
9,326
Location
Tunica, Mississippi,
Something I am noticing more and more: where there are inclusions - cleaning it and then filling with colored cast resins or turquoise powder or something.

I noticed that you had rough turned the bowls and there were some shallow spots. Keep an open mind whether to turn those shallow spots out, fill them or leave the natural edge. It will be something special no matter what.

I am not suggesting that you do this (buy more tools) but there are some chisels with curved blades that will rough hollow a bowl and basically make rough turned "nested" bowls - i.e. let you get two bowls from one blank.
 

kentonjm

Member
Joined
Jul 12, 2016
Messages
149
Location
Phoenix, AZ
Still deciding what to do with some of the pieces. The large piece is now a nearly finished bowl. Had some issues with tearout but managed to get rif of most of it.
 

Attachments

  • 2017-10-06 13.02.07.jpg
    2017-10-06 13.02.07.jpg
    216.7 KB · Views: 304
  • 2017-10-06 13.02.34.jpg
    2017-10-06 13.02.34.jpg
    159.7 KB · Views: 294
  • 2017-10-06 13.02.51.jpg
    2017-10-06 13.02.51.jpg
    190 KB · Views: 291
Top Bottom