Ball Turner Collaboration Project

Signed-In Members Don't See This Ad

mredburn

IAP Activities Manager
Staff member
Joined
Jul 5, 2009
Messages
8,753
Location
Fort Myers FL
I need a ball turner occasionally and often enough I decided to get one. Well that was easier said than done. THe ones I found were either super expensive or cheap and pretty much worthless. I found a couple ball turning projects on line base off of this design. Steve Bedair's 9x20 Lathe Site
I contacted Mike Roux and asked if he could help make it if I bought the materials. Since we both have the same model lathe it is easier to make 2 than one. We used 1/2 aluminum plate for the base and 3 inch diameter aluminum round bar stock for the tool post. I bought thrust bearings and races for the bottom of the post and for the shoulder bolt rather than just a friction fit between parts. I bought most of the parts off Ebay or Amazon depending on who had what cheapest.
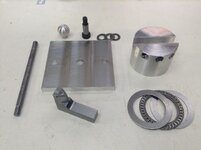
First picture of the parts used in making it.
attachment.php

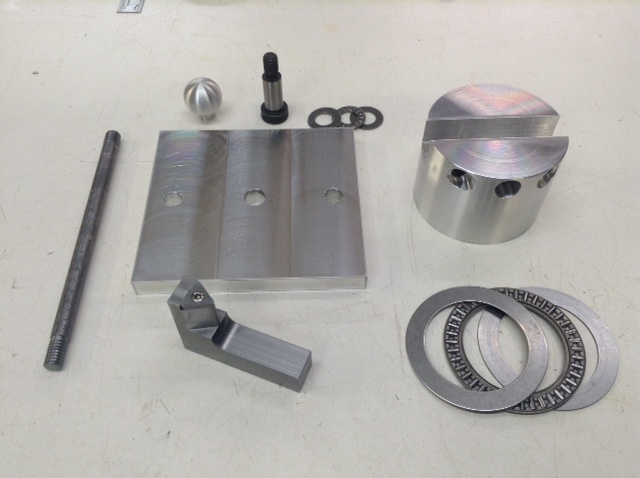
The handle is 3/8 round steel stock from Home Depot. The ball is the first one Mike made to fit his on his lathe.
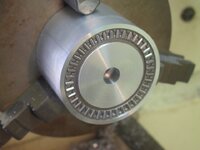
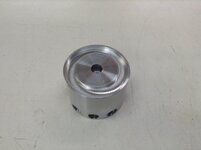
He milled the plates flat and drilled the hole for the cross slide hold down bolts and the center bolt for the tool post. He used a trim router with a carbide bit taking small cuts to cut the slot the thrust bearings fit into in the bottom of the post. It has been drilled and tapped to take a 1/2 shoulder bolt with 3/8-16 threads.

attachment.php


attachment.php


The bottom race sits about .015 proud so it rides on the bearings instead of the tool post. He nest drilled, milled and tapped the holes for the set screws that hold the cutter arm in place. Then cut a 5/8 slot for the cutter arm.

attachment.php

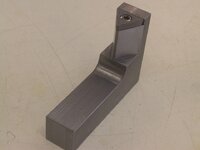
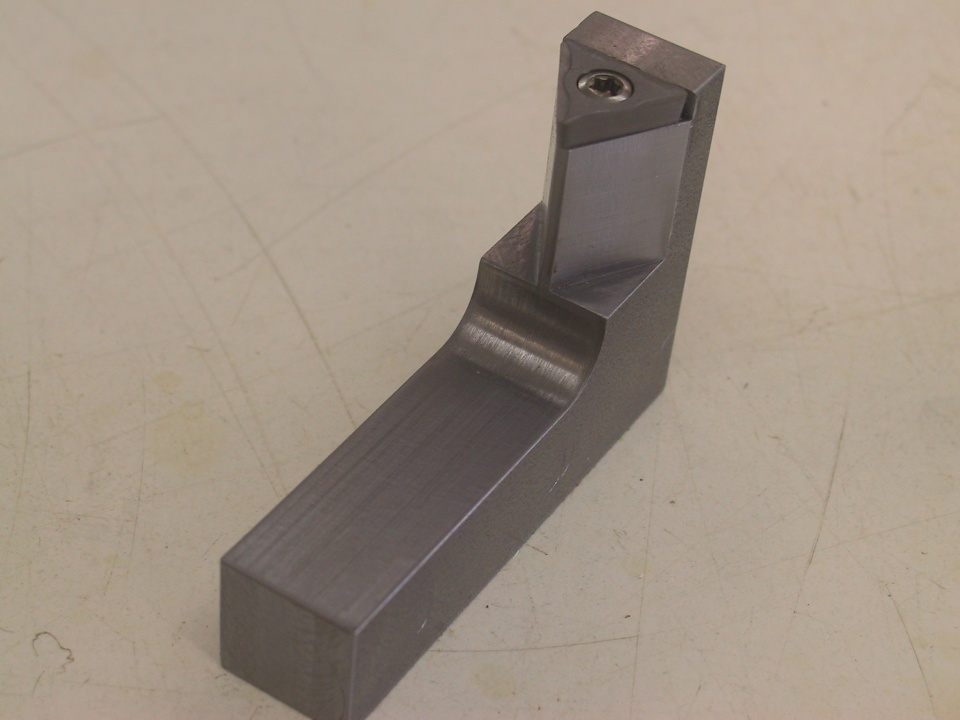
We made the cutter arm out of 5/8 steel flat stock. Mike cut the pieces from a 5/8 x2 x12 cold rolled steel piece of stock and then milled it to the shape you see. We borrowed an insert screw from one of my other tool holders until the ones I bought get here. I bought some German Manufactured ones instead of CHinese and it will take a couple weeks for them tto get here, Its a standard 4mm insert screw.

attachment.php


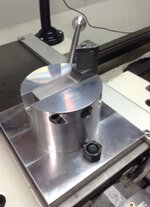
THere is a small thrust washer that goes between the bolt head and the aluminum plate and both thrust washers have steel races to keep the bearing from making grooves or dimples in the aluminum as its being used. Assembly is easy and we bolted it on to the lathe and Mike cut the ball for his.
attachment.php


attachment.php


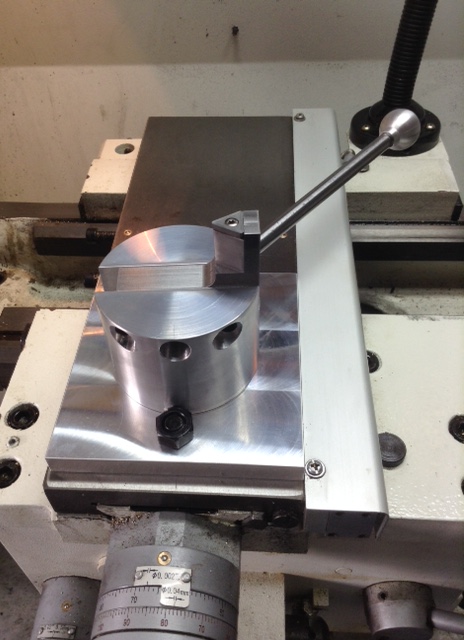
Now nothing goes according to plan and this was no exception. My lathe is newer than Mikes and they have made some changes. Like the DRO scales. Mine are different than Mike Roux's. Mine limit my cross slide travel half an inch shorter than Mike's. My ball turner would not make to the center of the axis for the lathe with the cutter. We had to change the bolt holes from front to back to left to right and move the bolt hole for the center of the tool post froward 3/8 of an inch in order for mine to be able to get to the center of the part when I cut it. We got the bottomplate remade and mine is now functional.

Questions and comment are encouraged.
 

Attachments

  • ball turner 1.JPG
    ball turner 1.JPG
    81 KB · Views: 2,316
  • ball turner 2.jpg
    ball turner 2.jpg
    138.5 KB · Views: 1,241
  • ball turner 3.jpg
    ball turner 3.jpg
    135 KB · Views: 1,292
  • ball turner 4.JPG
    ball turner 4.JPG
    68.2 KB · Views: 1,080
  • ball turner 5.jpg
    ball turner 5.jpg
    124.5 KB · Views: 1,132
  • ball turner 6.JPG
    ball turner 6.JPG
    93.9 KB · Views: 1,284
  • ball turner 7.JPG
    ball turner 7.JPG
    87.7 KB · Views: 1,670
Signed-In Members Don't See This Ad

toddlajoie

Member
Joined
Feb 6, 2010
Messages
1,728
Location
Feeding Hills MA
That's pretty sweet Mike. I've seen these before, but never seen them "In Use"

If you're using it some time I would love to see some pics of it in the process... My biggest question mark is, do you have to do the ball in 2 halves? If so, how do you secure the second half? (I know, that's 2 question marks...)
 

mredburn

IAP Activities Manager
Staff member
Joined
Jul 5, 2009
Messages
8,753
Location
Fort Myers FL
I will grab some pictures when I next use it. No you form the ball all at once. It does leave a shoulder next to the threaded rod. You can get to the center of the ball at the very end but not where its mounted. You cut from the side not the end. Once you go past center the material is coming up past the cutter from below and rubs not cuts. You can cut round or eliptical spheres depending on what arc you make the cutter swing.
 

mredburn

IAP Activities Manager
Staff member
Joined
Jul 5, 2009
Messages
8,753
Location
Fort Myers FL
You will need to ask Mike Roux, BLuwolf, He did all the work. On our lathes there is a large enough hole under the compound that we did not have to set the bolt head into the plate. You would need to remove your compound slide and see if yours is set up the same way.
 

Curly

Member
Joined
Nov 20, 2010
Messages
4,840
Location
Saskatoon SK., Canada.
Nicely done. To make it more versatile, another cutter arm with the point of the insert pointing out will allow you guys to cut coves too.
 

mredburn

IAP Activities Manager
Staff member
Joined
Jul 5, 2009
Messages
8,753
Location
Fort Myers FL
We thought about that. We decided we would make a second arm if we thought we wanted to do concave surfaces. I have a couple of caps I have to make that are domed and I have been hand forming and finishing them. In ones or twos thats ok when it gets to be 15-20 its not.
 

mredburn

IAP Activities Manager
Staff member
Joined
Jul 5, 2009
Messages
8,753
Location
Fort Myers FL
They do have a couple of people that made back to back inserts on the arm so they just switch the arm around.
 

jttheclockman

Member
Joined
Feb 22, 2005
Messages
19,132
Location
NJ, USA.
This is one of those things on my to do list or should i say bucket list at this stage of the game. Have so many ideas as what i want to do with being able to turn round spheres. Have looked at several hand made ones and also store bought. Lots of choices. Will see. Good luck with your new toy.
 

Ed McDonnell

Member
Joined
Oct 20, 2008
Messages
2,294
Location
Melbourne, FL
Don't you have a 4 axis cnc mill? Wouldn't it be easier to do these things with that? Maybe the jig on the lathe is faster for simple balls?

Nice job on the jig.

Ed
 

mredburn

IAP Activities Manager
Staff member
Joined
Jul 5, 2009
Messages
8,753
Location
Fort Myers FL
I do have 4 axis cnc machines. For a simple dome on a cap its faster especially on low volume runs. The parts are already cast to shape I just have to knock .020 or so off the casting to get a clean machined surface.
 

skiprat

Passed Away Mar 22, 2022
In Memoriam
Joined
Oct 19, 2006
Messages
7,812
Location
In a Skip in Wales
Mike, I have perhaps a dumb question......:redface:
It appears from the pics that you gained stability by increasing the toolpost height and reducing the cutter holder height. But to me, it looks like you now have more cutter adjustment than you could fit stock above the toolpost. ?
I love the thrust washer arrangement....that is cool.
Beautifully made, as is all your guys' ML gadgetry!!!:biggrin:
 
Last edited:

mredburn

IAP Activities Manager
Staff member
Joined
Jul 5, 2009
Messages
8,753
Location
Fort Myers FL
The diameter this set up will turn on our lathes is up to 2 inches /50 mm. Even At that diameter it will still have some clearance left between the ball and tool post. I dont forsee the need to turn anything bigger. Most of my stuff wont even come close.
 

magpens

Member
Joined
Feb 2, 2011
Messages
15,912
Location
Canada
Just a little unclear as to the proper orientation of the tool .... in the second last picture the point of the carbide cutter seems to be pointing towards the headstock of the lathe .... I thought it should point towards the axis of the lathe (which runs between the headstock center and the tailstock center).

Can you clarify that please. Thanks
 

mredburn

IAP Activities Manager
Staff member
Joined
Jul 5, 2009
Messages
8,753
Location
Fort Myers FL
It pivots 360 degrees with nothing in the way. When you chuck something up in the lathe it cuts from side to side and around to the center of the axis to form the ball.
 

Dalecamino

Local Chapter Leader
Joined
Jan 2, 2008
Messages
14,572
Location
Indianapolis, In.
This is awesome. It makes me feel homesick again :redface: I wish I could have been there for this project. But, I'm SO glad you guys managed it without my supervisory prowess :biggrin:
 

bluwolf

Member
Joined
Oct 2, 2008
Messages
995
Location
SW Florida
I'm glad you guys liked it. My wife thought I spent a lot of time on something that just makes little round thingies:rolleyes:

Nicely done. To make it more versatile, another cutter arm with the point of the insert pointing out will allow you guys to cut coves too.

If you push the cutter tool holder forward, past center in the slot it will cut coves. You would be somewhat limited in the coves you could cut as compared to an insert on the other side. I'll have to test it one of these days to see what you can get out of it.

This is awesome. It makes me feel homesick again :redface: I wish I could have been there for this project. But, I'm SO glad you guys managed it without my supervisory prowess :biggrin:

It did hamper progress somewhat. But the long distance consultations were enough to get us through it. BTW, shouldn't you be out in the shop doing something?:biggrin:

Mike
 

Dalecamino

Local Chapter Leader
Joined
Jan 2, 2008
Messages
14,572
Location
Indianapolis, In.
Hey! Glad I could help :rolleyes::biggrin: Yes, I should be in the shop. Long days since the cold and, snow has been around. Lots of crashes equates to more auto parts being ordered by our body shop customers. Need time for Susanne so, shop time will wait.

Very nice work on the new thingy Mike!
 

mredburn

IAP Activities Manager
Staff member
Joined
Jul 5, 2009
Messages
8,753
Location
Fort Myers FL
Having been asked, we have about $56.00 in Materials each. Mike has a couple of days invested in cutting them. Part of the time is figuring out the working dimensions. There was a lot of time on the Milling Machine cutting the arm with the triangular sides and to get it to the right height, along with the slot and the flats for the set screws Figure a good days time for each. We had to mark each arm for the insert tool on the lathes they would be used on. There are slight differences between the 2 lathes even though they are the same model. You can find a cheap tuning fork style for sale on Ebay for $59.00 but you have to buy a parts kit or source your own small parts. That adds another $20.00 plus you will need to fit everything together and you may need another adapter for your qtcp. And the tuning fork style has vibration issues.
 
Top Bottom