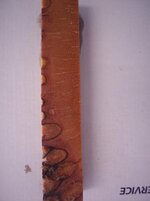
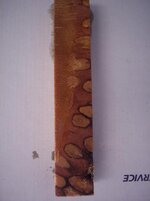
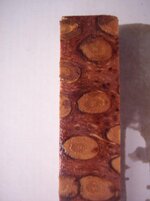
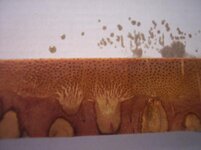
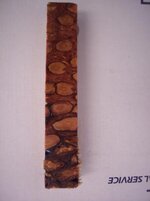
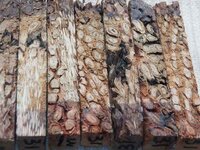
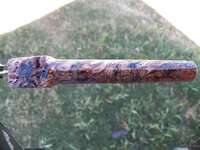
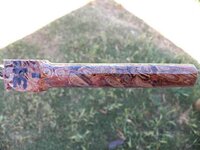
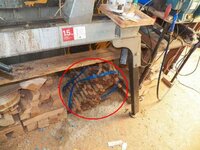
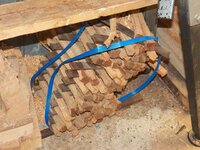
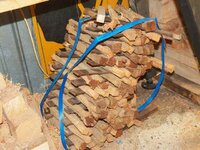
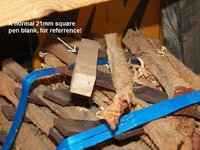
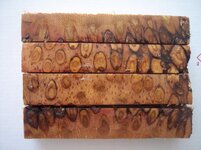
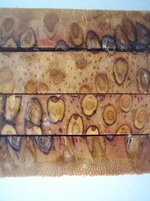
Can anyone figure out what this wood is ????????

Signed-In Members Don't See This Ad

shadetree_1

Member
Joined
Jan 3, 2011
Messages
934
Location
Wittmann AZ
Try this one on for size folks, it's a real beauty for sure BUT what is it?? No it is not something I cobbled up and cast! It is a real wood!

Thanks

Joe and Linda:biggrin::confused::giggle:
 

Attachments

  • 100_8895.jpg
    100_8895.jpg
    21 KB · Views: 175
  • 100_8896.jpg
    100_8896.jpg
    20.3 KB · Views: 166
  • 100_8897.jpg
    100_8897.jpg
    22.7 KB · Views: 207
  • 100_8899.jpg
    100_8899.jpg
    35.4 KB · Views: 203
  • 100_8894.jpg
    100_8894.jpg
    19.9 KB · Views: 233
Last edited:
Signed-In Members Don't See This Ad

robutacion

Member
Joined
Aug 6, 2009
Messages
6,514
Location
Australia - SA Adelaide Hills
Try this one on for size folks, it's a real beauty for sure BUT what is it?? No it is not something I cobbled up and cast! It is a real wood!

Thanks

Joe and Linda:biggrin::confused::giggle:

That to me Joe, looks like "wood" from the bottom part/butt of some type of Palm tree.

I have some identical blanks that I cut from a small "banana" Palm I removed a few months ago and when I was slicing the outer edges of the bottom log, where all the exposed roots are visible all around the "tree" base, blanks come up some how, identical to those you have there, unfortunately not many, all processed/yield are on the pics...!:frown:
I haven't yet made a pen with any of these Palm "base" pen blanks but, I reckon they will make some unique pens, even if they require some careful handling and CA stabilization...!:smile-big:

If that is the case and if the wood is green, make sure you cut then well oversize, like 1" or more, otherwise you endup with tooth-pics. I also hope that you have plenty of that stuff to cut, looking like that as they will make impressive pens, for sure...!

The stuff we "dig" up and bring to everyone in this forum and elsewhere, huh...! True treasures hunters, we are, mate...!:wink:

Good luck with them...!

Cheers
George
 

Attachments

  • 100_1770_(1).jpg
    100_1770_(1).jpg
    28.5 KB · Views: 172
  • 100_1780_(1).jpg
    100_1780_(1).jpg
    58.3 KB · Views: 216
  • 101_0387_(1).jpg
    101_0387_(1).jpg
    128.4 KB · Views: 179
  • 101_0390_(1).jpg
    101_0390_(1).jpg
    136.1 KB · Views: 243

shadetree_1

Member
Joined
Jan 3, 2011
Messages
934
Location
Wittmann AZ
Try this one on for size folks, it's a real beauty for sure BUT what is it?? No it is not something I cobbled up and cast! It is a real wood!

Thanks

Joe and Linda:biggrin::confused::giggle:

That to me Joe, looks like "wood" from the bottom part/butt of some type of Palm tree.

I have some identical blanks that I cut from a small "banana" Palm I removed a few months ago and when I was slicing the outer edges of the bottom log, where all the exposed roots are visible all around the "tree" base, blanks come up some how, identical to those you have there, unfortunately not many, all processed/yield are on the pics...!:frown:
I haven't yet made a pen with any of these Palm "base" pen blanks but, I reckon they will make some unique pens, even if they require some careful handling and CA stabilization...!:smile-big:

If that is the case and if the wood is green, make sure you cut then well oversize, like 1" or more, otherwise you endup with tooth-pics. I also hope that you have plenty of that stuff to cut, looking like that as they will make impressive pens, for sure...!

The stuff we "dig" up and bring to everyone in this forum and elsewhere, huh...! True treasures hunters, we are, mate...!:wink:

Good luck with them...!

Cheers
George

George,

I should have known another treasure hunter had cut it before, but I just had to put it out there for others, Yes it is the butt of a palm where all the roots are exposed, these are very solid but I will stabilize them anyway after the DNA drying process and think they will make a wild pen!!

This has been laying in a field where someone dumped it for over a year and is still wet so they will take some work before I can present them to members but it will be fun doing it, Man I love being a "treasure hunter" !!! We do find some goodies don,t we George!

In this case, who knew that a Mexican Fan Palm could look like this !!!

Joe and Linda
 

robutacion

Member
Joined
Aug 6, 2009
Messages
6,514
Location
Australia - SA Adelaide Hills
Try this one on for size folks, it's a real beauty for sure BUT what is it?? No it is not something I cobbled up and cast! It is a real wood!

Thanks

Joe and Linda:biggrin::confused::giggle:

That to me Joe, looks like "wood" from the bottom part/butt of some type of Palm tree.

I have some identical blanks that I cut from a small "banana" Palm I removed a few months ago and when I was slicing the outer edges of the bottom log, where all the exposed roots are visible all around the "tree" base, blanks come up some how, identical to those you have there, unfortunately not many, all processed/yield are on the pics...!:frown:
I haven't yet made a pen with any of these Palm "base" pen blanks but, I reckon they will make some unique pens, even if they require some careful handling and CA stabilization...!:smile-big:

If that is the case and if the wood is green, make sure you cut then well oversize, like 1" or more, otherwise you endup with tooth-pics. I also hope that you have plenty of that stuff to cut, looking like that as they will make impressive pens, for sure...!

The stuff we "dig" up and bring to everyone in this forum and elsewhere, huh...! True treasures hunters, we are, mate...!:wink:

Good luck with them...!

Cheers
George

George,

I should have known another treasure hunter had cut it before, but I just had to put it out there for others, Yes it is the butt of a palm where all the roots are exposed, these are very solid but I will stabilize them anyway after the DNA drying process and think they will make a wild pen!!

This has been laying in a field where someone dumped it for over a year and is still wet so they will take some work before I can present them to members but it will be fun doing it, Man I love being a "treasure hunter" !!! We do find some goodies don,t we George!

In this case, who knew that a Mexican Fan Palm could look like this !!!

Joe and Linda

Joe,

Each Palm species have differences in colour but particularly, the molecular structure that can very from more or less "stringy" and with tighter or bigger water sacks/grain cells.

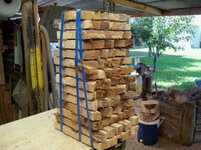
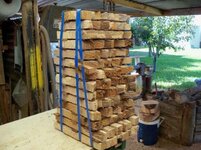
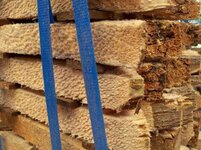
I have had some very intriguing results when air drying Palm, the blanks you see strapped in one of my drying towers, were all cut at just over 40mm square, 6 months later some (very few) have not moved a single mm, the majority get to about 22 to 24mm and about 6" long from the 10"+ they were cut at green, and some become simply a shrivelled up stick of about 1/2" square and about the same 6" long.

There is just no telling and or parts of the log or tree where the drying reactions can be pointed at, I see these things happening, regardless where the blank was cut from, in the whole tree...!:eek:

And yes, it gives me great pleasure to find treasures that many people would think as "rubbish", firewood or "no good for nothing", ha...! how wrong they are...!:wink::biggrin:

Cheers
George
 

robutacion

Member
Joined
Aug 6, 2009
Messages
6,514
Location
Australia - SA Adelaide Hills
Joe,

Even tough the Palm species you've got there, is very different than the one I have, your close up pic of your blanks is a great looking material, which will give a much different final result and probably a better looking than the half dozen I cut from my small Palm tree.

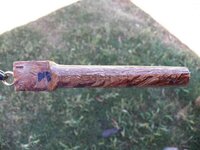
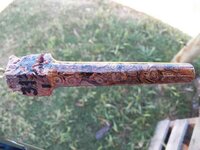
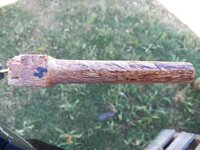
However, your thread has made me curious on how these butt blanks of mine will look with a finish as I only had turned the normal Palm material (centre of logs...!) so, even with the 36°C at the moment, I went to the "oven"/shed and turned the second blank from the right on the previous pics of mine.

This morning I had no intentions to turn anything or even been in the shed for any purpose at all, at least until late evening, about 4 hours from now but, I just couldn't help myself, as its all your fault...!:wink::)

So here we go...!

PS: Sorry, if I spoiled your fun, as I actually though that you didn't know what it was, even tough, thinking straight, I can't see how anyone wouldn't know as is nothing can compare with it, even if was delivered to you in chunks...!:biggrin:

Cheers
George
 

Attachments

  • 101_0398_(1).jpg
    101_0398_(1).jpg
    112 KB · Views: 152
  • 101_0401_(1).jpg
    101_0401_(1).jpg
    115.1 KB · Views: 174
  • 101_0399_(1).jpg
    101_0399_(1).jpg
    115.2 KB · Views: 156
  • 101_0397_(1).jpg
    101_0397_(1).jpg
    113.5 KB · Views: 169
  • 101_0396_(1).jpg
    101_0396_(1).jpg
    112.1 KB · Views: 185
Last edited:

shadetree_1

Member
Joined
Jan 3, 2011
Messages
934
Location
Wittmann AZ
Joe,

Even tough the Palm species you've got there, is very different than the one I have, your close up pic of your blanks is a great looking material, which will give a much different final result and probably a better looking than the half dozen I cut from my small Palm tree.

However, your thread has made me curious on how these butt blanks of mine will look with a finish as I only had turned the normal Palm material (centre of logs...!) so, even with the 36°C at the moment, I went to the "oven"/shed and turned the second blank from the previous pics of mine.

This morning I had no intentions to turn anything or even been in the shed for any purpose at all, at least until late evening, about 4 hours from now but, I just couldn't help myself, as its all your fault...!:wink::)

So here we go...!

PS: Sorry, if I spoiled your fun, as I actually though that you didn't know what it was, even tough, thinking straight, I can't see how anyone wouldn't know as is nothing can compare with it, even if was delivered to you in chunks...!:biggrin:

Cheers
George

THANKS George,

I wondered what they would look like when finished and all I can say is .....WOW !!!!! And I think you are right! Nothing I've seen can compare with it !!!

Well looks like I have my work cut out for me getting a bunch of these ready for market, Thanks for venturing out to the "oven/shed" to turn one for us!!! This is going to be FUN !!!

Thanks

Joe and Linda:biggrin::biggrin::biggrin:
 

patmurris

Member
Joined
Feb 25, 2011
Messages
357
Location
Nice, French Riviera
Coming a bit late to the party... I could tell from the 'inside wood' on the picts it was palm, but i had never seen it like this, sort of midway through the bark... Really nice stuff indeed, but very delicate to turn from my experience. You better soak it with CA or something else before even looking at it!

The phoenix palm i've cut did shrink quite a bit while drying, although not as much as George mentions. Cross cut is very nice too but even more delicate. Some logs did spalt a bit and gained some really nice yellow and orange hues.

...now i'm going to go fetch one log i have collecting dust somewhere and see if i can cut something similar. :biggrin:

BTW George, did you ever cut some New Zealand ponga - Cyathea dealbata?
 

robutacion

Member
Joined
Aug 6, 2009
Messages
6,514
Location
Australia - SA Adelaide Hills
Coming a bit late to the party... I could tell from the 'inside wood' on the picts it was palm, but i had never seen it like this, sort of midway through the bark... Really nice stuff indeed, but very delicate to turn from my experience. You better soak it with CA or something else before even looking at it!

The phoenix palm i've cut did shrink quite a bit while drying, although not as much as George mentions. Cross cut is very nice too but even more delicate. Some logs did spalt a bit and gained some really nice yellow and orange hues.

...now i'm going to go fetch one log i have collecting dust somewhere and see if i can cut something similar. :biggrin:

BTW George, did you ever cut some New Zealand ponga - Cyathea dealbata?

Hi Pat,

I had to search Google to see what the ponga things was, as I couldn't put a image to the name but after I searched it, I can say that I've seen 'Silver Tree Fern – Ponga' before but, I never had the chance to get my hands on any...!:frown:

I reckon, it would be very "spongy", huh...???:wink:

Well, you mention that you haven't experienced the amount of shrinkage on the Palm "wood" as I claimed, and I hope like hell that not all Palms shrink like this one as I don't think that I want to get any more of this damn thing...!

I mention the shrinkage on some previous lots I made from this Palm tree and today I had a dear friend visiting me, all the way from Tennant Creek in the Northern Territory, also a member of this forum (wm460) and in the process of looking for stuff he would like, I got my hands of the very pile (drying tower) shown on the pic previously, taken just after it was cut and strapped, only to discover that this lot is nearly all useless from too much shrinkage...!:mad:

Now, this log was only sliced up about 3 months ago and the weather/temps have been quite mild compared with most summer years, nevertheless and been just under my main wood lathe, these blanks have shrivelled up beyond believe, in such short period of time...!

My friend couldn't believe what he saw and realised how difficult this Palm stuff, is to process into a normal pen blank size...! He actually wanted some Palm pen blanks from the butt, straight cut and diagonal cut ones, which I had manage to process in a limit amount from my previous attempts, as from this last lot, we wouldn't many if any usable stuff...!:redface:

I'm going down stairs now to take a couple of pics of this shrivelled up pile, as my friend has left a little wile ago, with a big smile on his face...!:eek::biggrin:

OK, here are the pics...! (remember, they were cut at 40mm square, minimum)
I'm truthful to what I say, always and if was there any need to validate my claims, ain't think that this, would result in any doubts, huh...???:wink::)

Cheers
George
 

Attachments

  • 100_1780_(1).jpg
    100_1780_(1).jpg
    58.3 KB · Views: 141
  • 100_1781_(1).jpg
    100_1781_(1).jpg
    67.5 KB · Views: 170
  • 101_0411_(1).jpg
    101_0411_(1).jpg
    61.8 KB · Views: 147
  • 101_0413_(1).jpg
    101_0413_(1).jpg
    125 KB · Views: 153
  • 101_0414_(1).jpg
    101_0414_(1).jpg
    127.2 KB · Views: 157
  • 101_0415_(1).jpg
    101_0415_(1).jpg
    59.8 KB · Views: 141

patmurris

Member
Joined
Feb 25, 2011
Messages
357
Location
Nice, French Riviera
Thanks for the additional pics Georges, they do show very well the severe shrinkage you are talking about - what a waste! The thing is you cut the blanks as it was very green, maybe Joe will have better luck since his palm stuff has been cut for over a year.

Another question: how did you manage to turn the sample you show above? What did you use to stabilize and reinforce the material?
 

robutacion

Member
Joined
Aug 6, 2009
Messages
6,514
Location
Australia - SA Adelaide Hills
Thanks for the additional pics Georges, they do show very well the severe shrinkage you are talking about - what a waste! The thing is you cut the blanks as it was very green, maybe Joe will have better luck since his palm stuff has been cut for over a year.

Another question: how did you manage to turn the sample you show above? What did you use to stabilize and reinforce the material?

I simply put the blank in my Nova G3 chuck and marked the centre of the blank with a pointed screwdriver I have for this purpose, one drop of CA on that centre mark and gently centred on the tail stock.

I didn't use anything else on the blank until I had it round using the "Flap" disc 40 grit, putting a hews paper under the blank to capture the sawdust. Filled the holes with that sawdust and I then soaked it while on the lathe with thin CA, rotating and filling at each turn, waited a couple of minutes, sprayed a few "puffs" with accelerator to harden the CA and voila, I gave it a run with the "Flap" disc 80 grit, to get to the size I wanted and then, used wet and dry 600 - 800 -1000 - 1200 -1500 - 2000 and 2500. Cleaned it, put a little of polish compound, buffed it and, was done...! (take note Joe, this is what you have to do on your samples...!:wink::biggrin:)

There is a big difference in between making these samples and making a pen, when it comes to fragile to very fragile materials, while the turning in between centres of something so fragile, require some gentle touch but particularly the "magic" touch of the "Flap" discs on the 4" grinder, for the making of a pen, the initial drilling step, is was it makes or brakes the usability of that blank in very fragile.

This is when stabilising or CA soaking the day before is a must, or at least after the blanks has been cut and ready for drilling. The soft material needs to be soaked with very thin CA from both ends of the half blanks and either let them dry naturally or use the accelerator to speed up the process, however, it not enough time has passed, is very possible that the CA at the centre of the blank is not yet dry as the accelerator wouldn't have the capacity/capability to reach that far in so, that why I suggest to do the CA soaking the day before drilling.

After that, and after the tube is properly glued in, that same blank will be very solid and strong to be turned in between centre if preferred, the tube will support strongly, even the most soft and fragile materials, something that, when making the samples with a very fragile full blank totally unassisted, using any cutting tool, regardless of how sharp, it will have little changes of not snapping in half, in the process, this is when the "Flap" discs worth their weight in gold...!:wink::biggrin:

Hope I have responded to your question, Pat...!:wink:

Cheers
George
 

patmurris

Member
Joined
Feb 25, 2011
Messages
357
Location
Nice, French Riviera
Thanks for the details Georges. As i understand, you don't cut the blank round, but 'grind' it using abrasive. What exactly is that 'flap disk' tool?

I have used sanding paper instead of a gouge to turn a couple phoenix palm pens, but one problem i had is it goes out of round rather quickly - well, it was cross cut palm too. You don't run into that issue with your flap disk?

When working with very fragile materials, one step i find is very efficient is to run thin CA inside the hole, let dry, and then glue the tube with epoxy. That way, the material has been strengthened right where it matters, around the tube.
 

robutacion

Member
Joined
Aug 6, 2009
Messages
6,514
Location
Australia - SA Adelaide Hills
Thanks for the details Georges. As i understand, you don't cut the blank round, but 'grind' it using abrasive. What exactly is that 'flap disk' tool?

I have used sanding paper instead of a gouge to turn a couple phoenix palm pens, but one problem i had is it goes out of round rather quickly - well, it was cross cut palm too. You don't run into that issue with your flap disk?

When working with very fragile materials, one step i find is very efficient is to run thin CA inside the hole, let dry, and then glue the tube with epoxy. That way, the material has been strengthened right where it matters, around the tube.

Hahahaha, I remember someone not that long ago that, put it the same way, I don't do wood turning I do wood "grinding"...!:eek::wink::biggrin::biggrin:

Not exactly tough, this system was developted, particularly to deal with the very difficult pen blanks materials, one come accrosss. Not always they are the soft stuff, many times, the very contrary is the case and the "Flap" discs have proven to be yoir best friend, when dealing with these type materials.

I should say that, I turn normal woods with gouges and I tent to give it a go to the very hard materials first with my carbide tipped gauges but, when I'm dealing with something that is soft from extremely fragile, I don't hesitate for a second and I grab by 4" grinders set up with various grits, to save time changed grits using a single grinder, and for the price these grinders are sold in our days $40 or less, I see no point in using only 1 when 2 different grits at least are required...!

I have been talking about the "Flap" disc for some time now, and I wrote a simple thread to explain what it is and how it works, here

In fact, many turners have resorted on the heavy sandpaper grits to do exactly the same, most times due to the inability to use a cutting gauge to take the blank to final shape and size, regardless of what material is , taken the precautionary road with the sandpaper and this is all fine by me, one was the right to make they choices to use how and what they use to get the job done...!

However, one of the major difference of the "Flap" disc is the minimal risk of getting the blank out of round, as the hand sanding will produce quite easily...! The gentle touch, only needed to make the "Flap" discs work properly, gives a very accurate cut surface that can be improved if one uses the tool rest as a support/guide for the grinder outer disc cover.

I can also tell you that, I understand why so many people I know that have started using the "Flap" discs in their every day turnings, are so sceptical at least to admit publicly that, they are using it, as they feel that would be scrutinized/ridiculousrised by some, for using such a method that is not within the proper wood turning methodology they preach...!:wink::)

Is only one thing I say to you, try it and then let me know...!


Cheers
George
 

robutacion

Member
Joined
Aug 6, 2009
Messages
6,514
Location
Australia - SA Adelaide Hills
Thanks for the additional pics Georges, they do show very well the severe shrinkage you are talking about - what a waste! The thing is you cut the blanks as it was very green, maybe Joe will have better luck since his palm stuff has been cut for over a year.

Another question: how did you manage to turn the sample you show above? What did you use to stabilize and reinforce the material?

I actually forgot to mention that, the blanks I've got done (ready to use), were from the first batch I cut, within a couple of day of cutting this Pal tree down. The batch that I have shown in the pics, is actually my second batch cut from one of the logs of that Palm tree, about 3 months ago, while the Palm was cut about 6 months ago.

So, the approx. 3 months that took for both batch's to dry, the very green stuff behaved a lot better than the second lot that was 3 months old (from cut) when I ripped that log, with about 20% wastage, while this lot, will be about 95% or more, wastage...!:mad:

I still hope that some Palms are better while drying, and hope that the one Joe's got, falls in the last category...!:wink::)

Cheers
George
 

shadetree_1

Member
Joined
Jan 3, 2011
Messages
934
Location
Wittmann AZ
Thanks for the additional pics Georges, they do show very well the severe shrinkage you are talking about - what a waste! The thing is you cut the blanks as it was very green, maybe Joe will have better luck since his palm stuff has been cut for over a year.

Another question: how did you manage to turn the sample you show above? What did you use to stabilize and reinforce the material?

I actually forgot to mention that, the blanks I've got done (ready to use), were from the first batch I cut, within a couple of day of cutting this Pal tree down. The batch that I have shown in the pics, is actually my second batch cut from one of the logs of that Palm tree, about 3 months ago, while the Palm was cut about 6 months ago.

So, the approx. 3 months that took for both batch's to dry, the very green stuff behaved a lot better than the second lot that was 3 months old (from cut) when I ripped that log, with about 20% wastage, while this lot, will be about 95% or more, wastage...!:mad:

I still hope that some Palms are better while drying, and hope that the one Joe's got, falls in the last category...!:wink::)

Cheers
George

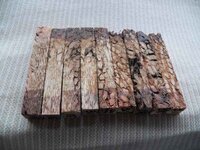
Here is a picture of some of the finished blanks folks, What do you think? They are actually pretty hard stuff except in a few spots where the 'buds" are, I have soaked these in a 50/50 mix of Deft Lacquer and thinner overnight, but I would keep the CA handy when working them!

I first soaked them in DNA for a minimum of 24 hours and then after they air dried for awhile I wrapped them in newspaper for a couple of days before the 50/50 soaking in Deft and thinner and to show the color and grain I applied 1 coat of full strenght Deft to one side.

I hope you like them and that I need to make bunch for you folks!!

Let me know if I should make a bunch !!

Joe and linda:biggrin:
 

Attachments

  • 100_8906.jpg
    100_8906.jpg
    67.5 KB · Views: 119
  • 100_8907.jpg
    100_8907.jpg
    43.3 KB · Views: 137

robutacion

Member
Joined
Aug 6, 2009
Messages
6,514
Location
Australia - SA Adelaide Hills
What great looking, those Palm blanks are, mate...!:eek::wink:

There is no doubt that, the Palm species you have there is very different than mine and I can say that I may like yours, even more...!:frown:

It will be interesting to see how they turn out finished...!:biggrin:

I hope you have a fair amount of this stuff, I have no doubt they will sell well for you...!

Good luck,

Cheers
George
 

Ambidex

Member
Joined
Nov 2, 2011
Messages
1,108
Location
Bristol NH 03222
am also late to the party...but from what I saw from Georges turning all I can say is wow...truly cool results..let me know if you have an overabundance George:wink::biggrin:...George
 
Top Bottom