
You are using an out of date browser. It may not display this or other websites correctly.
You should upgrade or use an alternative browser.
You should upgrade or use an alternative browser.
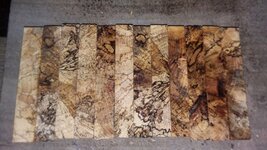
Spalted Pin Oak Pen Blanks
- Thread starter sleevecc
- Start date
Signed-In Members Don't See This Ad
- Status
- Not open for further replies.
cseymour
Member
Hello Steve,
If those are still available, I will take them.
Just let me know (shipping to 12550) and I will send PayPal
Thank you
Sent from my iPhone using Penturners.org mobile app
If those are still available, I will take them.
Just let me know (shipping to 12550) and I will send PayPal
Thank you
Sent from my iPhone using Penturners.org mobile app
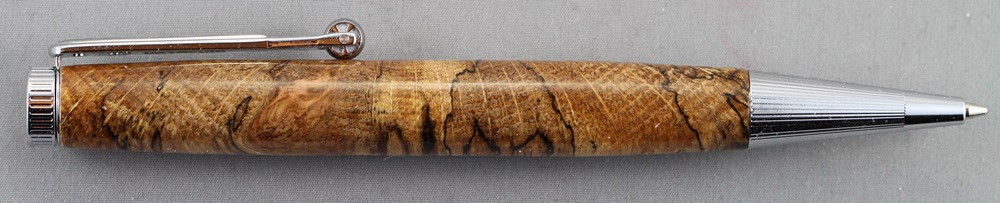
First Spalted Oak Pen Using Indigo Pen Kit (Dayacom)
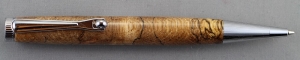
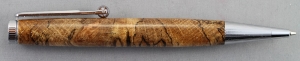
As you will note from the above posts, I bought some of these blanks. . Here is one of them converted to a pen. . Just thought I would show it off because I am very pleased with the result. . The result is actually considerably better than the pictures tend to show. . I am not a photographer ! . My wife has already claimed the pen !
I used the chrome "Indigo" pen kit, a Dayacom kit (which I bought from Exotic Blanks). . This kit is extremely nice for showing off lots of blank. . The barrel is 3.82" long, the tube size is 3/8", and bushing diameter is 0.445". . I actually turned the barrel diameter to be 0.525" in the center and then did a 3-degree taper on the ends down to the hardware size of 0.445". . I rather like this shape and size rather than the straight-sided shape.
The turning was done on a metal-working lathe with a carbide cutter (11mm diameter round). . This worked fine, since I stabilized the blank before turning. . Someone skilled with a skew chisel (I am not) could probably turn the blank (possibly better) on a wood-turning lathe. . I think a very sharp skew would be necessary, and not just a gouge type chisel.
Prior to turning, I stabilized the blank (it was a little soft in places) by immersing in Minwax Wood Hardener for a couple of hours and then letting the blank dry for 2 days (not sure that length of time is necessary).
Before stabilizing, I had carefully turned the blank round (0.75"), squared the ends, and drilled a 3/8" hole the full length of the blank. . Drilling was done first with 9/32" drill bit and then with a 3/8" drill bit. . The drillings from both ends accurately met in the middle because the drilling was done horizontally on the lathe and because the blank had been previously carefully and accurately rounded. . Drilling was done very carefully with sharp bits at fairly low speed (about 400 RPM approx.).
Turning the blank was a pleasure and uneventful, just like turning a professionally stabilized blank. . Thanks to the seller of these blanks for telling me about the Minwax Wood Hardener which I used to stabilize. . It resulted in a very sound blank with seemingly uniform turning properties.
Finishing was 4 coats of thin CA. . Carefully sanded with 600 grit. . Polished with Mequiar's cut polish, Novus 3, Novus2, then Meguiar's high shine polish.
I will probably re-post this report in the SOYP Forum. . But I thought it appropriate to post here first.
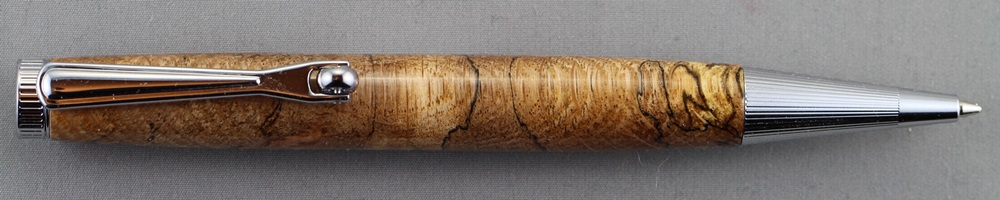
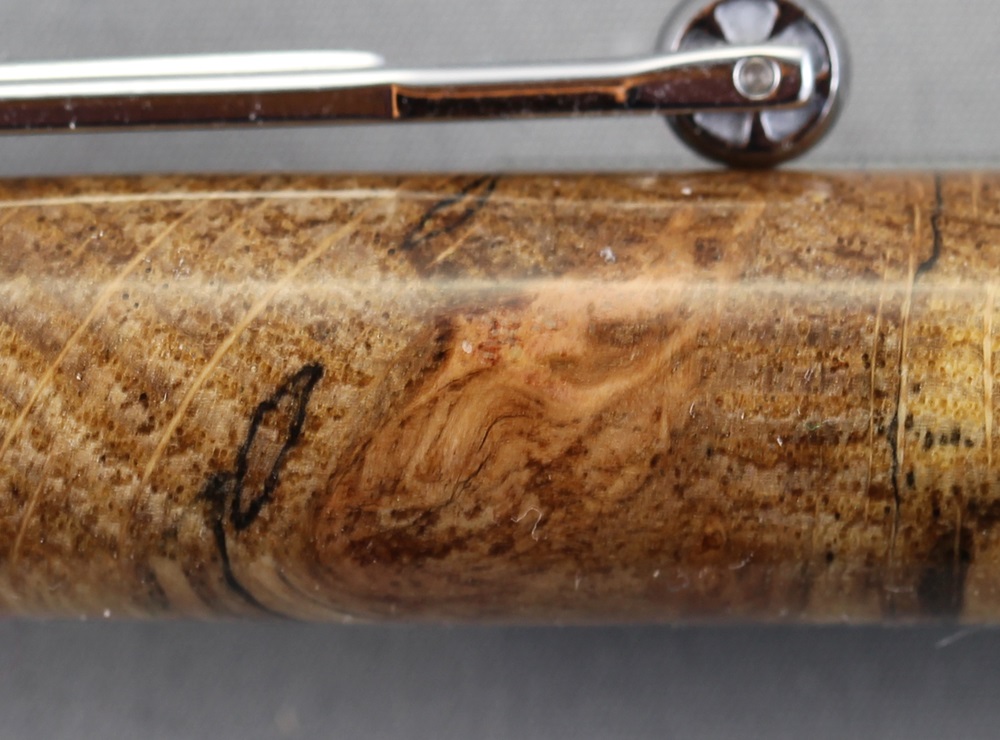
There are pictures of all four sides of the pen, plus an enlargement showing, at greater resolution, one of the more interesting features of the blank. . This particular blank is not one of the most interesting which i bought. . I did not know how the process would turn out so I chose a blank which I could "sacrifice" to this experiment. . The result, as I said, I find to be very pleasing and a pleasure to "show off". . These spalted oak blanks have interesting potential.
I also highly recommend this kit, which is a twist action. . You can replace the refill either by unscrewing the nib, or by gripping the nib securely and carefully and then pulling out the whole mechanism. . Unscrewing the nib is probably the best method.


As you will note from the above posts, I bought some of these blanks. . Here is one of them converted to a pen. . Just thought I would show it off because I am very pleased with the result. . The result is actually considerably better than the pictures tend to show. . I am not a photographer ! . My wife has already claimed the pen !
I used the chrome "Indigo" pen kit, a Dayacom kit (which I bought from Exotic Blanks). . This kit is extremely nice for showing off lots of blank. . The barrel is 3.82" long, the tube size is 3/8", and bushing diameter is 0.445". . I actually turned the barrel diameter to be 0.525" in the center and then did a 3-degree taper on the ends down to the hardware size of 0.445". . I rather like this shape and size rather than the straight-sided shape.
The turning was done on a metal-working lathe with a carbide cutter (11mm diameter round). . This worked fine, since I stabilized the blank before turning. . Someone skilled with a skew chisel (I am not) could probably turn the blank (possibly better) on a wood-turning lathe. . I think a very sharp skew would be necessary, and not just a gouge type chisel.
Prior to turning, I stabilized the blank (it was a little soft in places) by immersing in Minwax Wood Hardener for a couple of hours and then letting the blank dry for 2 days (not sure that length of time is necessary).
Before stabilizing, I had carefully turned the blank round (0.75"), squared the ends, and drilled a 3/8" hole the full length of the blank. . Drilling was done first with 9/32" drill bit and then with a 3/8" drill bit. . The drillings from both ends accurately met in the middle because the drilling was done horizontally on the lathe and because the blank had been previously carefully and accurately rounded. . Drilling was done very carefully with sharp bits at fairly low speed (about 400 RPM approx.).
Turning the blank was a pleasure and uneventful, just like turning a professionally stabilized blank. . Thanks to the seller of these blanks for telling me about the Minwax Wood Hardener which I used to stabilize. . It resulted in a very sound blank with seemingly uniform turning properties.
Finishing was 4 coats of thin CA. . Carefully sanded with 600 grit. . Polished with Mequiar's cut polish, Novus 3, Novus2, then Meguiar's high shine polish.
I will probably re-post this report in the SOYP Forum. . But I thought it appropriate to post here first.
There are pictures of all four sides of the pen, plus an enlargement showing, at greater resolution, one of the more interesting features of the blank. . This particular blank is not one of the most interesting which i bought. . I did not know how the process would turn out so I chose a blank which I could "sacrifice" to this experiment. . The result, as I said, I find to be very pleasing and a pleasure to "show off". . These spalted oak blanks have interesting potential.
I also highly recommend this kit, which is a twist action. . You can replace the refill either by unscrewing the nib, or by gripping the nib securely and carefully and then pulling out the whole mechanism. . Unscrewing the nib is probably the best method.


Last edited:
I also purchased some of these and they are gorgeous! Buyer beware that they are crosscut blanks and require a bit more attention and care than others. There are some soft areas that you can turn through but stabilizing is safer. I have done it both ways.
- Status
- Not open for further replies.