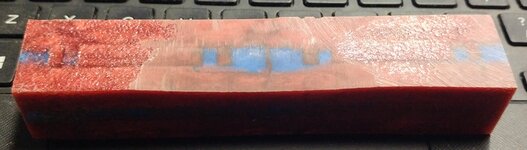
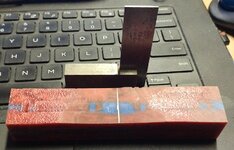
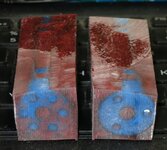
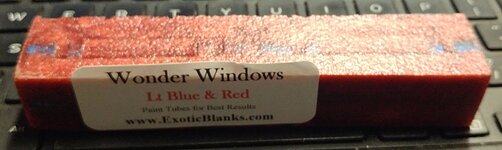
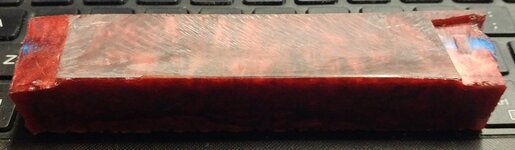
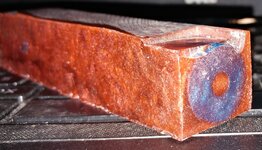
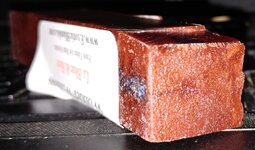
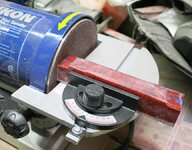
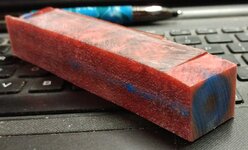
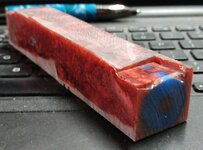
Wonder Window blank?

Signed-In Members Don't See This Ad

qquake

Member
Joined
Feb 8, 2004
Messages
5,015
Location
Northern California

Attachments

  • blank07.jpg
    blank07.jpg
    103.9 KB · Views: 266
  • blank08.jpg
    blank08.jpg
    87.2 KB · Views: 219
  • blank02.jpg
    blank02.jpg
    233.5 KB · Views: 286
  • blank03.jpg
    blank03.jpg
    199.9 KB · Views: 240
  • blank13.jpg
    blank13.jpg
    148.4 KB · Views: 300
Signed-In Members Don't See This Ad
Joined
Jan 10, 2013
Messages
238
Location
Howell, Michigan
Inside of clamping on the sides, put it in the chuck so the corners are clamped (only two will be touching). Put the tailstock up tight, and turn with a light touch to round the blank.
I haven't tried this particular blank, looks interesting...
 

edstreet

Member
Joined
Aug 12, 2007
Messages
3,684
Location
No longer confused....
For starters it appears that the blank was poorly constructed. The last photo shows there to be hidden detail that can be missed and overlooked, thus allowing you to fubar the blank quite good.

The center ring on the end shows to be the centering area which indicates the ends need to be trimmed before you do any 'roundish' work what so ever. Not seen the length you do need to take that into consideration and while most blanks would allow you some extra room for cut off's that can be a benefit in your case with this blank.
 

qquake

Member
Joined
Feb 8, 2004
Messages
5,015
Location
Northern California
I thought about using my chuck, but the problem with that is the round blue portion of the blank isn't centered in the rectangular red portion. But I'm not sure a spur drive would "bite" an acrylic blank enough. I don't know what to do.
 

Skie_M

Member
Joined
Aug 7, 2015
Messages
2,737
Location
Lawton, Ok
I would CENTER DRILL with a 1/8" bit into the middle of each end of the blank ... right in the middle of that blue ring as close to perfect as possible.

Then, I would turn it between centers ... I have a spurr drive with a center, and a live center ... turn it round and sand/polish so that I can see what I'm working with. A perfectly smooth cylinder without bumps is what I'ld want for the next stage.
 

edstreet

Member
Joined
Aug 12, 2007
Messages
3,684
Location
No longer confused....
In this case put it in the corner, ponder on it and wait. The only rush is to ruin the blank so hold for now until either understand it more or have a more direct purpose for it.
 

qquake

Member
Joined
Feb 8, 2004
Messages
5,015
Location
Northern California
I sanded both ends of the blank, and now you can clearly see both centers. They're definitely not centered.
 

Attachments

  • blank15.jpg
    blank15.jpg
    214 KB · Views: 193
  • blank18.jpg
    blank18.jpg
    172.7 KB · Views: 212
  • blank19.jpg
    blank19.jpg
    177.1 KB · Views: 223

edstreet

Member
Joined
Aug 12, 2007
Messages
3,684
Location
No longer confused....
OK, one proposal I am going to make is if you DO center the circles on either side then yes the blank will not be centered as its cut but will be with the circles. The question is this ..... What does the inside of the blank look like. If it's what I am thinking it is then you want to center the circles and go from there. Aligning the ends with the circles will put the rest in alignment. However if the rest of the blank is not uniform and / or consistent as you show in the photo's then all bets are off and it likely really does not matter much at all.
 

Skie_M

Member
Joined
Aug 7, 2015
Messages
2,737
Location
Lawton, Ok
I sanded both ends of the blank, and now you can clearly see both centers. They're definitely not centered.

Good, now drill a small 1/8" hole in the center of those rings and turn it round between centers... :)


Once you've done that, you can then cut it to length and drill your blanks right down the middle.
 

KenV

Member
Joined
Oct 28, 2005
Messages
4,720
Location
Juneau, Alaska.
Always the choices

Center the blank

Center the pattern desired. Sometimes offset from literal center is desired. Tibbetts calls it "lamination trickery".

Sometimes they are the same,
 

darrin1200

Member
Joined
Mar 17, 2010
Messages
1,854
Location
Lyn, Ontario, Canada
I use a steb centre all the time on my acylic blanks. It's actually why I bought it. Works great and you can line it up wherever you like. Take light cuts, to agressive and it will spin.
 

eharri446

Member
Joined
Mar 17, 2016
Messages
1,036
Location
Marietta, GA
Try using a starter bit, you can get a set of 5 or 7 bits from HF for $7, and see where it lands in the blank. That way you do not waste to much material.

Another option is to try and square it up on either a table or band saw.

I drill rectangular blanks quite often on my lathe using a NOVA G3 chuck with the Pen Plus jaws and a 1/2 drill chuck. For the most part they drill down the center.

Also, you could cut a piece of wood to the same dimensions and use that to try and see how best to drill the hole.
 
Last edited:

Skie_M

Member
Joined
Aug 7, 2015
Messages
2,737
Location
Lawton, Ok
Seriously ... drill a 1/8" starter hole EXACTLY where you want your centerpoint to be and turn it round.

Once it's round, you can use your dedicated pen blank drilling jaws or chuck it directly in a 3-jaw or 4-jaw chuck, cut it to the desired length, and drill it. It's really that simple.

There's no need to guess where your pen blank drilling jaws will develop the center once it's chucked up, and there's no need to fiddle with a tablesaw or bandsaw or drill press.


That appears to be an acrylic ... I would grab a carbide tipped tool and turn the RPM's up, starting with very light cuts till it's round.

My previous advice about sanding it and polishing it up to see what it looks like once it's round still stands ... I like to know what I'm working with.

I already said to put the center drill into the very center of the blue ring, but if you don't want it lined up exactly, that's up to you. You could even line one end up exactly and offset the other end, or offset both ends in opposite directions, or even offset them the same direction. It's up to you, but the first step is still to drill your centers where you want them and turn the blank round.
 

qquake

Member
Joined
Feb 8, 2004
Messages
5,015
Location
Northern California
I plan on using a center drill, as close to the center of the pattern on each end as possible. Then turn it round between centers. I'll probably cut it in half first.
 

qquake

Member
Joined
Feb 8, 2004
Messages
5,015
Location
Northern California
I obviously didn't cut it in the exact center of the blank, but I can clearly see where to put the center drill.
 

Attachments

  • blank21.jpg
    blank21.jpg
    186.4 KB · Views: 151
  • blank22.jpg
    blank22.jpg
    206.9 KB · Views: 150
  • blank23.jpg
    blank23.jpg
    159.6 KB · Views: 145
  • blank24.jpg
    blank24.jpg
    180.4 KB · Views: 168
Top Bottom