Turnin a set of Wedding Pens (Or Jumping into the Deep End)

Signed-In Members Don't See This Ad

CabinetMaker

Member
Joined
Mar 16, 2009
Messages
256
Location
Arvada, CO
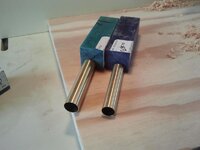
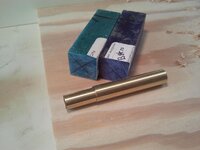
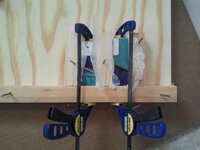
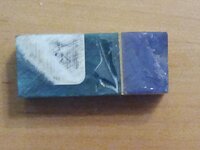
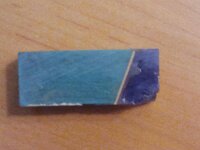
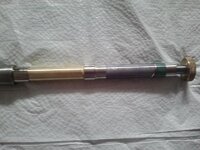
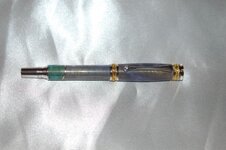
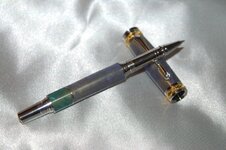
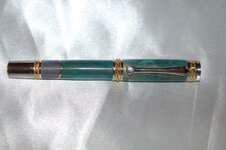
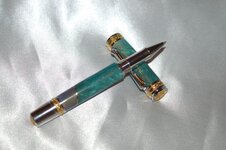
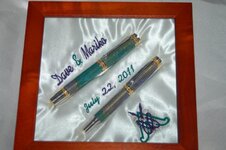
After gathering all my source materials I have started making my pens. Here is the concept for my pens. (Pretend that the orange is gold. It is the closest I could get with my marker set.) The green pen with purple highlight will be a Majestic and the purple pen with the green high light will be a Majestic Jr. Both kits are the 22k gold kits so that the brass between the two colors will tie in nicely with the pen. Neat idea or at least I think so. At least I thought so until I actually started to make them. The fact that I sketched these on an instruction sheet for the Majestic almost lead to a big error.
 

Attachments

  • Pen.jpg
    Pen.jpg
    42 KB · Views: 320
Signed-In Members Don't See This Ad

CabinetMaker

Member
Joined
Mar 16, 2009
Messages
256
Location
Arvada, CO
First Challenge

The first challenge came when I went to drill the bottom tubes. I was going to drill them and then cut the angles. I was then going to drill the brass separately and glue it all together on the pen tube. As I was setting up the drill press I got out the tubes to check to see how deep I needed to drill. At which point I noticed something that should have been painfully obvious from the get go - the tube diameters between the Majestic and the Majestic Jr. are not the same. Time to revise my drilling plan.
 

Attachments

  • 2011-04-10 14.32.01.jpg
    2011-04-10 14.32.01.jpg
    39.9 KB · Views: 131
  • 2011-04-10 14.32.57.jpg
    2011-04-10 14.32.57.jpg
    40.9 KB · Views: 110

CabinetMaker

Member
Joined
Mar 16, 2009
Messages
256
Location
Arvada, CO
I decided that I would have to cut the blanks and the brass and glue them together and then drill. Based on the responses from a thread where I asked about drilling brass, this was not my preferred option but I didn't seem to have any choice. So I cut everything, sanded it a bit and got out the 5 min epoxy. Here are the blanks in a little jig I used to keep things aligned while the epoxy set.
 

Attachments

  • 2011-04-10 15.37.27.jpg
    2011-04-10 15.37.27.jpg
    45.3 KB · Views: 199

CabinetMaker

Member
Joined
Mar 16, 2009
Messages
256
Location
Arvada, CO
Second Challenge

The planks came out of the jig okay so off to the drill press. The Majestic Junior blank drilled perfectly - no problem at all. The Majestic blank blew out. Nuts. It split into three pieces so I got out the 5 minute epoxy again an glued everything back together. My plan at this point is to continue with these blanks. I will glue the tubes in and trim the blanks up flush and square and start turning. I will see if the epoxy joints hold and then shine the pens up on the buffing wheels. If things don't work out I will turn the blanks off of the tubes and start over but at least finishing these blanks will help me learn how to turn the brass insert and see how Rhino Plastic turns. Fortunately, I have spare blanks so if all goes bad I can start over with the hard earned knowledge that only failure seems to bring. Still, its a fun challenge for me so I am not complaining, just learning.
 

CabinetMaker

Member
Joined
Mar 16, 2009
Messages
256
Location
Arvada, CO
Been a bit busy with school musicals and horse riding lessons and Westernaires and have been having trouble finding time to get to the shop.

I drilled the blanks and drilled the Majestic Jr. blank without incident. When I got to the Majestic blank I got a bit greedy and had a blow out. I glued it back together with epoxy. Part of it held and part did not so after carefully looking at how long the tube was I determined that I could cut the blank and have enough material to complete the pen. I cut it and it looks like it will work.

So the next step will be be to epoxy in the tubes and let those set until Saturday. With any luck, I will be able to get one pen on the lathe then.

Before any tool touches these blanks I will spending a few minutes at the grinder making sure the tool is sharp. The brass just looks thick to me so I want to have sharp tools and patience.

I am actually quite enjoying this process. I am trying to make each step very deliberately and I am learning a some new things as I go along. It is always nice to learn something new.
 

Attachments

  • 2011-04-21 07.47.22.jpg
    2011-04-21 07.47.22.jpg
    37.9 KB · Views: 111
  • 2011-04-21 07.47.51.jpg
    2011-04-21 07.47.51.jpg
    37.7 KB · Views: 120

CabinetMaker

Member
Joined
Mar 16, 2009
Messages
256
Location
Arvada, CO
I finally started turning. We had a stretch of bad weather that kept me out of the shop. I started with the Majestic junior and all went well. I was cleaning up with my skew chisel and had a catch. I blew out the upper blank. Bummer. But I had anticipated a few problems so I had ordered a spare blank. A quick cut, drill and a touch of epoxy and I was ready to go again.
 

Attachments

  • 2011-05-28 16.21.24.jpg
    2011-05-28 16.21.24.jpg
    55.8 KB · Views: 115

CabinetMaker

Member
Joined
Mar 16, 2009
Messages
256
Location
Arvada, CO
So here is the finished Majestic Junior. Since I was using a brass stripe I opted not to paint the barrels. I wont make that mistake again!

Comments and critique are welcome.
 

Attachments

  • DSC_3286.jpg
    DSC_3286.jpg
    66.2 KB · Views: 175
  • DSC_3290.jpg
    DSC_3290.jpg
    65.6 KB · Views: 136

CabinetMaker

Member
Joined
Mar 16, 2009
Messages
256
Location
Arvada, CO
And here is how the Majestic turned out. I am also starting to learn a bit about photographing pens. Comments and critiques are welcome.
 

Attachments

  • DSC_3288.jpg
    DSC_3288.jpg
    69.6 KB · Views: 161
  • DSC_3289.jpg
    DSC_3289.jpg
    67.6 KB · Views: 155

CabinetMaker

Member
Joined
Mar 16, 2009
Messages
256
Location
Arvada, CO
Finally, we needed a way to present the pens to the bride and groom. Since we did not engrave the pens, we came up with a nice presentation box. The box came from Penn State and the embroidery was accomplished by me lovely bride and my daughter. The colors of the wedding are amethyst purple and emerald green.

Overall, I am pleased with my very first attempt at a project of this scope. The pens are for my niece and her fiancee and they will love them (I hope). I learned a lot and still have a lot to learn.
 

Attachments

  • DSC_3285.jpg
    DSC_3285.jpg
    58.4 KB · Views: 193

KenV

Member
Joined
Oct 28, 2005
Messages
4,720
Location
Juneau, Alaska.
Good outcomer with some learning along the way -- I am sure that they will be well received -- Nice set of pictures.
 

BSea

Member
Joined
Dec 28, 2009
Messages
4,628
Location
Little Rock, Arkansas
Those look great, and coincidentally, my daughter's wedding is June 18th, and she's using the same colors. So if it's not too much trouble, could you make a set for me? I'll be glad to supply the blanks & kits. :wink:

But to be serious, those look great.
 
Last edited:

CabinetMaker

Member
Joined
Mar 16, 2009
Messages
256
Location
Arvada, CO
Those look great, and coincidentally, my daughter's wedding is June 18th, and she's using the same colors. So if it's not too much trouble, could you make a set for me? I'll be glad to supply the blanks & kits. :wink:

But to be serious, those look great.
As much as it pains me to say this, I must, regretfully, say no. I will offer you lots of encouragement to turn a set up yourself! It was fun and I really liked the Majestic pen kits.
 

CabinetMaker

Member
Joined
Mar 16, 2009
Messages
256
Location
Arvada, CO
Not bad, but I hope you don't end up kicking yourself in the butt later for not painting the tubes. I really like the display!
There are a couple of things about the pens that I will always know about and not be pleased with every time I see them. But that seems to be the nature of wood working. No matter how well the project appears in the eyes of others, we ALWAYS know and remember the flaws.
 
Top Bottom