Trouble to accemble cap for Cambridge pen

Signed-In Members Don't See This Ad

VotTak

Member
Joined
Jan 4, 2015
Messages
214
Location
Staten Island, NY, USA
Hi there.
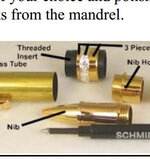
I'm having difficulties to put together threaded insert into the center band.
The only way it supposed to be inserted is the way that threaded insert will be at the end of insert ring... But it does not allow to push it in .... Instructions are talking about some kind of "wooden push block" ... but diameters of plastic insert next to thread which i'm trying to put in smaller end is not working.
Can someone come up wit clear picture? Coz instructions are not good at all.
 
Signed-In Members Don't See This Ad

Mr Vic

Member
Joined
Aug 11, 2008
Messages
1,865
Location
Falcon, CO
I presume you're taking about a Fountain/Rollerball pen? Here's a link to Woodcrafts instructions. Even thought the kit if from Berea the Woodcraft instruction s are clearer. Are you referring to pressing J through E,F & E and into tube L? Depending on the components this can be a snug fit and don't always just slide on but will slide on when you press in the insert. Go slow and easy checking alignment often.

http://www2.woodcraft.com/PDF/77C76.pdf
 
Last edited:

Fireengines

Member
Joined
Jan 22, 2012
Messages
540
Location
Plano, TX
I've never made this pen but in the past with other kits, I found the inside of the tube was not clean. All it takes is a small amount of glue to stop the assembly.
 

ed4copies

Local Chapter Manager
Joined
Mar 25, 2005
Messages
24,527
Location
Racine, WI, USA.
There are two designs to the Cambridge. Be certain the instructions you are using are for the "kit" you are using.

I have checked Exotics, it appears you did not purchase it from us, so I don't know what you have, can't give you more specific help.

Ed
 

VotTak

Member
Joined
Jan 4, 2015
Messages
214
Location
Staten Island, NY, USA
Ed I got it from Bereahardwoods. Instructions from there as well.
It is not about putting it in the tube... it is about assemble threaded insert with 3-piece center band.
this is a part which does not work:
"10. Slide the gold center band base onto the black threaded insert from the small end
of the insert. The large end of the base should face the large end of the insert.
11. Using a wooden push block on top of the gold base, with a 33/64" hole drilled in
it, that's the one you used to drill the short blank with, press the gold base flush
with the large end of the threaded insert. "

What is meant by large end on threaded? and on ring? picture would speak louder than words.
 
Last edited:

Mr Vic

Member
Joined
Aug 11, 2008
Messages
1,865
Location
Falcon, CO
Look at the good center band - one end is a bigger outside diameter, the other is smaller and the trim rings will fit over it. That's the end you to slip over the plastic insert and press flush. The left side of the pic is the small OD, the right side has not been pressed flush only slipped in. Your wood block would go on the left end and press the center band onto the threaded insert. When flush you should not see the plastic on the right hand side...
 

Attachments

  • Cambridge_1.jpg
    Cambridge_1.jpg
    18.5 KB · Views: 160

ed4copies

Local Chapter Manager
Joined
Mar 25, 2005
Messages
24,527
Location
Racine, WI, USA.
Ed I got it from Bereahardwoods. Instructions from there as well.
It is not about putting it in the tube... it is about assemble threaded insert with 3-piece center band.
this is a part which does not work:
"10. Slide the gold center band base onto the black threaded insert from the small end
of the insert. The large end of the base should face the large end of the insert.
11. Using a wooden push block on top of the gold base, with a 33/64" hole drilled in
it, that's the one you used to drill the short blank with, press the gold base flush
with the large end of the threaded insert. "

What is meant by large end on threaded? and on ring? picture would speak louder than words.

IF that does not work, it is highly probable you have the other style pen. They made a minuscule change to the product number, and even that is not consistent, so the only way I can make an educated guess at your problem is to SEE the kit parts YOU have. So, as you suggest, post a pic of the assembly YOU have.
 

VotTak

Member
Joined
Jan 4, 2015
Messages
214
Location
Staten Island, NY, USA
Thank Vic, it works that way.
Thanks Ed.
After I pushed everything as per Vic's suggestion I got to the point where instructions said:
"19. One other adjustment. If your pen looks like this(Image here I'm skipping)
when finished, with the nib holder showing below the center band, then place the cap
on the pen and push downward slightly to hide the nib holder."
I'd say every pen will need that adjustment, meaning that plastic threaded part needs to be pushed slightly deeper into the center ring on every assembly.
Anyway, I really appreciate Vic's and Ed's help and guidance.
 
Top Bottom