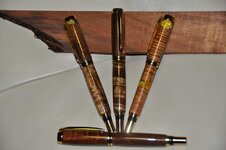
Tips on acrylic joined to wood?

Signed-In Members Don't See This Ad

hagemierj

Member
Joined
Jan 20, 2014
Messages
47
Hey guys,

I have a "new turner" question regarding acrylics. You know how YouTube makes everything seem so easy? Well, I was inspired to take a crack at throwing some "bling" into some pens I'm making. I used 5-minute epoxy and joined up some acrylic/wood pen blanks I plan to turn tomorrow.

I squared up the segments, roughed up the sides to be joined with sandpaper, mixed epoxy in the measurements via package instructions, joined/clamped material for 15 mins or so each, and have the blanks sitting overnight to finish hardening.

Here's the question, what tips do you have on drilling, turning or sanding that might keep me from making simple yet significant mistakes (assuming it's not already too late for that)? :rolleyes:

Thanks in advance for your inputs!

J
 
Signed-In Members Don't See This Ad

plantman

Member
Joined
Jan 2, 2012
Messages
3,437
Location
Green Bay, Wi
When you drill your blanks, wrap them in Duct Tape to keep them from splitting, and drill slowley using progressively larger drills. Heat is your enemy. I would also go with thick CA glue and use an acceleraror to join your pieces . No waiting until tomorrow to drill or turn!!!! Jim S
 
Last edited:

TimS124

Member
Joined
Apr 11, 2012
Messages
735
Location
Asheville, NC
Glue on more wood than you need and don't drill past the bottom…helps avoid blowing out (same basic principle works for all-acrylic blanks as well…"drill short" then trim the excess).

The acrylic is likely harder than the wood so expect to use lighter/shallower cuts and expect the "feel" to change as your cutting edge transitions between the two materials.

Beyond that, experiment and enjoy the learning experience.
 

robutacion

Member
Joined
Aug 6, 2009
Messages
6,514
Location
Australia - SA Adelaide Hills
Well, great advice so far..!

Wrapping the blank with a few layers of a strong tape (non-stretchy), is a major help.

The advice on drilling is good, just make sure the drill bit is really sharp.

And as for turning it, 50% or more, of failures with segmented blanks, are due to catches, whole turning, with the one going from square to round as one of the most critical however, different material densities/hardness can be tricky for the less experience person.

There is no reason why you can't be successful turning it, with the normal or even carbide tipped tools BUT, if you would prefer to do it with less risks to blow the blank into bits, you can always try use the Flap Disc System, you don't need much, and you can re-use it over and over, have a look here and see it it "fancies your boat"...!

If in any doubts with it, just ask...!:wink::biggrin:

Best of luck,

Cheers
George
 

Pjohnson

Member
Joined
Feb 16, 2012
Messages
278
Location
Plympton, MA
the following answer depends on two things:
- How you have segmented the blank
- You method of drilling/accuracy

I drill on the lathe using a sled that moves the piece into the drill which is mounted on the headstock. This gives me a consistant hole as long as my blank is square.

Before drilling through the blank, I start a hole at one end - drill approx 3/16" and then flip the blank and drill through. This method and the use of a backer board limits the chance of tear out when the bit emerges from the blank.

Another suggestion is to clear the bit multiple times during the drilling. I have found this reduces some of the heat from friction.

Good luck!
 

hagemierj

Member
Joined
Jan 20, 2014
Messages
47
Well, great advice so far..!

Wrapping the blank with a few layers of a strong tape (non-stretchy), is a major help.

The advice on drilling is good, just make sure the drill bit is really sharp.

And as for turning it, 50% or more, of failures with segmented blanks, are due to catches, whole turning, with the one going from square to round as one of the most critical however, different material densities/hardness can be tricky for the less experience person.

Failures... 2 for 3, both failures on end pieces that caught while going from square to round. Interestingly enough, the one piece that held was a center piece. I ended up giving the pieces a new sanding with courser grit, re-gluing with medium CA, then knocking off the edges of the square on the sander.

Turning... I'm hooked, I loved how smoothly the acrylic shaped once round and found the transition between materials to be less abrupt than expected, just needed to be smooth and consistent with the pressure.

Finishing... Coat of thin CA, repeated coats of medium CA, no sanding until done with CA application (I apply with lathe off and hand turn... can't seem to get it right with the lathe on and hand turning just works for me when I combine with quick back and forth motion to apply). Sanded from 220 to 600, jumped to micro mesh and ended with polish Hut polish liquid. Polish was clean and glossy across the whole piece..... simplicity!

Great advice and good opportunities to learn from mistakes made an interesting idea into beautiful pens... thanks to all responders, and I'll post pics of the finished pens when I get the last few done!!

J
 

hagemierj

Member
Joined
Jan 20, 2014
Messages
47
Here's what came from my time at the lathe.
 

Attachments

  • Pens.jpg
    Pens.jpg
    182.7 KB · Views: 222

Jim Burr

Banned
Joined
Feb 23, 2010
Messages
3,060
Location
Reno, Nv
Having done dozens of these, some do great with CA and others with epoxy. As mentioned, do not let it heat up!! Try to round over the corners in whatever fashion you deem satisfactory. YMMV...but carbide works well for me. MAKE SURE you cover up!!! Last thing you need is a joint failure smacking you in the face regardless of the speed.
Oh!! and when you hear that "tap, tap, tap" you have a failure...time to get the CA out!
 
Last edited:
Top Bottom