Slight Chip At End Of Turned Blank - What To Do?

Signed-In Members Don't See This Ad

pauly99

Member
Joined
Oct 27, 2012
Messages
96
Location
Montgomery, IL
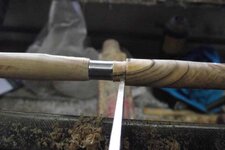
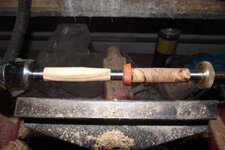
I just turned my 3rd pair of blanks (ever) and made what I thought was a nice shape (for lack of knowing the correct term) with the soft poplar. Well unfortunately one of the pair of planks has maybe 3 slight chips of maybe 1/64th or so of an inch at the end. I'm assuming it happened because I may have tightened the nut a little bit too much and the pressure caused the problem. I don't believe it happened with the skew.

So my question. Is there any way that I could take some of the shavings and somehow fix the damaged end of the blank? If so, how would that be done.. ie what type of glue/epoxy, and then would I sand it out?

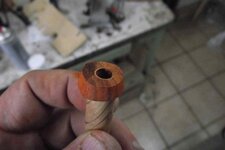
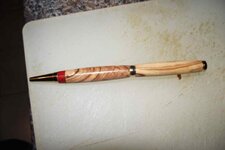
At maybe 1/64th of an inch or so, if this is for my own use and I didn't attempt to fix the blank, would I be able to see the brass if I put the pen together "as is"?
 
Signed-In Members Don't See This Ad

walshjp17

Member
Joined
Jul 29, 2012
Messages
3,418
Location
Weddington, NC
Put a bit of the shavings in the voids and then drip in a few drops of CA. Hit it with accelerator and then, after a few minutes to catch your breath, return that area.
 

Lenny

Member
Joined
Jan 6, 2009
Messages
3,475
Location
Searsport, Maine
Depending on what kit you are making you may be able to just shorten the blank. Most 7mm kits are forgiving when it comes to tube length. If you only need to remove 1/64" I would try sanding it back with a tool like rherrell sells or you can make your own by reversing the barrel trimmer on it's shaft and applying some sticky back sandpaper. A regular paper punch will create a suitable hole in the sandpaper.
 
Joined
Oct 11, 2011
Messages
534
Location
Monterrey Mexico
What I do in these cases, I cut a small band where the chip is. Just enough to get rid of the chip. Think making a tenon, but get rid of all the wood down to the tube. Then take a contrasting blank and drill a hole just a bit deeper than the width of your cut. Cut and glue to your blank. Trim and turn to size. You will get a nice looking band.
Hope this makes sense.
 

pauly99

Member
Joined
Oct 27, 2012
Messages
96
Location
Montgomery, IL
Makes me wish I had a few of these blanks with chips so that I could give each method a try. Because I saw the first response and also received and email from a former IAP member telling me to do the same thing, I put a mixture of CA glue and shavings on the end of the blank which covered the chips. After sanding, the result is no more chips albeit a slightly off-color look. Hoping this may fade away a little with the finishing.

I like what you are saying Lenny and I think I should set myself up that way if this were to happen again. Although I'm a newbie and am not familiar with rherrell, I have seen a video showing someone sanding the end of a blank similar to what you have mentioned.

Ulises, I would have to see a video to put in my head what you are describing. Otherwise if I tried this on my own with my limited knowledge (tenon and such), I'm afraid I would have a gap between my current blank and the band that I would be creating.
 

Lenny

Member
Joined
Jan 6, 2009
Messages
3,475
Location
Searsport, Maine
Rick (rherrell) is a member here and last I knew makes a sanding tool for "touching up" the ends of your blank prior to assembly. This one step will ensure your pens fit nicely to the components and is something I do on every pen.
 

Randy Simmons

Member
Joined
Jun 28, 2012
Messages
395
Location
Cary, NC
Rick (rherrell) is a member here and last I knew makes a sanding tool for "touching up" the ends of your blank prior to assembly. This one step will ensure your pens fit nicely to the components and is something I do on every pen.

Lenny,

His sanding mills are great, but I believe (unless he has changed his design) that you will need collet chuck to use it. I second your idea to reverse the cutter head. That's a tool anyone has and it's easy to do.
 

Lenny

Member
Joined
Jan 6, 2009
Messages
3,475
Location
Searsport, Maine
Rick (rherrell) is a member here and last I knew makes a sanding tool for "touching up" the ends of your blank prior to assembly. This one step will ensure your pens fit nicely to the components and is something I do on every pen.

Lenny,

His sanding mills are great, but I believe (unless he has changed his design) that you will need collet chuck to use it. I second your idea to reverse the cutter head. That's a tool anyone has and it's easy to do.

No reason you would HAVE to use it in a collet chuck .... a portable drill works. The shaft will keep it stable and 90 degrees to the tube. :)
 

pauly99

Member
Joined
Oct 27, 2012
Messages
96
Location
Montgomery, IL
Lenny, thanks for the advice. I'll head off to the big box store tonight to find some sticky sandpaper across several different grits and then flip over the barrel trimmer that I have to give it a try.
 
Joined
Oct 11, 2011
Messages
534
Location
Monterrey Mexico
Ulises, I would have to see a video to put in my head what you are describing. Otherwise if I tried this on my own with my limited knowledge (tenon and such), I'm afraid I would have a gap between my current blank and the band that I would be creating.

Pauly99 I have no means to make a video, but I hope these photos are self explanatory. If they aren't, please ask!
I HAD to make this band today because a chip in one of my BOW blanks.
 

Attachments

  • bandmaking 001.jpg
    bandmaking 001.jpg
    40.5 KB · Views: 134
  • bandmaking 002.jpg
    bandmaking 002.jpg
    43.2 KB · Views: 136
  • bandmaking 003.jpg
    bandmaking 003.jpg
    44.5 KB · Views: 139
  • bandmaking 004.jpg
    bandmaking 004.jpg
    39.3 KB · Views: 129
  • bandmaking 005.jpg
    bandmaking 005.jpg
    32.3 KB · Views: 127
  • bandmaking 006.jpg
    bandmaking 006.jpg
    62.1 KB · Views: 152
  • bandmaking 008.jpg
    bandmaking 008.jpg
    33.1 KB · Views: 200
Last edited:

Karl_99

Member
Joined
Aug 20, 2012
Messages
1,672
Location
Winfield, PA
I like that idea. I will give it a try. I have wanted to try experimenting with wooden bands as an alternative to the metal bands.
 

pauly99

Member
Joined
Oct 27, 2012
Messages
96
Location
Montgomery, IL
Ulises, thank you for posting those pictures. Yes, I can understand how that is done now and the nice thing is that it does give options. I'm assuming some CA glue to secure the band to the blank?
 

BSea

Member
Joined
Dec 28, 2009
Messages
4,628
Location
Little Rock, Arkansas
Makes me wish I had a few of these blanks with chips so that I could give each method a try.
Don't worry, you'll have lots of opportunity. DAMHIKT:rolleyes:

I'm all for using rings or even an inlay material. I tend to accent the problem rather than try & hide it. If you try and hide a mistake or just a bad spot in the blank, it always seems to stick out like a sore thumb. At least it will to you. However, if it's something like a slimline, then as others said, just remove the small part and make a shorter pen.

Besides, you learn so much from rescuing a damaged blank. Even if you can't recover, it gets the creative juices flowing, and you come up with new ideas & techniques. And that's the fun of it. At least for me.
 

Hendu3270

Member
Joined
Mar 13, 2012
Messages
919
Location
Pearland, Texas
I'm all for using rings or even an inlay material. I tend to accent the problem rather than try & hide it. If you try and hide a mistake or just a bad spot in the blank, it always seems to stick out like a sore thumb. At least it will to you. However, if it's something like a slimline, then as others said, just remove the small part and make a shorter pen.

Besides, you learn so much from rescuing a damaged blank. Even if you can't recover, it gets the creative juices flowing, and you come up with new ideas & techniques. And that's the fun of it. At least for me.

This is what got me into doing inlays. Had a sizable chip come off the end of a Eucalyptus Burl blank while turning and ended up filling in with CA and paprika. Figured the paprika would add just a little bit of color and look really neat. The color ended up so dark it just looked like part of the wood. BUT, I learned to fill voids in that process and it pushed me in the direction of adding my colored inlays to voids or damaged woods to show off the unique characters of the burls I've been turning.:wink:
 
Top Bottom