Segmenting? How did you do that?

Signed-In Members Don't See This Ad

tbfoto

Member
Joined
Dec 16, 2009
Messages
320
Location
Lafayette, Indiana
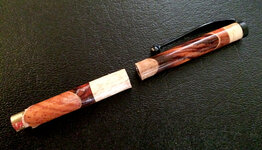
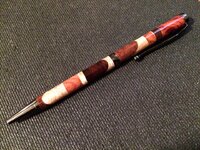
I want/need to take my pen turning to another level. Most all of my pens are pretty boring. I have so many wood blanks that are...well boring. Recently I got to see the IAP Pen Collection. Amazing work. I have no dreams of being able to do that at this point but while looking at them I see alot of segmenting of different woods together and that is something I've never done. So now while looking at all the segmented pens posted here I have to wonder....How did you come up with that design? Did that come to you in a dream or influnced by some powerful drugs? I'm beyond impressed with this kind of turning but I'm not able to "see" the design in my head. Is there a science to it or just mad luck?
 
Signed-In Members Don't See This Ad

jttheclockman

Member
Joined
Feb 22, 2005
Messages
19,132
Location
NJ, USA.
Tom

There is no secret formula for segmenting. There are articles in the library explaining and even tutorials how to do some of these works. You get inspiration from many sources. I like to surf the web and use google. I get the Pen World magazine. But a very good place to start your adventure is in the blank making forum under the sub forum segmenting.

Here is a thread started a few years ago and it was designed to give inspiration and also to document some of the segmented pens that have gone through here. http://www.penturners.org/forum/f179/no-comments-just-post-new-segmented-pens-likes-111419/

If you have questions that is the forum to ask them. It is designed specifically for the segmented pen.
 

Paul in OKC

Member
Joined
Jul 26, 2004
Messages
3,090
Location
Oklahoma City, OK, USA.
My first 'segmented' pen was a bunch of cut offs glued together. Came out pretty cool. Then cut a few different woods with a bit of an angle to each and did the same. I don't have the vision some of these guys do in what they see a blank looking like, but ya got to start some where!
 

cmiller

Member
Joined
Nov 23, 2015
Messages
111
Location
Eugene, Oregon
Hi, no rules that I know of, just whatever looks fun. I've only done one (see attached picture) which was a fail--let me explain: Everything went great with the gluing and turning and finishing. The end blew up when I tried to press the pen tip in. Frustrating.

But here's what I learned from this one attempt:
- on this one my cut angles allowed the entire blank stays straight. My only other attempt at segmenting failed because the angles of the pieces weren't right and the blank kind of leaned and I couldn't get a good hole for the tube
- I found that turning the pen was more difficult because the different species of woods behaved differently under the tools. I had to be careful transitioning from one to the next as I ran my cutting tool across.

These are fun, I'm going to do more. Good luck with yours.
 

Attachments

  • segmented-blowup.jpg
    segmented-blowup.jpg
    405 KB · Views: 238

tbfoto

Member
Joined
Dec 16, 2009
Messages
320
Location
Lafayette, Indiana
Can you all tell me about using aluminum pop can material? I watched one video where it was being used and it looks nice and I understand its effect however the person doing the video said to be sure the printing of the pop can had to face the outside of the blank but did not explain why that is. I wouldn't think any of the printing would show. So does it really matter which side faces the outside of the blank?????
 

jttheclockman

Member
Joined
Feb 22, 2005
Messages
19,132
Location
NJ, USA.
Can you all tell me about using aluminum pop can material? I watched one video where it was being used and it looks nice and I understand its effect however the person doing the video said to be sure the printing of the pop can had to face the outside of the blank but did not explain why that is. I wouldn't think any of the printing would show. So does it really matter which side faces the outside of the blank?????


You would do so much better if you get some roof flashing from Home Depot. It comes in rolls and is inexpensive. With any cans you have to worry about getting the residue off or you do not get a good glue bond.
 

plantman

Member
Joined
Jan 2, 2012
Messages
3,437
Location
Green Bay, Wi
I sometimes start out a design with graft paper and colored pencils. Use the quarter inch squares to map out a design you like and add the colors that look good together. This will give you your size and places to cut for your blank. I sometimes also use one of my PC programs to design, as this gives me a full scale 360 degree view of my finished turned blank, plus I can change the colors or cut lines with the click of the mouse. As John T said, there is a large amount of information on this site and on you tube to give you ideas. Sometimes you can make up a fairly simple blank, and after cutting, rotate the segments slightly to get a bricked or other interesting effect. If you introduce any type of metal into your design make sure you rough up the surface on both sides with sandpaper or the two unlike surfaces may not stick together. The only limit to what you can do is you yourself !1 Here is an example of a rotated brick effect I had done several years ago. Start with something simple using scrap woods and dyes/inks to add color and work you way up. Jim S
 

Attachments

  • DSCF0023 (350x640).jpg
    DSCF0023 (350x640).jpg
    169 KB · Views: 241
Last edited:

cmiller

Member
Joined
Nov 23, 2015
Messages
111
Location
Eugene, Oregon
Here's Take 2 on the segmented pen. Burmese blackwood, Burmese redwood, and maple (no, not from Burma, from my back yard in Oregon).

Not sure I'm 100 percent happy with it, I was hoping the maple would be whiter. And maybe it's just too busy overall. I'd be interested in your opinions and maybe people could post some wood combinations that they think would work well together.

Sorry the picture's not great. Just took a quick pic with my iPhone.
 

Attachments

  • segmented.jpg
    segmented.jpg
    415.4 KB · Views: 159

jttheclockman

Member
Joined
Feb 22, 2005
Messages
19,132
Location
NJ, USA.
Here's Take 2 on the segmented pen. Burmese blackwood, Burmese redwood, and maple (no, not from Burma, from my back yard in Oregon).

Not sure I'm 100 percent happy with it, I was hoping the maple would be whiter. And maybe it's just too busy overall. I'd be interested in your opinions and maybe people could post some wood combinations that they think would work well together.

Sorry the picture's not great. Just took a quick pic with my iPhone.


My thoughts are that pen is way too busy with too much of a mish mash of cutoffs. Now if that is the look you were going for then it works but what I like to do is have a theme. Keep symmetry throughout the pen both top and bottom if a 2 piece. The eye is trained to look for this. As far as combinations go you get into trouble when mixing heavy grained woods or burls with grained wood. You need woods that compliment each other. Light ---dark But the grain patterns can not fight each other. Use a heavy grained wood with a mute wood such as ebony or holly on the other end of the spectrum. The use of accent pieces such as metals or acrylics or even veneers to divide the woods is a great look. just look at some of the celtic knots shown. Just some of my thoughts. :)
 

KenV

Member
Joined
Oct 28, 2005
Messages
4,720
Location
Juneau, Alaska.
There are two polar perspectives on segmentation.

One is symmetrical

The other is asymmetrical.

One of the classic pens towards the asymmetrical is one named "Morning After". There is a tutorial and a number of interpretations in the gallery.

Both are good, but tend not to appeal to those of the opposition taste.
 

jttheclockman

Member
Joined
Feb 22, 2005
Messages
19,132
Location
NJ, USA.
By the way maple will never be white. It will always have a tan tint to it and depending on the finish it could even have a yellow tint. If you want pure white Holly is the answer there. Or acrylic. Now you can lighten maple if you bleach it but the tannin in it will not allow pure white.
 

cmiller

Member
Joined
Nov 23, 2015
Messages
111
Location
Eugene, Oregon
Good thoughts, thanks. I especially like JT's observation that you need contrast in grain as well as color, I think that's some of what bothers me with this example. I was going to look for some Holly. Madrone is also light-colored wood with a soft grain--and I have plenty of that.

Ken, I'd like to see the Morning After sample. I'm looking and can't find it. Still new to the site and don't know my way around yet.
 

jttheclockman

Member
Joined
Feb 22, 2005
Messages
19,132
Location
NJ, USA.
Ken brings up those examples but again there is a theme to his pens. You can say they are asymmetrical but to me they are symmetrical. His use of the soft grained woods is apparent. You do not want the woods to fight each other.
 

cmiller

Member
Joined
Nov 23, 2015
Messages
111
Location
Eugene, Oregon
Ken, thanks for the link. His work is beautiful.

Notscottish, that is one wild pen. And I thought mine was busy. Yours looks like a ton of work, it must have taken forever. I bet you have mixed opinions on it, but it looks like you're working something out and I say go for it. Well done.

I'm still interested in people's specific opinions about which woods would work well together. After my last try I'm thinking of trying a cocobolo-madrone combo.
 
Top Bottom