Segmenting with Aluminum

Signed-In Members Don't See This Ad

brownsfn2

Member
Joined
Jun 23, 2011
Messages
1,574
Location
Plain City, OH
I have been trying segmenting and tonight is my fourth attempt (first three were sadly lost). I have been using lighter wood and when I sanded the other night grey sanding dust went from the aluminum right into the wood. Is there anyway to avoid this? Any tips out there?
 
Signed-In Members Don't See This Ad

jfoh

Member
Joined
May 27, 2007
Messages
390
Light, open porous woods can be sealed with thin CA before sanding. Might need to repeat as you sand. Use air to blow the AL dust off often and use clean sand paper.
 

leehljp

Member Liaison
Joined
Feb 6, 2005
Messages
9,329
Location
Tunica, Mississippi,
For me, I made sure that my scraper chisel was very sharp. In other words, I spent 10 to 15 minutes or more making sure it was mirror sharp or scary sharp as some say. Then I turned the blank to size with the scraper taking very small bites. If you practice with this, you can make the segmented blank, both wood, resin and or aluminum as smooth as if it were sanded with 600 sandpaper.

From this point, CA the blank without using sandpaper.

FYI, there may be some who may say it can't be done, but that is their "opinion" and their loss for not trying. DAMHIKT. I do have some picts where CA was applied to blanks where SP never touched it and the wood is smooth underneath.
 

brownsfn2

Member
Joined
Jun 23, 2011
Messages
1,574
Location
Plain City, OH
My trial failed again last night. It seems like my Unitool (bigger pen pro) keeps catching on the aluminum and breaks the blank. I can get down to almost finished size and sometimes get one half of the pen done but the other half blows up. I am starting to wonder if the aluminum I selected (flashing from the hardware store) is too hard. I have wood, aluminum, Acrylic, Aluminum, and wood in a blank sandwhich. A really simple glue up. I just can't make it work. I might have to go back to pop cans. :)
 

t001xa22

Member
Joined
Jun 17, 2011
Messages
441
Location
Arlington, TX
I don't know if this will help, but I used a plain thin strap of aluminum (1/16") from Lowes to make the inserts in this segmented pen. Admittedly, I was using leather instead of wood, but I had a challenge to keep the leather stabilized enough to progress down the turning. As long as I kept re-stabilizing the barrel, I didn't have much problem carving both the leather and the aluminum. I was using my basic HSS chisels, but had to keep re-honing them often. Based on what the strap felt like cutting and shaping it, I would guess it to be about T3 temper.
 

Attachments

  • Leather Aluminum Sierra2.jpg
    Leather Aluminum Sierra2.jpg
    13.1 KB · Views: 295

glycerine

Member
Joined
Aug 7, 2009
Messages
3,462
Location
Fayetteville, NC
As others have said, seal the wood before you sand, but I have also had luck using denatured alcohol and a toothbrush to "scrub" out the aluminum dust...
 

Mike D

Member
Joined
Jan 4, 2005
Messages
295
Location
Battle Ground Washington
I agree with Glycerine. I only have limited experience with metal and wood pens but other wood projects where I've had aluminium inlayed into the wood after sanding wipe down with denatured alcohol and that usually takes care of the metalic dust fouling the wood.
 

LarryE

Member
Joined
Mar 27, 2011
Messages
22
Location
Tigard, Oregon
I agree with everything said so far - stabilize, sharp tools, light passes. Having said that, I have a stack of blown blanks - stuff happens - keep trying.
 

BSea

Member
Joined
Dec 28, 2009
Messages
4,628
Location
Little Rock, Arkansas
One thing to consider that I didn't see mentioned, is to slow down. Heat will cause the glue to fail, and AL is a great conductor of heat. So work in a area, then give it a break and work on another area. And take a break yourself, and let everything cool off from time to time.
 

brownsfn2

Member
Joined
Jun 23, 2011
Messages
1,574
Location
Plain City, OH
Thanks for all the advice. I found a piece of brass in the basement that is thinner than what I was working with so I may try that tonight.

What about tin? It seems really soft and I could probably go thicker. I really like the look of the metal with the wood and acrylic. (ran of scrap acrylic last night though so I am going to do all wood with Brass tonight).

Thanks again!
 

t001xa22

Member
Joined
Jun 17, 2011
Messages
441
Location
Arlington, TX
I hope you have luck with the brass. I have found that typically brass of the same given thickness as aluminum is usually of a higher strength or temper. I tried turning some from the same source store at 1/2 the thickness of the aluminum I had used, and the brass was too tough on my tools. If you want an interesting contrast color, you might consider copper. I took a piece of 1/2" pipe, mashed it flat, and turned it. It cut very easily. Once it is encased in a seal coat, i.e. CA, etc., it should arrest any potential tarnishing.
 

brownsfn2

Member
Joined
Jun 23, 2011
Messages
1,574
Location
Plain City, OH
I might try copper. That sounds like a good idea.

My attempt with the Brass was successful! The woods I picked were scrap so they were not attractive enough to make into a pen.

It came to me as I was turning the blank that the same thing was happening that happened all the other times. I could hear and feel the carbide occasionally catch at the brass strip. I tried to take lighter and lighter passes but it would still catch.

At one point I mistakenly addressed the tool to the blank on an angle and realized the tool had less catches. I tried another pass with the tool edge at 45 degrees to the blank. So instead of this "--" horizontal the tool was "/". The shaft of the tool was still level at 90% just rotated. This seems to work really well. It was almost like changing from scraping to a more slicing cut or something you might do with a skew. I no longer was getting catches and was able to turn to final size without so much worry of a blow up.

I am not sure if this method is the correct way to use the woodchuck tool but it seems to work well. It is a less agressive cut and certainly allowed me to turn the brass with the wood without any catches.

I am going back to the aluminum and will try some better looking materials tonight.

Thanks again for all the help!
 

glycerine

Member
Joined
Aug 7, 2009
Messages
3,462
Location
Fayetteville, NC
I might try copper. That sounds like a good idea.

My attempt with the Brass was successful! The woods I picked were scrap so they were not attractive enough to make into a pen.

It came to me as I was turning the blank that the same thing was happening that happened all the other times. I could hear and feel the carbide occasionally catch at the brass strip. I tried to take lighter and lighter passes but it would still catch.

At one point I mistakenly addressed the tool to the blank on an angle and realized the tool had less catches. I tried another pass with the tool edge at 45 degrees to the blank. So instead of this "--" horizontal the tool was "/". The shaft of the tool was still level at 90% just rotated. This seems to work really well. It was almost like changing from scraping to a more slicing cut or something you might do with a skew. I no longer was getting catches and was able to turn to final size without so much worry of a blow up.

I am not sure if this method is the correct way to use the woodchuck tool but it seems to work well. It is a less agressive cut and certainly allowed me to turn the brass with the wood without any catches.

I am going back to the aluminum and will try some better looking materials tonight.

Thanks again for all the help!

I tend to hold mine that way as well. I have a homemade carbide insert tool made out of round stock instead of square stock. I like the fact that it's round for this very reason. Sometime it also helps to use the corner of the bit instead of the flat face...
 

t001xa22

Member
Joined
Jun 17, 2011
Messages
441
Location
Arlington, TX
I spent 39 years as a sign fabricator, using various media but mainly vinyls. I can tell you that anytime you are using a sharp edge to address a surface, a slicing action is always much more efficient and safer than a flat approach. Over the years, I had to remove many square feet of vinyls on surfaces that I didn't want to damage any more than necessary; this is why I always used a slicing action.
 

leehljp

Member Liaison
Joined
Feb 6, 2005
Messages
9,329
Location
Tunica, Mississippi,
I spent 39 years as a sign fabricator, using various media but mainly vinyls. I can tell you that anytime you are using a sharp edge to address a surface, a slicing action is always much more efficient and safer than a flat approach. Over the years, I had to remove many square feet of vinyls on surfaces that I didn't want to damage any more than necessary; this is why I always used a slicing action.

A skew does do a better job at "slicing." I have tried and tried learning a skew and even bought one of those high priced DVD videos as a training tool. After quite a few hours almost daily over several weeks and continuing over months of nothing but "practice", I never got consistent with it. As a result, I still do more "Shearing" than slicing, even with metal (mostly brass) segments.

Having said that, there are different times to use "Slicing" vs "Shearing", even in segments. In this link, click here, on the 7th post down, Russ Fairfield does a good job of explaining how the different actions/tools affect the end results. Scrapers do better at shearing and give smoother results on hard woods and terrible on soft woods and softer material such as resin/plastic. Skews do better on softer woods / material over all.

I used a shear / scraper to achieve such a smooth cut that I did not need to sand - which was the intent of learning this method for segments (on hard woods) with metallic content.


In response to brass and other metals as mentioned above:
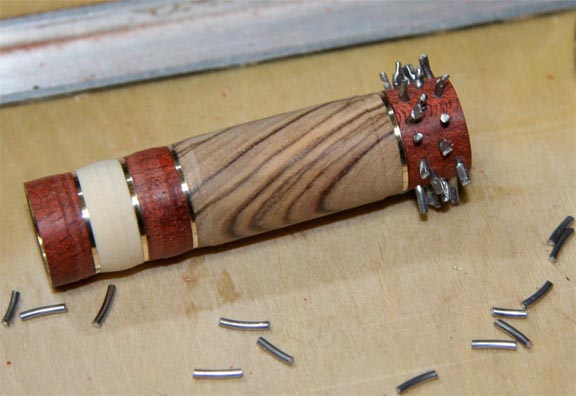
I use brass more than aluminum, but I do use aluminum. I also have used copper and lots of solder. I use these in Holly, Bloodwood, Ebonies and others of course. Holly requires that there is NO sanding dust on it. RARELY will one clean holly adequately from metallic sanding dust so that it is acceptable. The best way is to NOT get sanding dust on it in the first place. Ebonies are easier to clean, but porous and light colored woods are not.

In using the scraper (sharpened to the point the blade has a mirror finnish) I turn the lathe up to 1800 RPM or higher and do small light touches until it is sized - small bites - faster creates more heat build up and heat is the enemy as much as too fast a cut which will cause a blowout due to a "catch". I lap the chisel several times during the process. This also allows a small cool down time.

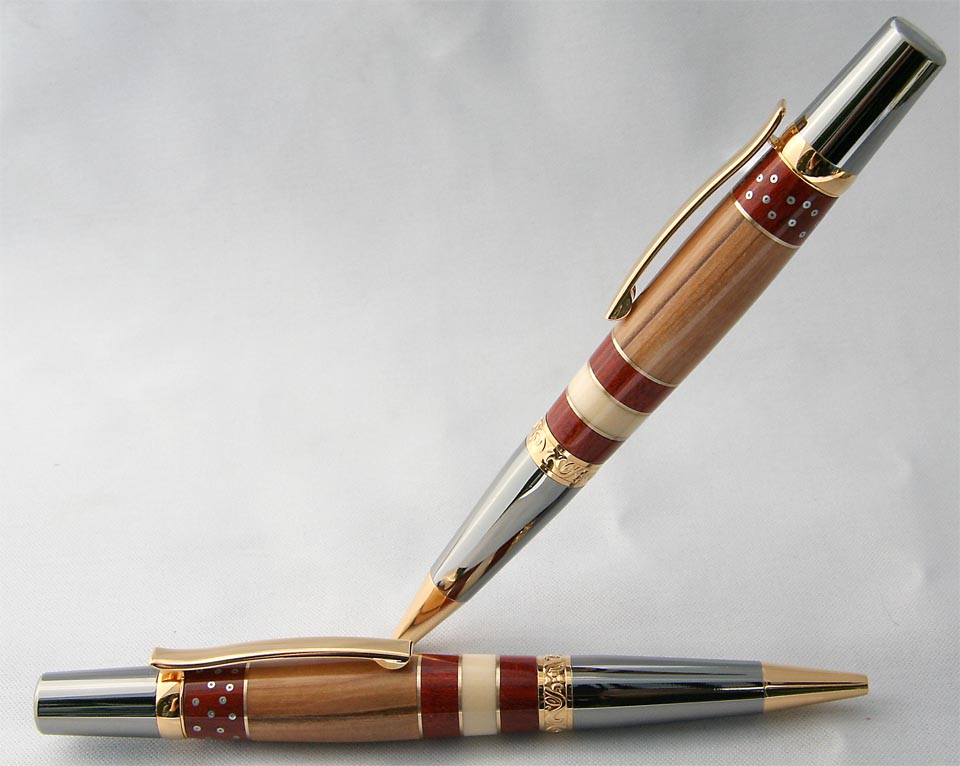
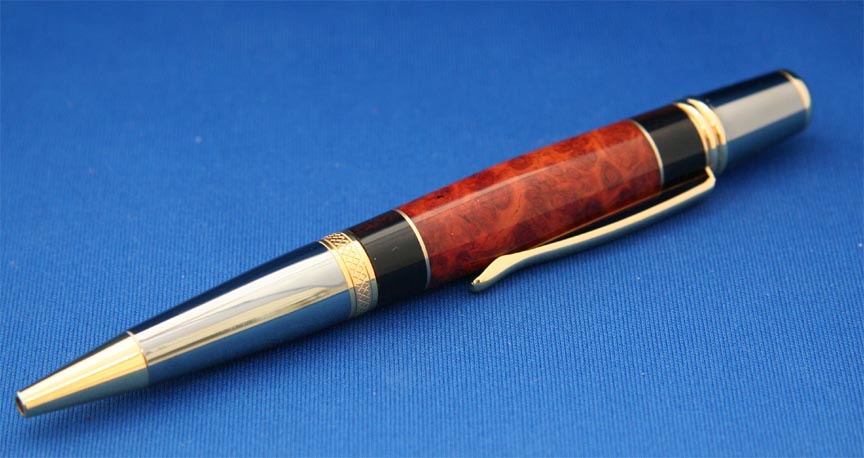
I have not done some of the heavy segments with metal as others but I do mostly straight forward segments as shown
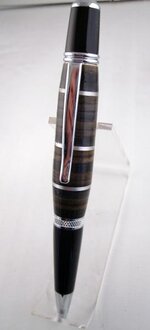
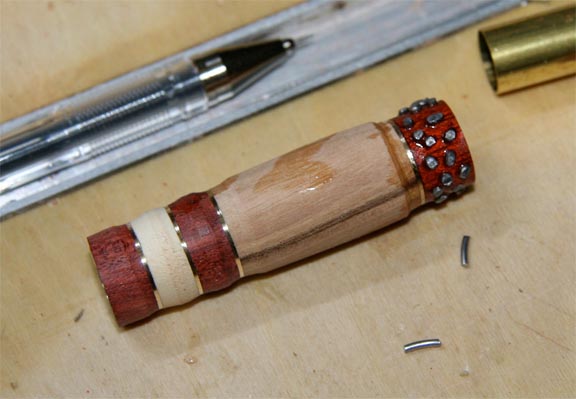
 here and here. The first pict was the first pen that I did without ANY sanding on the wood or brass. I covered it with reveal layers of medium CA and sanded the CA down to size, but no sandpaper touched the wood/brass/solder.
 
Last edited:

brownsfn2

Member
Joined
Jun 23, 2011
Messages
1,574
Location
Plain City, OH
WHen you say that you use solder you mean for the "dots" you put on the pen right? I would think that would be nice and soft. Do you just melt it into the hole? Is it ok if the solder has flux in it?
 

leehljp

Member Liaison
Joined
Feb 6, 2005
Messages
9,329
Location
Tunica, Mississippi,
WHen you say that you use solder you mean for the "dots" you put on the pen right? I would think that would be nice and soft. Do you just melt it into the hole? Is it ok if the solder has flux in it?

Solder - yes the dots. I cut small pieces, drilled holes, placed them in by hand and tapped lightly with a small hammer and then built up a thick layer of CA.

Here is are a couple of picts of the blank with solder before tapping and CA, and after tapping and CA:

http://www.penturners.org/photos/images/940/1_Solder_added_.jpg
http://www.penturners.org/photos/images/940/1_Glued_solder.jpg

Confession: I usually lose one or two pieces when turning it down to the wood. But that is not a real problem. I just replace the ones lost, tap lightly and CA the new ones.

Segments here:
http://www.penturners.org/photos/images/940/1_Blank_construction.jpg
 
Last edited:

brownsfn2

Member
Joined
Jun 23, 2011
Messages
1,574
Location
Plain City, OH
Nice work. It looks amazing! I have a bunch of old Solder. I will have to try using for something other than making little silver balls. :)
 

leehljp

Member Liaison
Joined
Feb 6, 2005
Messages
9,329
Location
Tunica, Mississippi,
Nice work. It looks amazing! I have a bunch of old Solder. I will have to try using for something other than making little silver balls. :)

ON that pen, it was representative of coins - 30 of them. The name of the pen was "30 Pieces of Silver" and had some significance related to my work.
 

scotian12

Member
Joined
Sep 9, 2007
Messages
985
Location
Halifax, Nova Scotia, Canada.
Hank....there are some pens that have been posted over the years that are real classics and an inspiration to others. Your pen "30 pieces of silver" is one of them. Your technique should be recorded in the Library so that others can build upon your knowledge.
 
Top Bottom