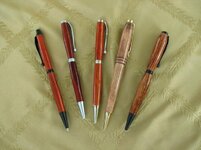
ruffles have ridges, so do my pens!!

Signed-In Members Don't See This Ad

rsulli16

Member
Joined
Jun 9, 2010
Messages
163
hi gang

Been trying my hand at CA finishes and I have been getting tiny ridges running all around the barrels. I have tried it with BLO first, then CA, i have tried CA first then BLO and just CA.
Once while applying the BLO i noticed them.

could it be the paper towel I am using? I tried terrycloth towel and that did it too.

I tried sanding after each coat, but the next coat just brings them back.

More pronounced with med and thick CA, better with the thin.

I have watched and watched the videos, linked from here and searching on YouTube. Found Ed and Russ, and grub and yoyo somethingorother:) there were a lot. Also been all over Russ' site, read his narratives and watched his vids. I'll look for that polyester batting next time I am out.

Any ideas on what I am doing wrong?
 
Signed-In Members Don't See This Ad

Monty

Group Buy Coordinator
Joined
Mar 4, 2005
Messages
8,358
Location
Pearland, Texas, USA.
Sounds like you're not sanding and polishing enough after the CA.
See if you can find a member close by that can demo the CA finish for you. Where are you located?
 

toddlajoie

Member
Joined
Feb 6, 2010
Messages
1,728
Location
Feeding Hills MA
I'm by no means the definitive answer, but for my process, I always get ridges in my CA, BLO will make the less pronounced, but no less, there. What I do is build the CA up a bit thicker than I need it, then sand the ridges down. I use 1200 grit wet, and when you stop the lathe you will see the dull spots where the sandpaper was touching, and shiny spots, where the sandpaper has not touched (since the CA generally dries with a shine, even if it is not particularly smooth...) Keep sanding until you get a uniform dull finish (no rings of shine) then move on to MM and polish
 

nevyen

Member
Joined
Jul 27, 2009
Messages
49
Location
Ludington, MI
I used to get that to. I'm not sure what changed but I dont usually get them anymore. I think maybe the amount of pressure your using has something to do with it. For materials I use charmin extra strength and a light touch. Three drops of med. CA for each section and a quick spray of activator between coats, gives me a pretty consistent finish.
As many will tell you your mileage may very. What works for one does always work for another.
Timothy
 

tim self

Member
Joined
Oct 2, 2008
Messages
2,150
Location
Atoka, Oklahoma
I recommend a lighter touch and more layers. You notice folks posting 6-8 coats on a finish. Mostly to remove ridges as you will probably loose 2 layers smoothing it out. I guess I was one of the lucky ones who the CA finish just came to without much work.(unless it's cold). It just takes patience to learn. I also quit using accelerator and do something else while waiting for the coat to dry.
 

RichW

Member
Joined
Jul 29, 2007
Messages
33
Location
Aldie, Virginia, USA.
Try an untextured paper towel

I used to get those when I used roll-type paper towels. My wife buys a brand that's heavily textured and I think the "waffle" pattern on the paper towel created ridges in the CA. I switched to the Scott's shop towels (rag-in-a-box type) and I have less problem with that. They are smooth with no surface texture.

I also helps to do more thin layers in stead of a few thick layers.

I also quit using accelerator. Causes more problems than it fixes.
 

fernhills

Member
Joined
Jan 22, 2007
Messages
2,142
Location
Hellertown, PA, USA.
Instead of paper towels, you can use the packing material that it used for electronics. It does not react with the C/A and it does not dry as quick and you have more time to smooth it out. Think wet line when painting with Latex paint. Carl
 

aggromere

Member
Joined
Mar 27, 2009
Messages
1,385
Location
Tampa, FL
someone gave the tip on the forums to use viva paper towels. If you compare them side by side with others they are much softer and smoother.

this is what I do. I fold a paper towel like an accordion till i have a long strip about 8 folds thick. I dip my finger in BLO and touch the papertowel and then run put that on the barrel while it spins at top speed. I then fold the used part of the towel under and starting with a clean spot put the BLO on that spot on the towel and then a small drop of thin CA. I keep the blank spinning and touch the CA to the blank and rub back and forth real fast until it looks real shinny (technical term) When you look at the towel it should have a hard coating of cured CA on it slightly concave. I repeat this process several times (5 or 6). Once I think I have a good base coat I then continue the exact same process but put larger drops of CA on the towel. With the larger CA drops I rub back and forth kinda slow at first to get the CA evenly coated on the blank then speed up my rubbing and apply more and more pressure till it goes shinny. I might do this 8 or 10 times, or even more, depending on what I'm doing.

I have found that I only need to use novus number 2 after I'm finished and I have a great shin with no scratches.

If I can ever find the cord that connects my camera to the computer I will shoot some pics and post them.

I learned all that from guys here on the forums. It took a while to get the hang of it. It's a mostly touch and feel kinda process for me, but I almost never have CA issues anymore. In fact I think if you sand between coats you just remove the CA and end up back at the wood and have a dull looking finish in some spots.

Hope that helps.
 
Last edited:

bradh

Member
Joined
Mar 9, 2005
Messages
688
Location
Aurora, Ontario, Canada.
A few people have already suggested this, so let me back them up. Try using less CA on each layer.
I find the ridges are more common when there is lots of liquid CA on the blank as it spins.
Keep the layers thin and you minimize the bumps and ridges. With few bumps and ridges, no need to sand much and less likely to sand thru. No sand thru reduces the need for many layers.
I typically put down 3 to 4 thin layers of medium-CA, a quick, light sand, MM and buff. The result is like glass.
 

LarryDNJR

Member
Joined
Feb 28, 2010
Messages
912
Location
Columbus, OH
I've seen before people using the small plastic baggies that come with pen parts. I've tried a few times using a small strip of wax paper to help blend out the ca as it spins.
 

PenMan1

Member
Joined
Jul 8, 2009
Messages
6,380
Location
Eatonton, Georgia
Sounds to me like you are putting on TOO much CA per coat. Try decreasing the amount of CA per coat (I use 7 drops for 2 barrels or 4 drops for single barrels) and use 10 coats. I've never had ridges using this method. This is NOT THE ONLY WAY TO DO CA, just a way that works for me.
 

Parson

Member
Joined
Jun 10, 2009
Messages
798
Location
Houston, Texas
I've gone to using the little zip lock bags that small pen parts come in for applying CA glue. Three or four drops on the bag over my finger and applied with the lathe off and me turning the blank by hand. Very light application allowing the glue to be pulled off the plastic instead of touching the plastic to the blank.

One application of thick and then it sits overnight without touching it. Then it's cured and ready for a couple of coats of thin CA glue applied with the lathe on slowest setting and lots of paper towels below the work to catch splatter. I really squirt quite a bit on the thin CA applications with good ventilation and I stand to the side so it doesn't splatter on me.

I wait at least a couple of hours before I touch the blank after I do this second bit. Curing is something no one talks about it seems. If I can stand the wait, I leave it for a much longer period of time. Often, I'll do the second coat before work and let it cure until I get home that night.

Then, I sand with 400 or wetted 600 from left to right (back and forth motion) with the lathe off and turn it by hand. This gets rid of any ridges and insures I don't sand off all the glue I put on the blank in the first place.

No BLO unless I want the wood to darken up and show more grain.

Hope this helps!
 
Last edited:

mick

Member
Joined
Mar 13, 2005
Messages
2,608
Location
Decatur AL, USA
13 replies 13 differing opinions. :biggrin: Seriously find what works for you and I can promise you that it'll be somehow different from anyone elses.

As ridges go they normally won't hurt a finish, just cause you to have to sand more or turn em off with a skew.

You stated that with thin CA they weren't as bad. I'd suggest build your finish on that. Use several coats without sanding between.(I use 8-10) The if you have ridges you won't cut through the finish removing them.

Whatever paper towel baggie or cloth you use, stick to what works best. Apply small amounts of Ca and don't rub back and forth any more than neccessary to cover the blank. Less movement=less ridges.

There is a learning curve to CA for some it's steeper than others but don't give up, you'll get there.

Keep it as simple as possible!
 

workinforwood

Member
Joined
Mar 1, 2007
Messages
8,173
Location
Eaton Rapids, Michigan, USA.
Just put 1 coat of thin CA and a quick shot of accellorator. Then 3 coats of med CA with quick shot accel in between each coat. Then sand lengthwise the pen with 220 and the lathe is off of course. When all the ridges are gone, it will be obvious because there will be no more shine spots. Then put towel on lathe, speed on high, wet sand with 320 then mm pads in sequence and finally a quick touch of plastic polish.

I never apply CA with bushings. Just place the spun pen between centers and apply the CA. Any CA that gets on the centers will spin off easy.

Oh yea..almost forgot...wait at least a few hours after applying finish before sanding. You can finish a barrel between centers, wait a couple minutes, remove it and start the next barrel as the last one just sits and cures for a few hours. Finishing takes some time to do it right...it's no hurry.

Love your sense of humor too...ruffles have ridges and so do my pens!:biggrin:
 

hunter-27

Passed Away Aug 14, 2013
In Memoriam
Joined
Oct 17, 2007
Messages
4,608
Location
Chadron, Ne, USA.
Just put 1 coat of thin CA and a quick shot of accellorator. Then 3 coats of med CA with quick shot accel in between each coat. Then sand lengthwise the pen with 220 and the lathe is off of course. When all the ridges are gone, it will be obvious because there will be no more shine spots. Then put towel on lathe, speed on high, wet sand with 320 then mm pads in sequence and finally a quick touch of plastic polish.

I never apply CA with bushings. Just place the spun pen between centers and apply the CA. Any CA that gets on the centers will spin off easy.

Oh yea..almost forgot...wait at least a few hours after applying finish before sanding. You can finish a barrel between centers, wait a couple minutes, remove it and start the next barrel as the last one just sits and cures for a few hours. Finishing takes some time to do it right...it's no hurry.

Love your sense of humor too...ruffles have ridges and so do my pens!:biggrin:


I should not even jumpin here(but I will). I agree who heartedly with Jeff except for the highlighted part. I've done it both ways and I personally can't say I notice a difference. I skip the "waiting period". I get a great finish(IMO) and it has the same durability and shine as ones I've "waited" before polishing. This works for ME, of course your results may vary. I also may or may not use the accelerator(depends on the wood for me).
 

Rfturner

Member
Joined
Jan 10, 2010
Messages
1,109
Location
Santa Maria, CA
I have been where you are and messed around with my finishing. Here is what I use for my finishing. It is what I found works for me, other opinions out there.
1. BLO
2. Thin Ca
3. Scott Shop towels (blue no pattern) torn or cut apart about 2in.
I you have ridges add 0000 steel wool and cd scratch remover

1. I start with BLO. (The paper towel Is folded so that it is several layers thick and about 1 in. wide.) I use BLO rather sparingly, I found that it helps when I put the CA on.

2. I use only about 2-4 drops of CA at a time on the same Paper towel I used the BLO. I rub it on with very little to medium pressure for about 10 seconds. I repeat this step on both blanks. I end up with about 7 layers of CA depending on the wood.

If I end up with ridges which rarely happens anymore I use 0000 steel wool. followed by CD scratch remover (plastic polish). If neccesary add more CA.
 

soligen

Member
Joined
May 11, 2010
Messages
1,085
Location
Sterling Heights, Michigan
Everyone has their own varient, but since I recently took this journey, I cant help but jump in with mine. When starting I read all the articles and wartched the videos. Bottom line is that there is a lot of very subtle technique that casues variations and the method needs to be adapted to you. One person may apply more pressure, another go back and forth slower/faster, different brand of towels, etc. With that said, here is my method. Took a while to practice and adapt and get there. A number of pens were made where I took off all the CA and started over (multiple times in some cases) as I learned.

I eventually gave up on Med CA even though some tuts and videos say it is easier (not for me). I was always getting really thick ridges, and cleaning them up casued sand through.

Pre-finishing (on real pouruos or open grain wood you may need to do this process more than once)

1) Sand to 800 or 1000 depending on my mood/the wood
2) Apply 1 good heavy coat of thin CA.
3) Sand the CA with 600 or 800 (depending on how rough it looks) up though 1000


Now applying CA for finish coats. I use bounty - just becasue a 12 roll pack was on sale at home depot when I started this journey, and I haven't used it all up yet. I dont know how much it really matters.

Note that I do not try to CA across the whole blank at one time. I do about half at a time, alternating ends. I can't rub the paper towel fast enough to do all the way accross at once.

I hold the folded over paper towel (pt) to the blank on the under side and drip 2 or 3 drops on top of the blank along one end and rub it on with the pt moving pretty fast. Go too slow and PT can stick to the finish - in which case you stop, sand, and start over.

Now, here is the interesting part that gave me a real ah-ha. You will see the finish dull as you rub - keep rubbing and it will shine up. What is happening is the CA is hardening in the PT and basically burnishing what was just applied, and taking a tiny bit back off (the little ridges) and shining it up. As I put more coats on it doesnt always shine all the way back up, but in the last few coats I put the CA on one drop at a time and that usually helps it shine up more. Even if it doesnt shine that well, no big deal, just start with a little lower grit in the end. I havent counted how many coats I do, but I would guess at least 10. I keep applying until the calipers show my diamerter is where I want it. There is virtually no wait time between coats.

Even with the shining action of the dried CA on the PT, it still needs wet MM/sanding and buffing. If I do a good job with my process, I can wet sand 1000, 1500, 2000 then buf, but at times I have had to go all the way down to 600. Going to 600 is a bit dangerous for me as I am likely to get sand through if I need to go that low - then I have to start all over. I was buffing with White Diamond, but i recently picked up some blue rouge, which I think gets a little better gloss than white diamond, but I think few people would ever notice the difference. I buf in multiple orientations so scratch patterms are replaced.


PS. you need the right kind of CA bottle to apply controlled drops to do it this way. My first bottle of thin was the woodcraft brand - comes out WAAAY too fast. When that was gone I picked up the satelite city brand - MUUUUCH more control.

PPS. Doing CA/BLO is much easier than this, but I did not get an even gloss when buffing a CA/BLO finish. I will use CA/BLO only if I dont want the full gloss finish.
 
Last edited:

soligen

Member
Joined
May 11, 2010
Messages
1,085
Location
Sterling Heights, Michigan
Another note - all the rubbing and CA curing can heat up the blank. If your blank is at all heat sensitive you need to wait between coats - not for curing - for cooling. I also use DNA to cool things down too sometimes.
 

rsulli16

Member
Joined
Jun 9, 2010
Messages
163
big thanks

Thank you all

Wow! It does seem that there are as many ways to do this as there are people who do it! :)

Extra shift at work, so I haven't gotten back to it yet, but I can't wait to start giving all this advise a try.

My last order from PSI came, I got the colored micro mesh pads, haven't tried it yet. I hope this helps, I have sanded thru the CA coats too, ending up starting over several times. I have been using EEE and (automotive)plastic polish at the end too, helped a bit. Also got he One Step, is that as good as Novus 2?

Thanks again everyone.
Ill let you know what happens
 

workinforwood

Member
Joined
Mar 1, 2007
Messages
8,173
Location
Eaton Rapids, Michigan, USA.
Yep...sanding through the finish is something I used to do all the time. That was back in the mandrel days. Since I do not use a mandrel anymore, I never have this issue. It is my belief that you sand through the finish because the pen is out of round. Certainly too much sanding can also be the issue, but I always found that I sanded through just a few spots and that was because the pen was not perfectly round to begin with. Now I just make sure my tail and head center are perfectly aligned and I spin between centers, one blank at a time.
 

Moosewatcher

Member
Joined
Feb 8, 2009
Messages
115
Location
Blue Bell, PA
I kinda agree with Tim & Tim. Too much pressure. Rub the first coat in somewhat because it soaks into the wood anyway, but subsequent coats, it's one very light and very quick motion. If you know you screwed it up, snd it out before going on because thats the level your going to have to sand down to anyways.

Ken
 

rsulli16

Member
Joined
Jun 9, 2010
Messages
163
maybe I got it

:party:hello all

well i ruined two blanks, sanding the glue off and putting it back on, I am sure i sanded completely to the wood, one I even used a skew to take the finish off down to the wood, lost he shape of the blank and went under the bushings, still the ridges came back. Once there are ridges it seems the blank might as well go in the trash right then and there, seems to be no fixing it.

Then for whatever reason, I got aceptable results on one blank and good results on another!! I did use the little plastic bags to apply it, light light pressure and fast back and forth movements.

Cant say for sure its the reason, but no more filling the pores with CA for me. I got ridges after that step I couldn't get rid off. I now use BLO at 400 grit wet sanding it. That filled them ok. Half the people here seem to use BLO and CA together anyways, it worked( Once anyway). I then applied the glue with the plastic. Six or so coats gave me enough thickness to see, i then used the MM pads wetted with water, starting at the 800 grit, light green ithink? all the way to 12000, the gray one, then a coat of One Step Plastic polish.

I hope this is it!
Thanks again to all who contributed
Sulli
 

rsulli16

Member
Joined
Jun 9, 2010
Messages
163
hers goes my first pix

ok here they are
a photographer I am not it seems:)
 

Attachments

  • whole group.jpg
    whole group.jpg
    58.9 KB · Views: 164
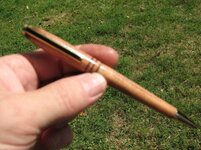
  • no centerband.jpg
    no centerband.jpg
    96.8 KB · Views: 159
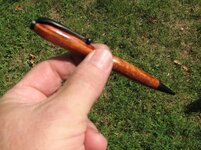
  • br and black.jpg
    br and black.jpg
    100.3 KB · Views: 170

rsulli16

Member
Joined
Jun 9, 2010
Messages
163
thanks

:redface:

the custom centerband one turned out nice, by forgetting a step i surprised myself.

I wire burned two grooves in, then forgot to keep the grooves cleaned out, sanding step to sanding step. Well the CA bonded the sanding dust into the grooves and it now appears as an inlayed material ! I dont know if you can see it in the photo well, but it is a real nice effect, smooth across. The dust with the wire burning and the CA combined to make it look like a dark brown inlay. I liked it!
 
Last edited:

bobleibo

Member
Joined
Mar 15, 2007
Messages
2,130
Location
Utah
Thank you all

Wow! It does seem that there are as many ways to do this as there are people who do it! :)


This is certainly the truth......I have used a ton of the recommendations that I got from reading many of these postings.

If I can add what has helped me...I only use CA, no BLO and have gotten pretty good results by adding two things
1) I use medium CA and soak the paper towel while applying to the blank. I only make one pass across the blank for each coat using a very light touch. This greatly reduces ridges that build up from the CA drying. Make sure not to have the towel still on the blank when it is almost dry.
2) I use long strips of sandpaper and never use my fingers for pressure. I hold the paper in a cradle type of manner as well as at a 45* degree angle. Same when I am using the micro pads. This eliminates the edges sanding a ridge around the barrel.

Not the only answer, just what has helped me. Good luck.
Bob

P.S.
Thanks Russell! I've used a lot of what you taught me last year and attained some great results!
 

rsulli16

Member
Joined
Jun 9, 2010
Messages
163
Just kept at it

Thanks again to all who replied,
doing much better now, just kept at it.

One thing I noticed, I am starting to think what I called ridges in the CA weren't in the CA, I am thinking my sanding technique might have had something to do with it, now i am sanding with MUCH less pressure.I start wet sanding, with BLO at 400 grit. I do much more longitudinal sanding, a lot more.

And lastly as it has been pointed out several times in this thread, very light pressure when applying the CA.
-Sulli

And now, I have to order more pen kits and blanks. I used up all my PSI starter kits :)
 

RussFairfield

Passed Away 2011
In Memoriam
Joined
Feb 10, 2004
Messages
1,522
Location
Post Falls, Idaho.
There are 8 things that I didn't see mentioned in your questions, and only a couple of them have been mentioned in all of the responces you have received. Maybe I just missed them. Anyway, here they are -

1. Are you only sanding with the pen spinning? You should be doing the final sanding with each grit with the lathe off and stroking the sandpaper lengthwise on the pen. This prevents round ridges on the wood which will make round ridges in the CA glue, particularly if the glue is put on in too thick a coat.

2. Are you doing the same thing with the CA application? It always helps to shut the lathe off and make the final strokes with the applicator lengthwise on the pen. This means you will have to use a Medium CA.

3. Are you using too much pressure on the CA?? A light touch is always better, and by "light" I mean barely touching the wood with the applicator. That is why a soft applicator works better than a hard one.

4. Are you spinning the wood too fast? Too fast will make the CA ball up into ridges, especially if there is too much of it. 100 RPM is a lot better than 1000 RPM. Many of the little lathes have fixed pulley drives and slow speeds are not available, so very light coats are necessary.

5. Are you trying to apply too much CA glue in one coat? Thin coats will prevent No. 4 from happening. Thin is 2 or 3 drops.

6. Are you trying to finish with a fast CA glue. A medium or slower curing glue is always better because you will not be able to do some of these suggestions before the "fast" glue starts to cure.

7. Is the applicator making the glue cure faster? That is why I have always preferred the "Synthetic Dressmakers Batting" for applying the CA glue. Cotton and paper will act as an accelerator. There is nothing in the batting to accelerate the glue. It is available at JoAnnes or WalMart.

8. Are you sanding between coats? If the previous coat isn't smooth, any ridges will only be magnified by each succeeding coat. That is why it is always best to sand between coats of CA glue. Besides that, the coats will stick better with fewer problems if the surface is slightly roughened under it.

That's everything I know about finishing with CA glue.
 
Last edited:

rsulli16

Member
Joined
Jun 9, 2010
Messages
163
thanks again everyone

yes, light pressure helped, also the sanding, i am suspecting that is the the root cause, i think i may have pressed too hard with the lower grits, i have been happy with my last few attempts.

lots of back and forth sanding with the lathe off, in fact last one i did was starting at 320, i did all the sanding by hand up and down the length of the blank, 400 and 600, then EEE paste with the lathe on, but with a very light touch. Also with fresh paper. Using more of it now. 2 or more pieces at each grit, I use the 5 roll pack from PSI, cut off a 2 inch piece at a time.

haven't gotten any of that synthetic batting stuff yet. tried the little plastic baggies tho, liked them but no problems last 2 times with paper towel. and yes, light light touch , fast back and forth slowest speed, I do have a var. speed lathe

light sanding with the 600 between coats.

been wet sanding with the colored pads for plastic for the final, then the One Step polish.

Shheeesh!!! listen to me go on, one starter kit and already i am going on about how i do MY system !:):):):):):):):):):):):):):):):)

I am enjoying it however, and i also enjoy and appreciate this forum and all the willing help
Thanks again
Sulli
 
Top Bottom