Question on Penn State Jig

Signed-In Members Don't See This Ad

jleiwig

Member
Joined
Jan 10, 2007
Messages
1,860
Location
Monroe, Ohio, USA.
I purchased the jig shown here and it arrived last night.
PKSCJIG.jpg

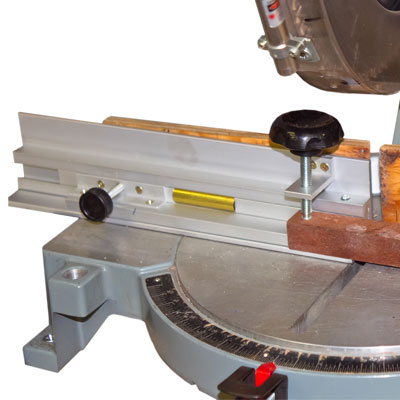
I'm wondering if anyone could show me a picture of how they mounted it to their miter saw?

I was thinking of drilling throught the bottom and tapping holes in the base of the CMS for an easily removable, but accurately positioned mounting. But then I'm worried about tear out due to the space between the bottom of the blank and the ZCI on my mitersaw.
 
Signed-In Members Don't See This Ad

scotirish

Member
Joined
Dec 10, 2007
Messages
526
Location
Macomb Twp., Michigan, USA.
I found that using it on my chop-saw (12") caused the blank to move and the cut was not straight. Several times it, the blank, jumped out of the jig as it is only held in one spot. So, I mounted it on my miter gauge (with a clamp) for the band saw. No problem getting a good clean cut every time. Marked the back so I could mount it the same every time.
 

PenMan1

Member
Joined
Jul 8, 2009
Messages
6,380
Location
Eatonton, Georgia
Works Great on 12" Dewalt Compound Miter Saw

I could not function in my pen shop without this jig. I use two of the Irwin qucik "C" clamps and attach them to the top of the jig and the back of the miter saw's left back fence.

I have made a mark on the aluminum miter saw fence where to position the jig. That way it can be removed and then repositioned in seconds when you have "real" work to do with the chop saw.

BE SURE TO USE 2 OF THE "C" CLAMPS-- ONE VERY NEAR THE BLADE AND ONE BACK TOWARD THE END OF THE JIG AS FAR AS POSSIBLE. Otherwise the vibration from the chop saw will cause it to move and not produce a square end.

Also, I have learned (the hard way) to adjust the jig to leave the blanks an eigth of an inch long. In case you have a brittle piece of PR, acrylic, stinky burl wood, useless wood or polymer clay that breaks, chips, splinters at the bottom of your drilled hole, it can be cleaned up and still used without issue.

I have tossed out the pen mill as a worthless tool. I use this jig and a Ryobi Sanding Station ($109 at HD) with a belt sander and disc sander with miter guage as my end squaring tool. The Miter guage on the disc sander allows for perfectly squared ends and EXACT tube endings EVERY TIME without the ameturish burnt ends or fluted tubes caused by a pen mill.

By putting plumbers putty in the brass tubes before glue goes on the tubes, you can make EXACTLY square and even tubes EVERY TIME with having the hassle of removing CA or God forbid Epoxy from the tubes. A 20 guage shotgun brass bore brush attached to a power drill will makes tubes shiney and precise as well.

If you use this jig for round blanks (and it works perfectly) take the small washer from the bottom of the hold down screw to the hardware store and buy four or five additional exact washers. Put a small "cup" bend on one of the washers and it will hold round blanks as well as the square one.

This jig will likely be you key to moving to the next level in pen turning.
 

jleiwig

Member
Joined
Jan 10, 2007
Messages
1,860
Location
Monroe, Ohio, USA.
Justin will that work with round blanks? I like the idea of using it on a bandsaw.

With the modifications I'm going to make it will. :biggrin:

Nothing more than a couple of triangles epoxied on each end to make it more like a v-block is my plan. I'm going to test with wood first and then try to find some aluminium Triangular tubing. I know K&S makes some, but I haven't seen it in the hobby shops.
 

jleiwig

Member
Joined
Jan 10, 2007
Messages
1,860
Location
Monroe, Ohio, USA.
If you use this jig for round blanks (and it works perfectly) take the small washer from the bottom of the hold down screw to the hardware store and buy four or five additional exact washers. Put a small "cup" bend on one of the washers and it will hold round blanks as well as the square one.

This jig will likely be you key to moving to the next level in pen turning.

Thanks for the tip! I hadn't thought of that! I looked at the washer last night, and the tip of the hold down screw is crimped to keep it on. How did you solve this when you put the bent washer on?
 

PenMan1

Member
Joined
Jul 8, 2009
Messages
6,380
Location
Eatonton, Georgia
Use the exact same washer (some kind of self locking thingy) and just bend the edges, not the center. I used a washer with the same sized center hole and just bigger circumfrence.

About every two or three months I have to change the washer if I do a lot of round blanks.
 

workinforwood

Member
Joined
Mar 1, 2007
Messages
8,173
Location
Eaton Rapids, Michigan, USA.
It's a nice looking jig. Safety is important. I have one just like this, but I made it myself with some scrap wood and instead of a screw knob I use a lever lock. I just clamp the jig with some pistol clamps to the fence of the saw..and I do that on the right side of the saw, not the left side. The right side of the saw is more sturdy because it doesn't have compound angle cut into the fence on that side. Then I stand on left side of the saw and operate with right hand of course..so just in case a blank could let go, it launches up, back, or to the right. Same principle as not standing in front of wood that is being ripped on a table saw. With a chop saw, never cross your arms while operating the saw..ie you put wood on right side and use left hand to hold wood and right hand to operate the saw..yikes. This is because if the wood was to lets say "jump", then you would istinctively pull back your left arm, but because the left arm is on the right side of the saw, it has to travel through the blade to get to you. It's happened..not to me, but people do it.
 
Top Bottom