Question: Cheap Pen design

Signed-In Members Don't See This Ad

monophoto

Member
Joined
Mar 13, 2010
Messages
2,544
Location
Saratoga Springs, NY
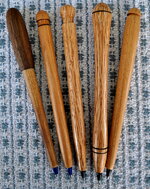
I know that many pen turners make 'cheap pens' using refills from inexpensive ball point pens that are sold in quantities at big box and 'dollar' stores (note that I am trying to avoid using an commercial brand names here).

Several weeks ago, Brendan Stemp posted a very helpful video on his method for making these pens. In that video, he demonstrated three things that I had not seen anywhere else.

The first was that rather than holding the blank in a chuck for drilling, he started with a blank that was a couple of inches longer than the final pen, and turned a crude morse taper on the end. Then, he simply pushed the blank into the morse taper in his headstock. I'm fortunate to have a chuck that I can use, but his technique is an option for those who don't have a chuck.

Sometimes the 5/32" hole in the barrel is too large, and the refill won't stay in the hole. Brendan solved that by wrapping the refill with a couple of turns of ordinary teflon plumber's tape.

The third new thing he did was to drill a very small breather hole in the side of the finished pen. I can certainly understand the theory behind this hole - as ink is used, there will be a tendency for a vacuum to form inside the ball point refill tube that will eventually strangle the flow of ink. Having a breather hole makes it possible for air to enter the barrel of the pen to equalize the pressure and keep the ink flowing.

But that begs the question that factory-made pens don't have a breather - so why is it necessary for us to drill one when we make pens from wood? I suspect the answer is that plastic nib on the refill has small deformations around its circumference that provide minute breather channels around the nib when it is used in a plastic barrel. Because wood can compress, those deformations could press into the wood, reducing the size of the breather channels when it is inserted into a wooden barrel. And if teflon tape is used to pad out the diameter of the refill, then it will also obstruct that breather channel.

But that raises the question - how many pen turners who make these cheap pens drill a breather hole in the barrel?
 
Signed-In Members Don't See This Ad

toddlajoie

Member
Joined
Feb 6, 2010
Messages
1,728
Location
Feeding Hills MA
No need for the plastic plug on those mass produced pens to have deformations on it, all it needs is to have a VERY slight leak. If you can imagine the approximate total volume of ink that is in any standard ink refill, that is how much leak you would need, but you could reliably assume that you would have DAYS to leak that much. Anyone with a pressure or vac setup will attest to how difficult it is to seal anything up THAT well. I can't say if these pens NEED that breather hole, it would depend on the materials and finish, as well as how tight the refill fits in. I know if I were making it, it would leak air rather easily:biggrin:.
 

monophoto

Member
Joined
Mar 13, 2010
Messages
2,544
Location
Saratoga Springs, NY
Here's a picture of a few of these pens that I made last week.

I drilled a breather hole on four of these pens using a very small drill bit in a pen vise. I know that the interior hole in the pen on the left is drastically off axis (the walnut end was added to repair the damage where the hole came through the side of the pen body!) If you look very closely, you can see a breather hole in the two pens on the right. In the next two over, the hole was drilled through an edge of the finial at the top of the pen so that it doesn't show.

L-r: walnut/ash, ash, 'mystery oak', 'mystery oak' , and ash . The 'mystery oak' is wood that looks and acts like oak, but came to me in the form of a very grungy shipping pallet.
 

Attachments

  • Cheap pens - s.JPG
    Cheap pens - s.JPG
    432.3 KB · Views: 358
Last edited:

ashaw

Member
Joined
Jun 23, 2004
Messages
1,590
Location
Phila, PA, USA.
There is no need for a breather hole in ball point, rollerball and fountain pens that screw on. Push on caps is another issue only because when you push on a cap air need to be released from the cap.
 

ashaw

Member
Joined
Jun 23, 2004
Messages
1,590
Location
Phila, PA, USA.
Also, I do not know anyone here on IAP makes a cheap pen. No talking about cost a cheap pen IMHO means to us lack of craftsmanship, and a purposely lack.
 

jzerger

Member
Joined
Feb 7, 2012
Messages
196
Location
Salisbury, NC
Although I like the creativity in these so called 12 cent pens, one of the reasons I started making pens was because you either paid 12 cents for a pen that was worth what it cost ; that is, didn't write well and didn't last OR you paid a lot for a pen because of the brand. Since I always have to have the right pen/pencil depending on how I feel and the tasks required for the day, I thought I'd just make what I like. Of course, I don't save much money doing this, but I'm sure having fun. I'm going to make a few anyway , thanks for sharing.
John
 

monophoto

Member
Joined
Mar 13, 2010
Messages
2,544
Location
Saratoga Springs, NY
I've made quite a few of these in the last couple of months - they cost next to nothing, and make nice giveaways, especially for casual acquaintances such as the person who cuts your hair, the folks at the coffee shop or the hardware store. Technically, they are very simple to make, and take only a few minutes.

There have recently been two new videos on these pens - one is an updated video by Capt Eddie in which he couples the pen with a holder, and the other is by Brendan Stemp (of "A Minute of BS" fame).

The one challenge is drilling the blank - when using Bic infills, the hole must be 5/32" (you can also buy both PaperMate and various house-brand pens, but I haven't measured those), and a long bit that size is very flexible and can easily deviate away from the center of the blank. Brendan suggests the traditional approach to drilling with the chuck in the tailstock, but the Capt suggests doing it differently - put the chuck in the headstock and feed the blank onto the chuck. The Capt does this manually - my experience is that using the tailstock ram to drive the blank onto the spinning drill bit helps keep everything centered. But most importantly, the key to keeping the drill centered is to run the lathe at a very low speed (perhaps 200 r/min), advance the blank VERY SLOWLY and in very short bites before backing it away to remove the swarf from the flutes in the bit. I hold the blank with my left hand just to the right of where the bit enters the blank - as long as the blank remains relatively stead at that point, the bit is centered. But if the blank starts to whip around at that point, then stop drilling immediately and black the bit out of the blank. By holding the blank, you can also sense an increase in temperature that means that the drill bit is no longer centered and is getting close to the surface. Rubbing the bit with a block of paraffin helps prevent squeaking.

Capt Eddie suggests using the drill bit as a mandrel, while Brendan mounts the drilled blank between centers. Both approaches work well, but using the drill-bit/mandrel approach gives the option of parting off and finishing the end of the pen while it is spinning on the lathe, but the between centers approach means that you have to sand and finish the end off the lathe. And the Capt has one other good suggestion - when drilling the blank, do not remove the bit after reaching the target depth. Instead, leaving the bit in the blank means that the swarf in the flutes helps prevent the blank from spinning on the mandrel/bit when you are turning the exterior shape.

My experience is that turning the blank between centers can cause the hole that the infill must fit into to become a bit oversized (this seems to not happen so often when turning on the mandrel/bit). The problem with an oversized hole is that the infill won't fit snugly. Brendan's solution to that is to wrap a turn or two of ordinary teflon plumbing tape around the infill to pad out the diameter enough to fit snugly in the oversized hole.
 

kovalcik

Member
Joined
Jun 9, 2011
Messages
891
Location
Barrington, NH
Correct me if I'm wrong but these sound to me like throw aways....


Maybe not quite throwaway as you can always put a new refill in. More like adding a little class to a throw away. They will not be cherished heirlooms, but they are quick to make and you can hand them out pretty freely. The long wood barrel can be fairly impressive even with a common piece of wood.
 

monophoto

Member
Joined
Mar 13, 2010
Messages
2,544
Location
Saratoga Springs, NY
Here are a few lessons that I've learned about turning these 'cheap pens' over the past 14 months.

1. Start by marking centers on both ends of the blank.

2. The simplest way to drill the hole is with the rotating blank held in a scroll chuck, and a stationary bit in a Jacobs chuck in the tailstock. It's always best to mount the blank between centers and turn a tenon at one end that the scroll chuck can grip. However, it may be possible to grip a square blank with pin jaws.

3. It's important to minimize the tendency that small bits have to flex while drilling. I start the hole with a center bit, then use a standard 'jobber length' bit mounted as deeply as it will go in the Jacobs chuck so that there is only about 3/4" of bit beyond the nose of the chuck. After drilling as deep as I can, I remount the 'jobber length' bit to use its full length, and finally, mount an 'aircraft style' long bit to drill the rest of the way. I take very small bites - around 1/2" at a time - and clear the swarf from the flutes between bites. The flutes on small bits are shallow and can't hold a lot of swarf, so frequent clearing is essential to avoid overheating the blank.

4. Always use a sharp bit. Bits can quickly be 'tuned up' using a diamond hone.

5. The lathe has to spin fast enough for the bit to efficiently cut the wood, but no so fast that it will overheat. 400-500 r/min seems to work well. But the bit must be advanced slowly into the wood - the end of the bit must cut a hole that the bit slips into. If you try to advance the bit too fast, it will follow the grain lines in the timber which generally means that the bit will come out the side.

6. I made a depth gauge/spacer that fits on my long bit from a scrap of HDPE. This gives me a guide for the diameter of the nib end of the pen, and also provides a buffer so that I don't inadvertently hit the Jacobs chuck jaws with my tool as I'm turning the pen.

7. The 'perfect' size hole for pens made with Bic refills is 5/32", but I found that repeated insertion of the bit into the hole causes the end of the hole to be enlarged very slightly. One solution for this is to use teflon plumbing tape as suggested by Brendan Stemp to 'pad' out the diameter of the refill to fit the oversized hole. Another solution is to use 9/64" bits (both the 'jobber length' and the 'aircraft length') and then, after the pen has been turned and finished, swap out for a 5/32" bit to bore out the first 1/2" of the hole.

8. After drilling the hole to the required 5" depth, remount the Jacobs chuck in the headstock (with a drawbar) with the aircraft-style bit serving as a mandrel to hold the blank. Turn the lathe on and carefully cut a centered dimple in the end; then, bring up the tailstock. If you are careful in drilling, the dimple with line up exactly with the marked center of the blank, but if it is off a little, that's usually OK.

9. Occasionally, the wood will split when the Bic refill is inserted. Timbers that have a tendency to splinter (eg, oak or ash) are more prone to this problem than others, but it can also happen if too much teflon tape is used. And it can happen as a result of overheating while drilling. It helps to be mindful of this issue when turning the body of the pen - if the taper at the nib end of the pen is too shallow, the wood will be very thin and more likely to split. Making the taper more severe tends to reduce the risk. That said, I think it's just one of the things that one has to be prepared for when making these pens.
 

KenV

Member
Joined
Oct 28, 2005
Messages
4,720
Location
Juneau, Alaska.
Back in the day when Rich and I were young, there was a need for a vent hole -- not so much for loss of ink, as for changes in barometric pressure. The ball point pens were not to as tight tolerances and a "low pressure day" would result in a bit of pressurization inside the pen bodys and encourage some extra ink ooze out of the ball point and create something of a mess --


These can be a fun thing for kids to make on a lathe with scraps -- and have some instant success for next to nothing for an investment --
 
Top Bottom