Purple Pinecone

Signed-In Members Don't See This Ad

Beautys_Beast

Member
Joined
Sep 27, 2017
Messages
161
Location
Wisconsin/
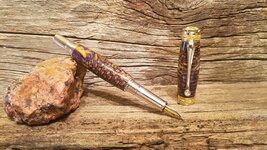
Today I turned a cast purple pine cone, for a Majestic Jr kit.

Let me start by saying there was nothing wrongwith the blank. I thought it would make a beautiful pen, It just wasn't for me. Once I got it turned, and sanded, I realized it had tons of little holes. Not from tool chatter, but from the pine cone itself. Try as I might, I couldn't get the perfectly smooth, high gloss finish I was after, even after 3 coats of thick CA glue, and 6 coats of thin. Tomorrow I will take it apart, and try running the skew over it, to see if I remove all the other CA glue, if it will smooth out. If not, I will cut it off the blank, and start over with something else.

I enclosed a picture, but my photography isn't the best.
 

Attachments

  • Purple Pinecone Majestic Jr.jpg
    Purple Pinecone Majestic Jr.jpg
    325.8 KB · Views: 371
Signed-In Members Don't See This Ad

Beautys_Beast

Member
Joined
Sep 27, 2017
Messages
161
Location
Wisconsin/
Your photography looks good, I really like the back drop. Problem I have had with pinecone pens in the past is the finish does not stay smooth after a long time. Unless I cut it down more and go thicker on the finish.

Two old pieces of cedar decking, but it works. I am going to re turn it tomorrow. Will use the skew, and cut all the CA glue off. Hopefully what remains will have filed in all the little holes.

Yes, It is a VERY pretty blank. I think it is more operator error then anything else. It will be a learning experience either way, and those are priceless.
 

Gregory Hardy

Member
Joined
Jul 13, 2017
Messages
276
Location
Scio, New York State, USA
...And I think you might be too hard on yourself. Trim it again, fill and finish the pen. God made every pinecone different. Manmade finish after the fact is secondary to a truly beautiful pen from natural (and uncontrollable) material. Finish it and then make another. Beautiful blank. Congratulations.
 

Dehn0045

Member
Joined
Mar 19, 2017
Messages
1,533
Location
US
Cool looking blank, I love the look of pinecone pens, but never done one myself. You should be able to get a smooth/high gloss finish after turning off some of the CA. You might have some bubbles or defects under the surface that are visible, but should be smooth on the surface. I like to hit the blank with 400 grit sandpaper, if there are any glossy spots then I keep sanding until the whole blank is a consistent matte look. I've also found that wet sanding gets a slurry going and you can remove CA pretty fast with 400 grit. Good luck, I hope you can get it looking how you want!
 

Kelley Crafts

Member
Joined
Aug 25, 2016
Messages
57
Location
AZ
Definitely fixable. I do pine cones often and encounter this often. I don't think it's user error at all. I stabilize the pine cones first but even that doesn't solve the issues completely. On my knife blanks I make I fill with clear epoxy and sand flat but the pens don't show until turned as you've seen. My fix at least is to fill with medium CA and pole the holes with a toothpick with the CA in the hole. This will help push air out. Then some careful sanding so you don't take your blank down to far, especially since yours is to a finished state. I just use medium and let it dry completely before sanding. You can do it!! That's a beautiful blank.
 

Herb G

Member
Joined
Nov 13, 2015
Messages
1,461
Location
Southern Maryland
According to your post, you are defeating yourself by using thick CA first, then thin CA.
You should use thin CA first, so it soaks in, then use medium at most.
I don't think I ever heard of anyone using thick CA for a finish.
 

Beautys_Beast

Member
Joined
Sep 27, 2017
Messages
161
Location
Wisconsin/
It ended up chipping at the end of the tube when I want to sand it. If I were to do it again, I would leave it proud on the edges, fill the holes with epoxy, and the after the epoxy cured, skew it down to the correct size for a CA finish. As for now, I will use a different blank for this pen. Was a learning experience.
 

Kelley Crafts

Member
Joined
Aug 25, 2016
Messages
57
Location
AZ
Mark, if you don't have anymore blanks like that, check out my store and pick one out and I'll ship it to you for free. Maybe try another pine cone one so you get a win out of this? My store is in my signature.
 
Joined
May 18, 2017
Messages
27
Location
Germany
Hi Mark,

Dave got it dead on, diligence, and more diligence. I do a lot of pine cone and gum ball pens, and end up filling and sanding several times before getting a no pit surface. Make sure the cones are as dry as can be before casting. To prevent chipping at the ends, coat with thin CA and let dry , then sand; I hate it when that happens ! I often coat several times during turng to stop chip outs.

Irv
 
Last edited:

Beautys_Beast

Member
Joined
Sep 27, 2017
Messages
161
Location
Wisconsin/
Just to clarify, I didn't cast it, I bought it.

The advice is spot on. Fill, sand, fill, sand, once you get it perfectly filled and sanded, then cut down to finish size.

I appreciate the offer for a new blank. I just received 100 Rhino blanks in the mail, so I am sure I will make due with something.
 
Top Bottom