Prevent splitting of a diagonal blank?

Signed-In Members Don't See This Ad

Russknan

Member
Joined
Mar 13, 2012
Messages
537
Location
Nanuet, NY
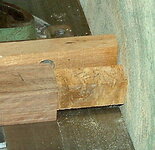
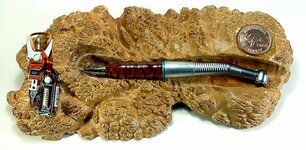
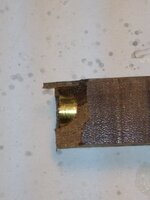
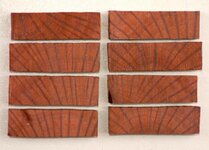
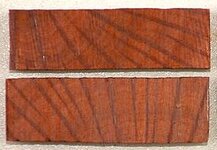
I hesitate going to the well of knowledge once again, but I'm not sure I have a problem that's solvable. I recently came into a very small quantity of ipe wood from the old Coney Island boardwalk. I have a few friends and family who would very much like to have a pen for commemoration. I cut a few blanks on the bandsaw and drilled them. This stuff is hard! Not to mention over 100 years old. Anyway, I cut one blank parallel to the grain, and two at a diagonal, thinking I might get better figure. Glued the tubes, then proceeded to use my barrel trimmer on the first Gatsby blank. Sharpened the flutes first. One side went OK but, just as I started to trim the other, the end of the blank blew apart. (See picture.) Other than using sharp tools and going slowly, is there a way to make survival of the blank a little more likely in the future (at least when trying the next diagonal)? Would it help to coat the whole thing in CA before trimming, etc.? I don't have the equipment - yet - or the knowledge to stabilize the blank, although I wondered about that. The wood is so hard, though, I doubt that much would penetrate. If I've asked too many questions lately, please tell me, in private or public. I can take it. And I'll try to wait a bit before soliciting help again. Russ
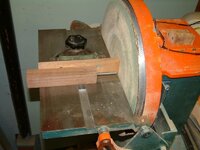
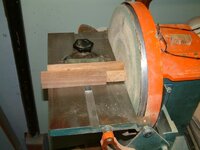
 

Attachments

  • photo.JPG
    photo.JPG
    43.1 KB · Views: 323
Signed-In Members Don't See This Ad

jmbaker79

Member
Joined
Dec 21, 2011
Messages
410
Location
Raleigh, nc
I have had similar issues in the past but since i usually sand them down close to the tube with a disc sander etc...Then usually turn round between centers and close to diameter. Then barrel trimming is done with the otherside of the cutter head with a small 1" square piece of adhesive sand paper attached. Use a single hole punch to punch the hole in the sand paper then slide on your pilot shaft as normal. I use a slow speed drill, as in the battery is never charged all the way :) , to do my trimming. Cant take credit for the idea as it has been passed around IAP for the last few months. Everyone does it a different way but this seems to work pretty well for me and doesnt put alot of stress on the end of the blank! I do the ca finish the same way as it builds up on the centers, take it off and re trim it with the sand paper before final sanding and polish! hope that helps a little!
 

airborne_r6

Member
Joined
Oct 28, 2008
Messages
279
From the picture it looks as though the barrel trimmer extended out past the sides of the blank, either due to the size of the blank or the tube being off center. Having the full diameter of the barrel trimmer contained with in the blank being cut helps to avoid blowouts. Also if you have the equipment the best thing to do would be to sand the end of the blanks square rather than using a trimmer.
 

Fibonacci

Member
Joined
Feb 9, 2011
Messages
823
Location
Ridgecrest, CA
My advice would be to either go slower or sand it.

I have not had any issues splitting blanks with a barrel trimmer, though I have seen it done. I generally cut it close with either a bandsaw or a hacksaw (within 1/16"), then finish it by going real slow with the barrel trimmer.

Another option is to take adhesive sandpaper and stick it to the back of the barrel trimmer and use that to sand your piece down. It is slower, but you don't have the risk of catching it and splitting it.
 

PenPal

Member
Joined
Nov 29, 2006
Messages
2,708
Location
Canberra, A.C.T., Australia.
Russell,

One of my favourite timbers I use is called Hairy Oak you can see why cause of the Hairy bark. It is tough as now I dredged up some old pics of a cross cut log, timber cut with and across the grain and you can easily see how or why yours flaked from the reamer. This one log was fragile in the extreme from the radials however I never lost a blank from it. Nearly every timber except burl I cur right angles to the grain in this timber it is remarkable the difference I will try to find a couple of finished pen pics to add to illustrate.

I use a sander mounted on the outboard of a lathe, a hardwood square piece with a glued in shaft for a mandrel at right angles all round since the tube orients the blank truly it gives the square face we desire. Like any proceedure it takes care and practice.

Trust this helps.

Now with regard to gluing with this log I used Gorilla or similar poly glue that foams and I found glue bubbling through the blanks through hidden faults making the whole stronger by far.

Kind regards Peter
 

Attachments

  • DSCF0003 [640x480].JPG
    DSCF0003 [640x480].JPG
    120.4 KB · Views: 174
  • DSCF0010.jpg
    DSCF0010.jpg
    66 KB · Views: 165
  • DSCF0015.jpg
    DSCF0015.jpg
    67.3 KB · Views: 155
  • Tree3 640x461.JPG
    Tree3 640x461.JPG
    15.4 KB · Views: 133
  • DSCF0001 [].JPG
    DSCF0001 [].JPG
    74.5 KB · Views: 149
  • DSCF0002.jpg
    DSCF0002.jpg
    55.8 KB · Views: 166
  • DSCF0003.JPG
    DSCF0003.JPG
    33.1 KB · Views: 162
  • DSCF0004.jpg
    DSCF0004.jpg
    54.8 KB · Views: 157
  • DSCF0007.jpg
    DSCF0007.jpg
    51.9 KB · Views: 162

PenPal

Member
Joined
Nov 29, 2006
Messages
2,708
Location
Canberra, A.C.T., Australia.
Russell,

My methods of naming stored pics is clear to me today gone tomorrow pic enclosed on a dental handpiece for a mate of mine in the last couple of months. Worth every bit of care.

Kind regards Peter.
 

Attachments

  • DSCF0017-001.jpg
    DSCF0017-001.jpg
    82.9 KB · Views: 238

Russknan

Member
Joined
Mar 13, 2012
Messages
537
Location
Nanuet, NY
My thanks to all! I guess it's time to fire up the sanding disc on the Shopsmith, and to try the hole punch, sandpaper, and back side of the barrel trimmer. I'm also thinking of trying to salvage the blank that I blew out, if the rest of it survives on the lathe, by parting off the broken end and adding a contrasting piece of wood where the rest was removed. Be interesting to see whether I can manage to mate the surfaces well. I've just begun to discover that mistakes or other oops events give the opportunity to try something I've never done before. Having nothing to lose frees one up, no? And Peter, thanks for all the pictures, as well as the advice. That truly is some "hairy" wood! That dental drill pen is unique and beautiful. I'd love to know how you pulled that off. Must have been some tricky engineering involved. Again, I really appreciate the advice from all of you. It's great to have the support. Russ
 

TerryDowning

Member
Joined
Apr 27, 2011
Messages
520
Location
Newhall, CA
My thanks to all! I guess it's time to fire up the sanding disc on the Shopsmith, and to try the hole punch, sandpaper, and back side of the barrel trimmer. Russ

2 more options for the shopsmith (SS user her as well)


Option 1
If you have a tail stock mounted drill chuck Chuck some rod of the appropriate diameter of the tubed blank (Drill bits and/or transfer punches work well for this)

Mount your sanding disc and position the head stock so it is very close (1/8"? or so) to the end of your blank (or drill bit whichever is longer). You way want to double check and ensure the drill bit or rod is square to the disc. Very carefully advance your blank along the drill bit to the disc and square it to the tube. I rotate my blank as I do this to make sure all sides of the blank are contacting the disc and it is square.

Option 2
Mount sanding disc
Install table
Using the miter gauge and the miter gauge extension rod (The Steel rod that goes into hole n the side of the miter gauge) Make sure the rod is square to the sanding disc. You may have to make a sleeve if working with diameters other than 7mm tubes place the blank on the rod and support with your hand, advance the disc into the blank using the quill advance.

I have used both of these methods, I prefer option 1 and use it regularly. It saves the step of having to install the table. All of my pen making operations are lathe based now that I have the tail stock drill chuck.
 

Culprit

Member
Joined
Jun 18, 2012
Messages
139
Location
Stafford, VA
Thanks Terry - I like option 1. I hadn't thought of that.

I use my barrel trimmer/pen mill in the headstock chuck, but for delicate blanks that need sanding instead, I'll remember this.
 

Russknan

Member
Joined
Mar 13, 2012
Messages
537
Location
Nanuet, NY
Great suggestions, Terry. I would definitely like to try Option 1. Quick question, though, about mounting a drill chuck to the tail stock. Does Shopsmith sell a taper that you attach the chuck to, or did you buy it from somebody else (if you remember)? I'm also looking to try drilling via tailstock drill chuck and collet or whatever on the quill feed, but I'm not sure where to get the latter. Do you know anything about that, too? Thanks again. Russ
 

Culprit

Member
Joined
Jun 18, 2012
Messages
139
Location
Stafford, VA
Yes, Shopsmith sells the adapter to mount the drill chuck on the tailstock:

Shopsmith - Accessory Catalog - MARK V Accesories - Lathe Accessories - Lathe Arbors

I actually ordered one earlier this week - it may even arrive today (along with some bandsaw blades).

So far, I have used a MT2 chuck that I bought off e-bay to mount in the tailstock and it works very well. I went ahead and bought the adapter simply to give me more options. That way I can mount anything else to the tailstock, like the sanding disk. I figure if the blank is already chucked up in the headstock to drill, then I could put the sanding disk on the tailstock to square the end before drilling. That way I only have to chuck up the blank once, and I won't have to swap out for the pen mill/barrel trimmer. I'll try it, but in reality I really like the pen mill/barrel trimmer, so I'll have to be really impressed by another method to give that up. But for blanks that splinter easily, it would give me another option.

You asked about how to chuck the blank on the quill for drilling on the lathe. I use a Nova G3 scroll chuck (4 jaw, self-centering) that I bought from Shopsmith.com. I like it, but I went through 2 bad ones and returned them before I got a good one (the third) with acceptable runout that didn't wobble. Teknatool (who makes the Nova G3 that Shopsmith sells) was very responsive and worked to make it right - it just took some extra time.

There are several other brands of 4 jaw scroll chucks on the market, just look for ones with a specific Shopsmith adapter. Others also use a collet chuck (which I would like to have, but I've spent enough recently so I need to wait). The collet chuck appears to be great for objects which are already round and for which you have the proper size collet insert. For most pen blanks, the 4 jaw chuck is more versatile.

Here is some background reading if you're curious: Shopsmith-Branded Nova G3 Lathe Chuck - Shopsmith Forums
 

RogerH

Member
Joined
Jul 28, 2011
Messages
307
Location
Illinois
Trouble turning cross cut or diagonal wood can be solved by:

1. Very sharp chisels (members on here refer to them as "scary sharp"), skew preferred ;
2. Coating the outside of the blank with CA, and recoating every time you turn off say 1/8 or more;
2. Take ultra light cuts (patience, patience).

All the above learned from the "veterans" on this site !
 

Russknan

Member
Joined
Mar 13, 2012
Messages
537
Location
Nanuet, NY
Just ordered the adapter for holding chuck in tailstock. While at it, discovered that SS has a tool rest upgrade that no longer requires an Allen wrench to adjust. Into the sack with that, too! Going to hold off on the scroll chuck for a bit. Might interfere with my need to overbuy blanks that appeal to me . . . Thanks again for the advise. Such an amazing wealth of it on this site!
 

KenV

Member
Joined
Oct 28, 2005
Messages
4,720
Location
Juneau, Alaska.
By the way -- looks like there was not a good glue bond at the end where the chip out occurred. Starved glue conneciton leaves the wood weaker and agressive pen mill will chip easily.

Take a good look at your gluing protocols -- I find Epoxy works for the least issues for me.
 

Russknan

Member
Joined
Mar 13, 2012
Messages
537
Location
Nanuet, NY
Very nice tutorial, John! I'll have to work out a variation for my Shopsmith. After this blowout, advice from others, and having a lack of a trimming sleeve for a new pen design that I wanted to try, I made a jig to hold a blank square while I advanced the quill. Worked very well. But I think having a jig with a rod for blanks where I have the means to use the tube will be better yet. (Yeah, that and turning my own sleeves for such occasions.) Ken, thanks, too, for your observation about the gluing. I thought I had glued it well but, examining the piece again, I think you're right. I've only used CA and Gorilla Glue so far, but I'll have to try epoxy. There were some good posts on that very topic in the last week. (You were probably part of the discussion.) Really appreciate the help, guys. Don't know of any pen turning clubs around where I live (Nanuet, NY in the lower Hudson Valley), but I'll have to start a new thread to see whether there are any. Would love to meet more experienced people and learn from them. IAP has certainly been great for that . ..
 

KenV

Member
Joined
Oct 28, 2005
Messages
4,720
Location
Juneau, Alaska.
Don't know of any pen turning clubs around where I live (Nanuet, NY in the lower Hudson Valley), but I'll have to start a new thread to see whether there are any. Would love to meet more experienced people and learn from them. IAP has certainly been great for that . ..


You may not find an IAP chapter close, but you are likely to find a chapter of AAW (American Association of Woodturners) close -

Local Chapters - The American Association of Woodturners

I see over 20 groups in New York --

While AAW chapters are into all kinds of turning -- there will be pen turners amongst the membership. There may be a few that still look down on penturners, but you will find some help.
 

Russknan

Member
Joined
Mar 13, 2012
Messages
537
Location
Nanuet, NY
Nice tip, Chris! Thanks. Ken, as usual, you are right on the money. Found an AAW chapter about 5 miles away. I'll contact them about membership.
 
Top Bottom