ColinH60
Member
Hello,
Has anyone turned polymer clay? If so, do you have any recommendations on books or online tutorials? Thanks
Has anyone turned polymer clay? If so, do you have any recommendations on books or online tutorials? Thanks

Hello,
Has anyone turned polymer clay? If so, do you have any recommendations on books or online tutorials? Thanks
Mrs. Wissen:I make polymer clay blanks that my husband Fred (PTownSubbie) turns. We had shared some at our last club meeting to let our members practice with the product. A carbide tipped tool works best with light cuts. It turns most like an acrylic.
Mrs. Wissen:I make polymer clay blanks that my husband Fred (PTownSubbie) turns. We had shared some at our last club meeting to let our members practice with the product. A carbide tipped tool works best with light cuts. It turns most like an acrylic.
Thanks. I looked on your website. Very cool. I can't wait to try.
Wow, now that you have a degree, you're MRS WISSEN!!!! :biggrin::biggrin::biggrin: I'm impressed!!!
Just pulling your leg, Tina!!
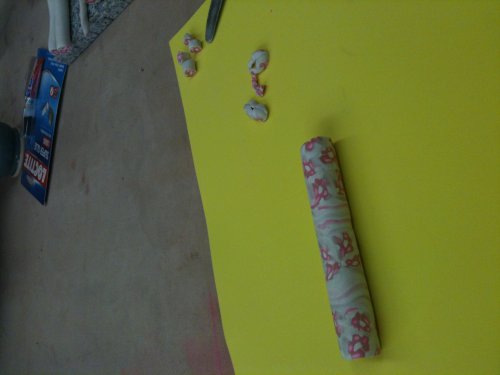
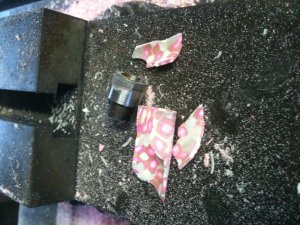
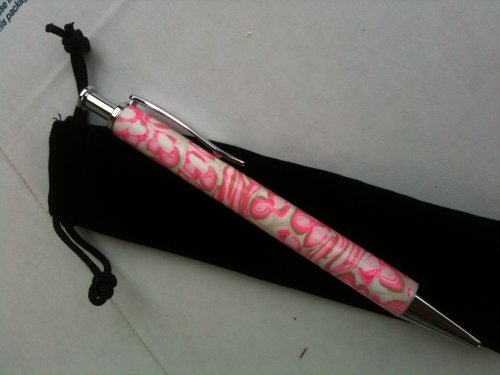
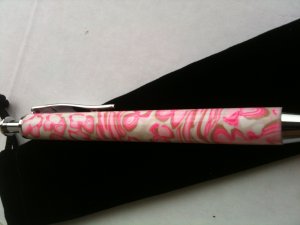
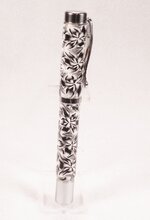
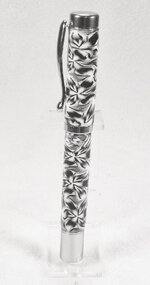
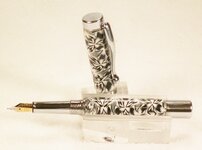
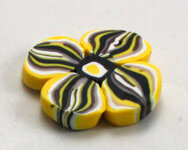
Look in the library on this site. Toni has a great article on how she makes the blanks, but she doesn't turn them. I have turned them for about a year, but use a totaly different approach to building up the blanks. Once you make the blanks and fire them, they are just like turning any other blank on the lathe. It just takes less turning preasure and lighter sanding. I turn mine on a mini metal lathe and use files to shape them. Check my photo for some examples. So far I have not seen any books or videos on youtube showing how to apply clay to a brass tube and than turn it on a lathe. The best book I could recomend would be The Art of Polymer Clay Millefiori Techniques By Donna Kato !! It doesn't tell you how to make pen blanks or turn pens, but is the best book for telling you how to work with Polymer Clay. Jim S
Is there any issue with colors bleeding during sanding?
You can use a similar caning approach, but the canes slices would need to be cut thicker than the bushings of the pen kit used, and when baking the clay, the tubes needs to be baked long enough to fully polymerize the clay so it gets hard enough to turn.
I show how I have set up my workstation to make my own canes at PTownSubbie.com - How to Make Polymer Clay Canes, but there's plenty of other ways and places to learn on the internet as well as books and videos. I watched dozens of tutorials myself.
Look in the library on this site. Toni has a great article on how she makes the blanks, but she doesn't turn them. I have turned them for about a year, but use a totaly different approach to building up the blanks. Once you make the blanks and fire them, they are just like turning any other blank on the lathe. It just takes less turning preasure and lighter sanding. I turn mine on a mini metal lathe and use files to shape them. Check my photo for some examples. So far I have not seen any books or videos on youtube showing how to apply clay to a brass tube and than turn it on a lathe. The best book I could recomend would be The Art of Polymer Clay Millefiori Techniques By Donna Kato !! It doesn't tell you how to make pen blanks or turn pens, but is the best book for telling you how to work with Polymer Clay. Jim S
). Many of them are extremely soft and won't hold up as well to the stress of turning.I forgot to mention the type of clay you use is also very important. Each clay has different charactoristics. I only use two brands (since they stopped making my favorite
You can use a similar caning approach, but the canes slices would need to be cut thicker than the bushings of the pen kit used, and when baking the clay, the tubes needs to be baked long enough to fully polymerize the clay so it gets hard enough to turn.
I show how I have set up my workstation to make my own canes at PTownSubbie.com - How to Make Polymer Clay Canes, but there's plenty of other ways and places to learn on the internet as well as books and videos. I watched dozens of tutorials myself.
Look in the library on this site. Toni has a great article on how she makes the blanks, but she doesn't turn them. I have turned them for about a year, but use a totaly different approach to building up the blanks. Once you make the blanks and fire them, they are just like turning any other blank on the lathe. It just takes less turning preasure and lighter sanding. I turn mine on a mini metal lathe and use files to shape them. Check my photo for some examples. So far I have not seen any books or videos on youtube showing how to apply clay to a brass tube and than turn it on a lathe. The best book I could recomend would be The Art of Polymer Clay Millefiori Techniques By Donna Kato !! It doesn't tell you how to make pen blanks or turn pens, but is the best book for telling you how to work with Polymer Clay. Jim S
Tina; I agree with you that there are thousands of videos out there on how to make canes and use Polymer Clay, and also how to cover plactic pens with clay, which are not turned. Have you ever run across someone showing putting the clay on brass tubes and then turning them on a lathe as we do ?? I also use the thicker slice method to make my pens. I have tried Toni's method, but I am not that talented !!! Love your designs. Jim S
Mind sharing which brands you use?:biggrin: Also what type of glue? ........Thanks and be well.............Jan
Mind sharing which brands you use?:biggrin: Also what type of glue? ........Thanks and be well.............Jan
!MrsPtownSubbie and plantman,
I am a little confused after reading this tread and Toni's tutorial thread. Do you use a base layer of clay around the tube before you add your cane slices like Toni, or do you use only the cane slices, or ....? Also, how do you fill in around the cane shapes to get a smooth filled in pattern?
Thanks for you help.
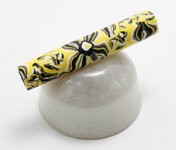
Toni uses a base layer of clay and than applies her designs on top of that. Her base layer is consistant in thickness, and she has the knack of being able to cut very thin slices of the same thickness to fill in her design. She than rolls her blank smooth and sands and finishes it. No turning!! I have tried this method, and believe me, it's not as easy as it sounds. I will usualy use the thicker cane slices to make my designs and use one of the colors in the design to fill in with, or a contrasting color, piece by piece. Or, if you know the brand and color of clay that is used in your cain, the same brand and color should match up fairly good, but dye lots can vary. If I find I can't get an exact match, I will circle the cain design with black or a contrasting color and than fill in the open spaces with some other color. When you use a base layer and add your design on top, than turn it round on the lathe you stand the chance of cutting through your design if you go to deep. If you use thick slices, the design goes all the way to the tube, and even if your barrel is not concentric, you won't loose your design. Thin slices saves a lot of design cain, but it realy takes a lot of practice to do it correctly and consistently. My hat is off to Toni for her beautiful work and the skillful art it takes to do it her way !!!! Photos are of my entry in this years beautiful pen contest. Tied for 7th place. Jim SI forgot to mention the type of clay you use is also very important. Each clay has different charactoristics. I only use two brands (since they stopped making my favorite
MrsPtownSubbie and plantman,
I am a little confused after reading this tread and Toni's tutorial thread. Do you use a base layer of clay around the tube before you add your cane slices like Toni, or do you use only the cane slices, or ....? Also, how do you fill in around the cane shapes to get a smooth filled in pattern?
Thanks for you help.
Thank you for the complements!! I love what I do.MrsPtownSubbie and plantman,
I am a little confused after reading this tread and Toni's tutorial thread. Do you use a base layer of clay around the tube before you add your cane slices like Toni, or do you use only the cane slices, or ....? Also, how do you fill in around the cane shapes to get a smooth filled in pattern?
Thanks for you help.
this is what happens when you read a post, post by post and make comments...
To fill in the spaces between the slices you roll the tube and it will fill it in by rolling.
YOur Pens are awesome I just love the pattern!!
MrsPtownSubbie and plantman,
I am a little confused after reading this tread and Toni's tutorial thread. Do you use a base layer of clay around the tube before you add your cane slices like Toni, or do you use only the cane slices, or ....? Also, how do you fill in around the cane shapes to get a smooth filled in pattern?
Thanks for you help.
I forgot to mention the type of clay you use is also very important. Each clay has different charactoristics. I only use two brands (since they stopped making my favorite
Hey Keith what was your favorite clay?
Whatever you do dont use Sculpey III for turning~!!!! I use Premo, Fimo and some Kato. Kato is very hard. I may not turn my pens but I know alot about caning and Polymer clay:biggrin:
MrsPtownSubbie and plantman,
I am a little confused after reading this tread and Toni's tutorial thread. Do you use a base layer of clay around the tube before you add your cane slices like Toni, or do you use only the cane slices, or ....? Also, how do you fill in around the cane shapes to get a smooth filled in pattern?
Thanks for you help.
Mind sharing which brands you use?:biggrin: Also what type of glue? ........Thanks and be well.............Jan
Not at all! Everyone has their favorite so this is only my opinion on the clay. I can see this opening a whole new can of worms, but each one is different. I believe in the library there is a link to Garie International. This is an artist who has done all kinds of testing (porousity?, floating, microwaving, strength, etc.). It is a great site for lots of good polymer information.
I use Premo & Kato. For me Sculpy III turns to mush as soon as you start kneading it. It's also more flexible than the others when it's baked which can lead to failures when turning. Fimo soft is another one that turns to mush. Premo & Kato tend to hold textures better due to their firmness. They tend to be harder to condition, but for what I do it is worth it. Fimo Classic is OK but not offered in as many colors as the others. Out of the two I use Kato seems to be the most durable once baked. I don't have a lot of experience with Pardo or Cernit (I have some of each to sample, but haven't got around to it). Studio was by far my favorite, but is no longer made
The glue I use is Crafters Choice (Hobby Lobby). Again there are many out there and people will have their favorites. For me Crafter Choice works the best. It works with all types of materials and surfaces. I spread a thin layer on the tube with my finger and let it dry. Once dry it almost has a plastic/rubbery feel to it. It creates a nice layer for the clay to adhere to. I have succesfully turned pieces with and without the glue, but I would rather error on the side of caution.
So i was making some tubes this evening and noticed I gave the wrong name for the glue. It is "The Ulitimate" by Crafters Pick.
I hate that I wasn't able to go to the meeting this year in VA!
I forgot to mention the type of clay you use is also very important. Each clay has different charactoristics. I only use two brands (since they stopped making my favorite
Hey Keith what was your favorite clay?
Whatever you do dont use Sculpey III for turning~!!!! I use Premo, Fimo and some Kato. Kato is very hard. I may not turn my pens but I know alot about caning and Polymer clay:biggrin:
I've seen that same report from Garie Int Which Types Of Polymer Clay Is The Strongest? The Tension, Compression And Flexibility Tests To all Types Of Polymer Clay. about brittleness in Sculpey III but I've not seen many issues with it. I've also read other reports stating Fimo Soft having the same problems as Sculpey III, so it's back to what works best for the artist and the resources they have available in their area. I like the color schemes available with Sculpey products and usually mix it with the stronger brands.
. I don't have the patience to cane so I go for the hard stuffI forgot to mention the type of clay you use is also very important. Each clay has different charactoristics. I only use two brands (since they stopped making my favorite
Hey Keith what was your favorite clay?
Whatever you do dont use Sculpey III for turning~!!!! I use Premo, Fimo and some Kato. Kato is very hard. I may not turn my pens but I know alot about caning and Polymer clay:biggrin:
I've seen that same report from Garie Int Which Types Of Polymer Clay Is The Strongest? The Tension, Compression And Flexibility Tests To all Types Of Polymer Clay. about brittleness in Sculpey III but I've not seen many issues with it. I've also read other reports stating Fimo Soft having the same problems as Sculpey III, so it's back to what works best for the artist and the resources they have available in their area. I like the color schemes available with Sculpey products and usually mix it with the stronger brands.
Thanks Tina for the link and the invite! I was looking for that link for an hour. That website has changed things up a bit. I know several people who have used Fimo Soft and Sculpy III for as long as I remember. They alway joke around with me that I am too hot blooded to use their clay
Tina, Tim and Tony,
How very civilised of you and others with your genuine sharing on this Post it has quite made my day and restored faith in some aspects of posting well done you three and Darley as well if I missed anyone cause Im old and memory is becoming a thing of the past.
Partisan talk is fine. Having heard from all of you I say there is room for more of this great interaction on the great IAP. Loving this way of sharing.
Kind regards Peter.