Please help me with my sanding/finishing skills

Signed-In Members Don't See This Ad

acturbo

Member
Joined
Jan 19, 2018
Messages
29
Location
Wilmington, DE
Hey everyone,

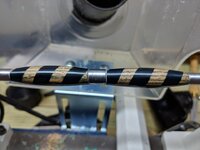
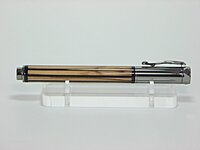
I've been making pens for about a year on and off. I have not problems turning pens casting blanks or any other aspect, but I just can't seem to get a scratch free finish on acrylics or alumilite. I've looked at all the videos, read all the threads, tried higher lathe speeds, lower lathe speeds, starting with a higher grit, starting with a lower grit, less pressure, more pressure, and I just can't get a finish I'm happy with. I attached a couple of photos of the pen I'm working on at the moment, it has been dry sanded starting at 320 grit to 400 to 600 to 1000 to 1500, then wet sanded from 1500 up to 3600. I know already at this point if I keep going the scratches will certainly not come out.

Does anyone have the magic tip I'm looking for? Any help would be greatly appreciated.

Thanks,

Chris

https://photos.app.goo.gl/VERRvtUivmmKDivC3

https://photos.app.goo.gl/rzwAZcKg0CwH9oXa2


rzwAZcKg0CwH9oXa2


VERRvtUivmmKDivC3
 
Last edited:
Signed-In Members Don't See This Ad

Ambidex

Member
Joined
Nov 2, 2011
Messages
1,108
Location
Bristol NH 03222
I start with 220 or 300 on acrylics...that's plenty rough in my book...any stronger grit will just dig deeper gouges. It looks like you didn't laterally sand(side to side) by the pictures. After each grit I stop the lathe and sand laterally to get the radial marks out. Try to make any radial scratches disappear before moving to the next grit. I usually wet sand to 12000 and don't have problems getting a good finish.
 

flyitfast

Member
Joined
Sep 3, 2009
Messages
1,690
Location
San Antonio, TX 78247
Agree with Ambidex - sanding laterally with the lathe stopped between grits with same grit will help to get rid of rings/ridges. I always wet sand on acrylics. This all applies to sand paper and micromesh. Also wipe down blank between grits to remove slurry with holds the previous grit ( you are sanding with 2 grits if you leave the slurry ).
Gordon
 

acturbo

Member
Joined
Jan 19, 2018
Messages
29
Location
Wilmington, DE
Agree with Ambidex - sanding laterally with the lathe stopped between grits with same grit will help to get rid of rings/ridges. I always wet sand on acrylics. This all applies to sand paper and micromesh. Also wipe down blank between grits to remove slurry with holds the previous grit ( you are sanding with 2 grits if you leave the slurry ).
Gordon

Thanks guys but I've done all that. Sanded laterally, wipe off after every sanding step.

As I said I've tried harder pressures, lower pressures, the lathe at 1200 rpm, the lathe at 800 rpm, I've tried spending more time wet sanding than dry and visa versa.

Why can't I seem to get a good finish? There has to be something I'm doing wrong.

What RPM are you sanding at, how much pressure are you applying?

Here's starting at 120 grit(actually looks worse then before):

https://photos.app.goo.gl/LRuZWA0VR8aMDj6t2
 

magpens

Member
Joined
Feb 2, 2011
Messages
15,912
Location
Canada
In my opinion, ALL "finish" sanding should be done by hand, laterally, WITH THE LATHE OFF and turning the headstock by hand ... from the first grit (180) to the last (2000).

No sanding with the lathe rotating for me ... I just cannot control the scratches.

Unless, of course, you are just doing rough shaping.
 

leehljp

Member Liaison
Joined
Feb 6, 2005
Messages
9,326
Location
Tunica, Mississippi,
Chris,

Have you tried liquid polishes or polish compounds? Also, by looking at the pictures, it looks like you might be too aggressive with your chisel and sandpaper, at least that is what I see in the second picture. I have never gotten to 12000 MM (micro mesh) without it being shiny.

Are you using CA on top, or using another finish on it? Rarely do I do a cast without adding CA on top and finishing with the CA. That is just MY preferences.

What finish ARE you using?

BTW, I rarely start out less than 400 sanding. I bring my blanks up to very smooth and shaped with my chisel before adding a finish.
 
Last edited:

acturbo

Member
Joined
Jan 19, 2018
Messages
29
Location
Wilmington, DE
Chris,

Have you tried liquid polishes or polish compounds? Also, by looking at the pictures, it looks like you might be too aggressive with your chisel and sandpaper, at least that is what I see in the second picture. I have never gotten to 12000 MM (micro mesh) without it being shiny.

Are you using CA on top, or using another finish on it? Rarely do I do a cast without adding CA on top and finishing with the CA. That is just MY preferences.

What finish ARE you using?

BTW, I rarely start out less than 400 sanding. I bring my blanks up to very smooth and shaped with my chisel before adding a finish.

I have this polish in the shop but have not tried it yet. I have one of the harbor freight buffers but I believe it operates at too high a speed for this?

https://www.amazon.com/gp/product/B0009SPY04/ref=oh_aui_detailpage_o05_s01?ie=UTF8&psc=1

I know I may be too aggressive with the sandpaper at times. I'm frustrated and tried add more pressure medium pressure, super light pressure. I just can't find anything that works to my satisfaction. The photo was up to 3600 MM but I know from experience with how deep the scratches are they likely will not come out from using the remaning grits of micro mesh.

Do you think I should try the harbor freight buffer with the polishes? Any recommendations I'd be happy to try at this point.

Thanks
 

JimB

Member
Joined
Mar 18, 2008
Messages
4,683
Location
West Henrietta, NY, USA.
It looks like you have sand8ng scratches on the bushings. If you are hitting the bushings with your sanding process you will get material from your bushings into your sandpaper and micro mesh. The metal from the bushings will leave deep scratches.
 

MRDucks2

Member
Joined
Jul 17, 2017
Messages
3,227
Location
Bristow, IN
My guess, and I am new also, so learning from my mistakes, is a combo of the above.

I use as fine a sandpaper as I can to start, sometimes that is 400 sometimes it is 240. I am now using abranet and micro mesh. Getting away from the turners packs of sandpaper (except for some shaping) has made a world of difference for me.

I make sure I get a uniform finish before moving on to the next grit. In the lower grits that is a uniform scratch finish, always finishing laterally. On the finer grits it means no scratches left before moving up or a uniform glare from my lighting.

While theoretically possible, I have learned that I cannot sand out scratches from a previous grit with a finer grit. If I see ANY scratches, I will go back one or two grits and work up.

I normally wipe between grits and clean the blank between every three grits. Most alumalite I am finding I must clean between every grit.

Just started wet sanding the plastic blanks a couple of months ago. Amazing difference with dry sanding. That could be more difficult on your hybrid blank (which is very cool).

If I am struggling with tool marks I will use a sharp round nose scraper burr up to clean it up before sanding (or re-sanding).


Sent from my iPhone using Penturners.org mobile app
 

acturbo

Member
Joined
Jan 19, 2018
Messages
29
Location
Wilmington, DE

acturbo

Member
Joined
Jan 19, 2018
Messages
29
Location
Wilmington, DE
It looks like you have sand8ng scratches on the bushings. If you are hitting the bushings with your sanding process you will get material from your bushings into your sandpaper and micro mesh. The metal from the bushings will leave deep scratches.

Thanks I will keep that in mind.
 

magpens

Member
Joined
Feb 2, 2011
Messages
15,912
Location
Canada
Just a suggestion ... learn to post your pictures inline without the viewer having to go to a separate website .... there is a short learning curve but you will learn it quickly and it is a whole lot better both for us viewers and for you (believe it or not).
 

gimpy

Member
Joined
Mar 10, 2012
Messages
2,584
Location
Danville, Pa
Below is what use.


This is what I use for stabilized wood and acrylics: and yes, sand laterally

1. Flitz Polish (for metal, plastic and fiber glass
2. Mequiars Plastx (clear plastic cleaner and polish
3. Hut Ultra Gloss (plastic polish
 

leehljp

Member Liaison
Joined
Feb 6, 2005
Messages
9,326
Location
Tunica, Mississippi,
Do you think I should try the harbor freight buffer with the polishes? Any recommendations I'd be happy to try at this point.

Thanks

As you gain experience, you will find by reading what others do that there are a thousand ways that attain what you want, but there will be only two or three that works for you, your skills and techniques.

By all means, try the HF buffer. I have one and haven't learned how to use it "effectively" yet. But in the last couple of days, I discovered I was using too much "polish". It doesn't take much.
 

acturbo

Member
Joined
Jan 19, 2018
Messages
29
Location
Wilmington, DE
My guess, and I am new also, so learning from my mistakes, is a combo of the above.

I use as fine a sandpaper as I can to start, sometimes that is 400 sometimes it is 240. I am now using abranet and micro mesh. Getting away from the turners packs of sandpaper (except for some shaping) has made a world of difference for me.

I make sure I get a uniform finish before moving on to the next grit. In the lower grits that is a uniform scratch finish, always finishing laterally. On the finer grits it means no scratches left before moving up or a uniform glare from my lighting.

While theoretically possible, I have learned that I cannot sand out scratches from a previous grit with a finer grit. If I see ANY scratches, I will go back one or two grits and work up.

I normally wipe between grits and clean the blank between every three grits. Most alumalite I am finding I must clean between every grit.

Just started wet sanding the plastic blanks a couple of months ago. Amazing difference with dry sanding. That could be more difficult on your hybrid blank (which is very cool).

If I am struggling with tool marks I will use a sharp round nose scraper burr up to clean it up before sanding (or re-sanding).


Sent from my iPhone using Penturners.org mobile app

I have some 3M polishing paper that I just ordered to try. Maybe I'll give that a shot and see if the results differ. I am using a round carbide bit as a final turning step and usually have some minor marks in the final product but nothing crazy.
 

acturbo

Member
Joined
Jan 19, 2018
Messages
29
Location
Wilmington, DE
Do you think I should try the harbor freight buffer with the polishes? Any recommendations I'd be happy to try at this point.

Thanks

As you gain experience, you will find by reading what others do that there are a thousand ways that attain what you want, but there will be only two or three that works for you, your skills and techniques.

By all means, try the HF buffer. I have one and haven't learned how to use it "effectively" yet. But in the last couple of days, I discovered I was using too much "polish". It doesn't take much.

Appreciate the help. I'm willing to try anything at this point to get a better result.
 

WriteON

Member
Joined
Aug 21, 2013
Messages
3,301
Location
Florida & Pa
If that is the result of lateral sanding I'm going to say that you need to work on better chisel control. Get the large scratches before sanding. Find a chisel you are comfortable with and make light gentle passes until the scratches are hardly visible. As for the first application of sanding try a little more pressure and keep the direction lateral.
 

MRDucks2

Member
Joined
Jul 17, 2017
Messages
3,227
Location
Bristow, IN
Frank has a valid point. It looks like you may not be sanding along the length of the pen blank enough with the lathe off before changing grits. There should be no scratches left around the pen like shown after wiping it down before moving to the next grit.


Sent from my iPhone using Penturners.org mobile app
 

acturbo

Member
Joined
Jan 19, 2018
Messages
29
Location
Wilmington, DE
Frank has a valid point. It looks like you may not be sanding along the length of the pen blank enough with the lathe off before changing grits. There should be no scratches left around the pen like shown after wiping it down before moving to the next grit.


Sent from my iPhone using Penturners.org mobile app

I took another layer off with the chisel and used the polishing paper, starting with the equivalent of 400 grit. Not perfect but much much better. I'm not leaning toward turning skills but something is up with either my sanding technique or the materials I'm using. I'll keep experimenting and see what happens. It's awfully frustrating though.

I appreciate all the help. :)
 

Attachments

  • MVIMG_20180325_213457.jpg
    MVIMG_20180325_213457.jpg
    164.5 KB · Views: 170

Fred Bruche

Member
Joined
Feb 11, 2018
Messages
975
Location
Philadelphia 19146
My experience from sanding/finishing CA, if the sanding grit doesn't look homogenous don't move to the next grit. Homogeneous means no valley (shinier than the rest of the blank) that would look like grooves in your case. If not homogeneous, keep sanding with the same grit until homogeneous. If it takes too long, back off and use lower number grit sanding. Speed and pressure are not really a factor in my experience.
 

TonyL

Member
Joined
Mar 9, 2014
Messages
8,915
Location
Georgia
Heed the advice of all of the above, you will eventually (and not in a very long time) find a process that balances the desired outcome/finish and amount of effort/expend you want to expend. Continue to observe (maybe with a light and a 10x loupe) what the finish looks like after each step.

In my experience, the best finishes have started with fewest tool marks (sharpest tools and gentlest cuts, especially as I am approaching the pre-sanded diameter). Sometimes I can start at 400, and sometimes (and I am not embarrassed to say) I hit the blank with 150 grit. I practice the process that works for me most, but not all of the time. Many on this forum in addition to my own trial and error, went a long way in helping me get to where I am today and I am no means any where close to the best of them - but I am pleased. You will get there, just as we all did. Very nice blank BTW. Happy turning.
 

gimpy

Member
Joined
Mar 10, 2012
Messages
2,584
Location
Danville, Pa
Also, don't use the same piece of sand paper over and over, the sand paper can and will make scratches as well. Don't be afraid of using new sand paper it's cheap enough, plus it'll be lease frustrating for you
 

dogcatcher

Member
Joined
Jul 4, 2007
Messages
2,361
Location
TX, NM or on the road
Buy a GOOD QUALITY sand paper, and use it like someone else is paying for it. Cheap sandpaper and failure to dispose of used sandpaper when it is worn out is one of the worst things a woodworker can do. Slow the lathe down, if you have to the speed too fast, it doesn't allow for efficient sanding, and using worn out sandpaper will burnish wood. Use a wetting agent when sanding acrylic, most people use water, but some use auto transmission fluid.
 

WriteON

Member
Joined
Aug 21, 2013
Messages
3,301
Location
Florida & Pa
For wet sanding I swear by the micro sanding pads and Kingpor wet/dry sheets.
On wood is use the strip packs that go from 150-800
 
Last edited:

jttheclockman

Member
Joined
Feb 22, 2005
Messages
19,132
Location
NJ, USA.
All in the tools. learn to use a skew and throw away the sandpaper. If you have to use sandpaper then wet sand always on acrylics. Start with nothing less than 600 grit. All in the tools. My opinion and have been doing it this way for over 10 years now.
 

DJBPenmaker

Member
Joined
Nov 10, 2016
Messages
539
Location
Cheshire, UK
I normally start sanding with 400 through to 1200 and use the wet and dry type, grey paper with a light touch and lathe running at 600rpm, then the micromesh grits. You should achieve a uniform, even finish before moving on. Sand laterally with the lathe off before going to the next grit and clean. After stepping through the grades I then use Plastic X as a final polish. Btw I don't wet sand at all. Lots of good advice given here, you will settle in to your own technique before you know it and then be giving others advice [emoji106]

Sent from my SM-G955F using Tapatalk
 

leehljp

Member Liaison
Joined
Feb 6, 2005
Messages
9,326
Location
Tunica, Mississippi,
In my first post on this thread, (#8) I mentioned that it looks like you are being too aggressive with the tool and sandpaper. I need to explain that a little bit. By saying "Too aggressive" I mean too much "pressure" using the sandpaper and the tool. I can see that on the bushing - the light gouges in the bushing.

Too much pressure/agression in using is often linked to the tool not sharp enough to do what is needed so more pressure is applied.

I agree with those that mentioned starting with 400 to 600 sandpaper. If your tool is sharp like it should be, you can sneak up on the size without making gouges. There are several good methods of sharpening tools. (Or get a good carbide insert tool). A few people have two or three chisels sharpened to use during the turning of a pen so that they won't have to stop and re-sharpen. I have a board with four 3" strips of sandpaper on it with the last one being .5?micron. A couple of swipes on that and my favorite scraper tool is sharp again.

JT mentioned that he starts at 600. That is because the tool does the work so that sandpaper doesn't have too. A SHARP tool eliminates a lot of sanding and keeps the deep sanding scratches out. 150 SP is good for flat work and large bowl work, but if one learns how to sharpen the tools and is OCD about sharp tools, that will mean less work with sandpaper, And you can start at 400, or if smooth enough - start at 600!

THAT sets the stage for getting smooth shines.

BTW - I remember a couple of posts over the years of some castings that just would not shine - similar to satin paint. No shine there. I don't remember what the cause was but it seemed to be a particular resin problem. It can be over coated with lacquer, poly, CA to get a permanent shine.
 
Last edited:

Ambidex

Member
Joined
Nov 2, 2011
Messages
1,108
Location
Bristol NH 03222
Frank has a valid point. It looks like you may not be sanding along the length of the pen blank enough with the lathe off before changing grits. There should be no scratches left around the pen like shown after wiping it down before moving to the next grit.


Sent from my iPhone using Penturners.org mobile app

I took another layer off with the chisel and used the polishing paper, starting with the equivalent of 400 grit. Not perfect but much much better. I'm not leaning toward turning skills but something is up with either my sanding technique or the materials I'm using. I'll keep experimenting and see what happens. It's awfully frustrating though.


I appreciate all the help. :)

This pic looks worlds apart from the original. I believe you're getting the hang of it and when you reach the OMG moment and get a glass like finish I think you'll find it's worth the practice and frustrating moments. If I remember correctly it only took me about 100 pens and struggles through many different styles of finishing to find the process that worked for me. Multiply that by many different materials and you get the appreciation of experience and all the wonderful help and knowledge available here. Just remember to apply others knowledge in a way that works for you as there is NO one way that works for all. Have fun and post your pics!:cool:
 

WriteON

Member
Joined
Aug 21, 2013
Messages
3,301
Location
Florida & Pa
Sometimes I can start at 400, and sometimes (and I am not embarrassed to say) I hit the blank with 150 grit. .

Why is it a crime? I told someone I start with 80 on certain applications and I got The Look.
 
Last edited:

leehljp

Member Liaison
Joined
Feb 6, 2005
Messages
9,326
Location
Tunica, Mississippi,
I see two different discussions emerging and they have to do with your OP question.

1. Sandpaper
2. Finishing

Sandpaper is usually the initial stage of finishing, but "finishing" usually goes beyond the sandpaper stages. To get a scratch free finish as your OP asks, this means moving beyond basic sandpaper usage.

OH, apologies to you on one item that I just saw: Yes the sandpaper you ordered from Amazon does cause problems. I have had that. I remember being told to ditch the black sandpapers a long time ago - but for a different reason - color on lighter woods. Still, those weren't quality sandpaper. Get some at an automotive place or speciality woodworking site.
 

nativewooder

Member
Joined
Feb 26, 2009
Messages
1,193
Location
Fort Pierce, Fl 34982
Sanding

My advice to anyone seeking help with sanding/finishing is: Go to Wood Central, scroll down to Russ's Corner. Read everything that Russ wrote as far as sanding and finishing. He was a genius. It took me a long time to realize that his saying about "no shortcuts". Then I had to read everything about MicroMesh sanding (wet) with mineral spirits and how to keep the MicroMesh from loading up with dust. Practice, practice, practice! MicroMesh is what jewelers use to polish all kinds of gems and will eliminate all scratches visible to the human eye. When you get to that point, you will realize that you have created some beautiful work. Practice, practice, practice!:eek:
 

acturbo

Member
Joined
Jan 19, 2018
Messages
29
Location
Wilmington, DE
Thanks for all the help everyone. Some great tips and info here. My first post and admittedly was not expecting so many responses. Great community here. I will def continue to share and gather information from you all.
 

WriteON

Member
Joined
Aug 21, 2013
Messages
3,301
Location
Florida & Pa
Thanks for all the help everyone. Some great tips and info here. My first post and admittedly was not expecting so many responses. Great community here. I will def continue to share and gather information from you all.

Once again welcome aboard. You'll work this out and will help others eventually. Just have fun and be safe.
 

MRDucks2

Member
Joined
Jul 17, 2017
Messages
3,227
Location
Bristow, IN
Keep in mind, Chris, that most of us learn something with each of these questions because of the tremendous response. There are a few who may already know everything but not many. There are some who also come across more harsh than intended because of the limits of communicating by message.

Frank - never have figured out some of the sandpaper negativity I see from time to time. I use whatever I need to get what I want. No, not a pro but even when I find something that works well, I then shoot for consistency, then see if I can get better.

The "Skew only" folks would surely send me to pen turning hell when I break out a 4-way rasp and use it on the lathe, but it sometimes will do just what I need. Lol.


Sent from my iPhone using Penturners.org mobile app
 
Last edited:

jttheclockman

Member
Joined
Feb 22, 2005
Messages
19,132
Location
NJ, USA.
Lots of info being thrown around here and some I am shaking my head at like the starting with 80 grit paper and 150 grit paper. Man if any pen needs to start at those grits there is a problem with turning techniques to begin with. Unless you are using the sandpaper to turn the blank down and no other turning tools should be no need to start that rough of a grit. I don't sand flat work with 80 grit paper.

I have a question after looking at the links provided what are we looking at?? Is that a wood with blue acrylic segmented in there?? Is that a spiral design or just biased cut segments?? That will have a different effect on what you can do and what you should do.

Chris the last photo you shown that you said you are getting better is showing me another problem developing and that is contamination of the blue in the wood grain. Is this on purpose?? I am not getting this blank. People are giving you answers to something totally different than what you are showing. We need to take a step back here.

Here is an example of acrylic and wood being used together. No way was I sanding and polishing the acrylic and then sealing and CA the wood and then polish out again.
 

Attachments

  • IMGP1049.jpg
    IMGP1049.jpg
    119 KB · Views: 125
Last edited:
Signed-In Members Don't See This Ad

acturbo

Member
Joined
Jan 19, 2018
Messages
29
Location
Wilmington, DE
Lots of info being thrown around here and some I am shaking my head at like the starting with 80 grit paper and 150 grit paper. Man if any pen needs to start at those grits there is a problem with turning techniques to begin with. Unless you are using the sandpaper to turn the blank down and no other turning tools should be no need to start that rough of a grit. I don't sand flat work with 80 grit paper.

I have a question after looking at the links provided what are we looking at?? Is that a wood with blue acrylic segmented in there?? Is that a spiral design or just biased cut segments?? That will have a different effect on what you can do and what you should do.

Chris the last photo you shown that you said you are getting better is showing me another problem developing and that is contamination of the blue in the wood grain. Is this on purpose?? I am not getting this blank. People are giving you answers to something totally different than what you are showing. We need to take a step back here.

Here is an example of acrylic and wood being used together. No way was I sanding and polishing the acrylic and then sealing and CA the wood and then polish out again.

Howdy,

That is a standard wood pen blank that I drilled the middle of, spiral cut on the lathe and then cut in 2 segments and filled with GREEN resin(lol). The contamination was not intentional but it was more of an experiment so I just decided to finish. It was cast with a slim line tube in mold if that makes a difference.

Thanks
 
Top Bottom