Panache pen profile

Signed-In Members Don't See This Ad

Mortalis

Member
Joined
Aug 19, 2013
Messages
660
Location
Bardstown, Ky
Turning my first Panache pen kit. I finished to longer piece with a lot of sanding to achieve a semi desired profile on the body. I was just wondering if anyone has any tips for making a large radius that I can use for making the next one once I get around to it?

TIA
 
Signed-In Members Don't See This Ad

jttheclockman

Member
Joined
Feb 22, 2005
Messages
19,140
Location
NJ, USA.
Can you explain more what you are asking. Can not follow it. Panache pens are a different profile than any other pens. But the kit more or less dictates the shape. No bulbous profiles on them. Bushing to Bushing.
 

Mortalis

Member
Joined
Aug 19, 2013
Messages
660
Location
Bardstown, Ky
Perhaps he is wanting a long sweeping concave arc on the pen body.
Yes, instead of a straight taper (borrring), I would like a large diameter 'cove' that sweeps from the large end of the body to approx1/3 to 1/4 the distance from the smaller diameter end.
 

flyitfast

Member
Joined
Sep 3, 2009
Messages
1,690
Location
San Antonio, TX 78247
As was said above, the kit limits the shape. However, you are the "artist" and however you want to shape it seems best. I have never thought of giving it some "character" but why hot?
Knock your self out and let us see what you come up with.
Gordon
 

Dale Lynch

Member
Joined
Dec 12, 2011
Messages
1,819
Location
Hastings,NE
The important thing to remember is to have your arc at the ends at the same angle as the bevel of the end caps.Start with the large ends,get the angles right then you can sweep the arcs to the center.Light cuts till your comfortable with the sweeping motion.
 

jttheclockman

Member
Joined
Feb 22, 2005
Messages
19,140
Location
NJ, USA.
Perhaps he is wanting a long sweeping concave arc on the pen body.
Yes, instead of a straight taper (borrring), I would like a large diameter 'cove' that sweeps from the large end of the body to approx1/3 to 1/4 the distance from the smaller diameter end.


I would not call that kit boring because you do not see them used much. It is more or less a desk pen. It has some weight BTB as is. But as said you are the one behind the tool. Lets see what you got. Go for it.:)
 

SteveG

Member
Joined
Dec 21, 2009
Messages
2,988
Location
Eugene, Oregon 97404
Try drawing out your concept. Lay out the lengths and diameters, and any important details such as the actual "bevel" angle of the end caps. Do this carefully, and do it to scale. Then you can pick off target diameters at a number of points along the length of the blank, and refer to these as you turn the blank. Always stay to the safe (underturned) side of the plans as you work toward the final shape and dimensions. This is a simple method to arrive at a desired profile, instead of just going at it, hopeful :confused: that you end up with the envisioned profile.

Maybe we will see something "new" out of your efforts.
Happy turning! :)
 

Mortalis

Member
Joined
Aug 19, 2013
Messages
660
Location
Bardstown, Ky
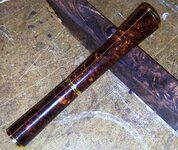
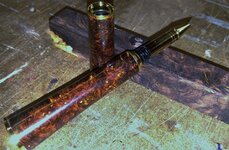
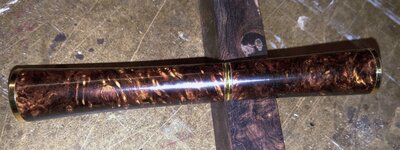
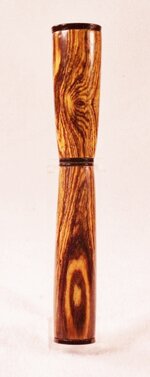
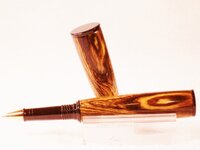
Ok, here is what I ended up with. Now, this was basically accomplished with hand sanding as I had the bulk of the profile completed while I was communicating with ya'all.
These pictures are not the best as they were taken quickly with my LG G4 phone.

I want to practice some on the coves before setting out on a $20 blank and $20 kit.

This is a Panache in gold accents using a Honduran Rosewood burl blank.
 

Attachments

  • 20160307_192222 (2).jpg
    20160307_192222 (2).jpg
    486.4 KB · Views: 120
  • 20160307_192406 (2).jpg
    20160307_192406 (2).jpg
    327.6 KB · Views: 91
  • 20160307_192456 (2).jpg
    20160307_192456 (2).jpg
    182.7 KB · Views: 99

jttheclockman

Member
Joined
Feb 22, 2005
Messages
19,140
Location
NJ, USA.
So you are going for the concave shape. I tried that on the Panache and i got the idea from a Mont Blanc pen design But was never able to get enough of a concave shape without hitting the tube to make it look presentable. I used a round nosed scraper to get my shape. Abandon the idea right after that and felt the original shape is enough of a design difference than other kits. Good luck as you try to perfect the shape.
 

plantman

Member
Joined
Jan 2, 2012
Messages
3,437
Location
Green Bay, Wi
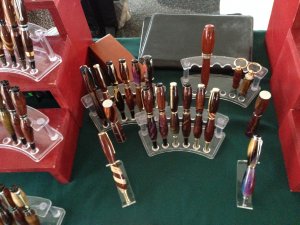
This is a twist I do on most of the Panache kits I build. It gives them a much better balance and look, stays away from that vampire stake look, and gives them a much better base for a stand alone deck pen. I switch the large end cap and the small end cap end for end. You will have to cut or grind off the flange for the large tube and super glue both caps on. Jim S
 

Attachments

  • DSCF0004 (255x640).jpg
    DSCF0004 (255x640).jpg
    172.9 KB · Views: 103
  • DSCF0005 (640x480).jpg
    DSCF0005 (640x480).jpg
    205.8 KB · Views: 92
Last edited:

Dale Lynch

Member
Joined
Dec 12, 2011
Messages
1,819
Location
Hastings,NE
That's really close,a slight bit more curvature needed on the cap.If your using bushings,slip it out of the way and hold the end cap up against the blank.You can check the angle and adjust your sanding to finesse it into shape.Don't forget to slip the bushing back in for sanding.
 
Top Bottom