Novice with question

Signed-In Members Don't See This Ad

kglass

Member
Joined
Feb 2, 2014
Messages
36
Location
Lake of the Ozarks
Hi all,
I am a novice Pen turner, but been turning for a long time. I have a basic question. I purchased a 7 pen set for Pennstate Ind. and made a few blanks and made a few pens form slimline kits . When I came to the comfort pen kit it has a silicone comfort grip piece in it. The bushing kit that came with it for comfort pens does not show how to incorporate the rubber piece. The bushing kit came with two larger bushings and a smaller one for the tip. How do gauge the width for the silicone comfort grip? What am I missing here?

Regards,
Ken
 
Signed-In Members Don't See This Ad

Jim Burr

Banned
Joined
Feb 23, 2010
Messages
3,060
Location
Reno, Nv
Welcome Ken!! I have never made one of those...but rest assured that some one who has will be to the rescue soon!!
 

Edward Cypher

Member
Joined
Feb 8, 2011
Messages
1,901
Location
Denver, Colorado
Welcome to the site. I am sure someone will answer this soon. I know another person asked if they even had to use the rubber grip because they thought it looked cheap and that answer was no they did not have to use it.
 

eranox

Member
Joined
Sep 12, 2012
Messages
322
Location
Killeen, TX
Ken, I can think of only two solutions. In both cases, you would start by gluing a smaller blank to the nib end (the end that you write with) brass tube, to allow room to slide on the silicone grip. This will leave you with a stubby blank with some exposed brass tube protruding from the end. You will of course want to leave just enough exposed tube to mount the silicone grip onto.

Option one: Go ahead and mount the silicone grip before turning, but don't glue it in yet. Use one of the larger bushings on the wood side, and use the nib bushing next to the silicone grip. Turn the pen barrel as you normally would, and use the silicone grip as a guide to help you turn the blank to the right diameter. Once it is turned to size, you can slip the grip off of the tube, and then remount the blank for final sanding and finishing. This method runs the risk of damaging the silicone grip during turning.

A better alternative would be to invest in a digital caliper. The caliper is a high precision measuring device, and is used frequently by pen turners. With it, you can take an accurate measurement of the end diameter of the grip, and then use the caliper to duplicate that diameter on the mating end of your blank. You can get a good but inexpensive digital caliper at Harbor Freight, usually on sale for about $10.

In either case, wait to glue on the grip until after you have sanded and finished the blank. You won't get any finishing compound or sanding marks on your grip that way, and you can simply turn the remainder of the blank down and try again if you make a mistake.
 

Marnat3

Member
Joined
Dec 29, 2013
Messages
394
Location
St Paul Minnesota
I was the one asking if I had to use the rubber grip.
Not because it looked cheap but I wanted to see more wood.
In answer to the question above, the instructions say to turn the lower part of the lower blank 1 inch to the brass tube. It was pointed out just to start with a smaller blank to begin with and leave the 1inch of brass exposed. Hope this helps.
 

Band Saw Box

Passed Away Dec 8, 2021
In Memoriam
Joined
Sep 21, 2013
Messages
3,670
Location
Hampton, VA 23666
Ken, I've look at those kits in the past and I think it said in the instructions how to turn the pen if you were using the rubber grip. I cant be sure but I think you turn the lower barrel to the size of the bushing and the remove the wood were tge grip would go, this is a kit that gives you the option of using the grip or not. I hope this helps.
 

Whitehat1994

Member
Joined
Jan 24, 2014
Messages
123
Location
Temple, Tx
Comfort pen

I turned one this weekend. The instructions came with the kit. After turning the blanks to the bushing size you then use a parting chisel and turn an inch off down to the tube
 

plantman

Member
Joined
Jan 2, 2012
Messages
3,437
Location
Green Bay, Wi
I agree with Stan !! Throw the rubber grip away. Every time you touch it, it is going to get sadder and sadder looking, and turn grey. It can not be brought back to the black look it started with!! I have made many of these pens and have never used the grip after the first one. As Stan says, let the wood or whatever you choose show. It makes a much richer looking pen. Jim S
 

kglass

Member
Joined
Feb 2, 2014
Messages
36
Location
Lake of the Ozarks
Thanks for all the advice. I think I found the solution by a Google search. You assemble as usual then turn and sand to final grit and then part off a 1" piece from the lower blank which is actually near the Headstock. I went ahead and finished the pen, but I am not a fan of the silicone grip, so I might leave it out on subsequent comfort pen kits. Thanks for the warm welcome to the forum as well....

Regards,
Ken
 

Tim'sTurnings

Member
Joined
Aug 19, 2008
Messages
420
Location
Central Michigan
I have made the comfort grip pens both ways. Some of my customers ask for the rubber grip, especially people who have problems gripping a pen. People with arthritis and other problems with gripping small items like them a lot. I always give my customers a choice by having both on hand to show them.
Tim.
 

Hendu3270

Member
Joined
Mar 13, 2012
Messages
919
Location
Pearland, Texas
I've only made one or two of those and I recall the instructions saying to remove a certain amount of material to accomodate the cushion grip. I remember it not being real clear at the beginning though. Been awhile.

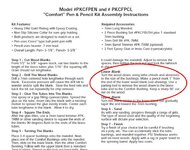
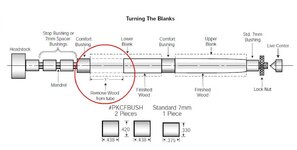
Just looked up the instructions on the PSI site. It's 1' of blank you remove from the lower blank. I remember now why it was difficult for me to locate when I turned this kit. I'm very "graphic" oriented. I skip right over text and go for pictures in all instructions, no matter what the item. In the graphic, shown below, the tapered end of the pen is on the right hand side, which made me think that's the lower blank, (even though it's clearly labeled as the upper). I always have pens oriented on the blank with the lower portion of the pen to the right, which fits with the graphic in the instructions.
 

Attachments

  • comfort-instruction.JPG
    comfort-instruction.JPG
    161.2 KB · Views: 62
  • COMFORT-REMOVE.jpg
    COMFORT-REMOVE.jpg
    91.7 KB · Views: 63
Last edited:
Top Bottom