ScoJo
Member
Do what I did. Attempt an inlay on your second pen. I'm gonna throw this thing across the garage.


The inlay came apart when I drilled the pen (twice), but I still managed to line up the grain. Lesson #1: rough up the inlay with sandpaper before trying to epoxy it. Lesson #2: 5 minute epoxy takes longer to set up to the point where you can drill the blank than I expected.
The key is to learn by observation so you don't make the same mistake to often. Don't look on it as a failure, look at it as an opportunity to learn what not to do next time.Here is the picture:
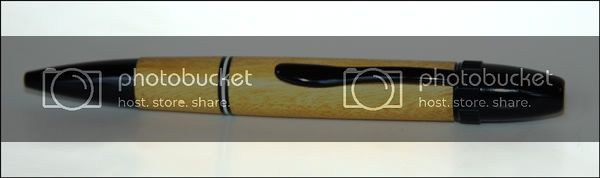
Being a Steeler fan (depressing today), I went for a yellowheart pen with black and white. The inlay came apart when I drilled the pen (twice), but I still managed to line up the grain. Lesson #1: rough up the inlay with sandpaper before trying to epoxy it. Lesson #2: 5 minute epoxy takes longer to set up to the point where you can drill the blank than I expected. This style of pen made it obvious to me that my pen is slightly out of round at the nib. The fit is better at the end with the twist mechanism. One thing I know is that I don't have a 60 degree live center, which I have read can cause this (the nib end was turned at the far end of the mandrel from the head stock). Is there anything else I could be doing wrong? Where can I get a reasonable live center? Online, somewhere? The Woodcraft catalog lists one at $20, but it is not in my local store.
One more thing. The description of this pen in the catalog lists an approximate length of 5.5" - this one is more like 5". Given that I cut the blank to the length specified and that the brass tubing fit, I'm guessing that's a typo. I would have preferred it longer.
). I managed to get my 4 christmas pens done, but ended up pitching every barrel I tried with the wrong live center (actually, I still have a practice slimline in walnut that my 7yo daughter wants so I'm going to give it to her). ). I suspect most of the improvement came from the right live center (I did turn one more pen, both barrels at the same time after switching livecenters but before going short mandrel, and it turned out pretty good... It's a fatline with no centerband so any out-of-round is pretty obvious, and it's very minimal) but I figure every little thing to help is more better, right?