My first efforts

Signed-In Members Don't See This Ad

diverdad

Member
Joined
Aug 5, 2011
Messages
10
Location
fayetteville ga
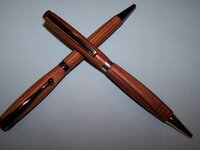
I hope the picture comes out okay. The bottom pen is a piece of 2x4 cut and drilled, and stained with walnut. The top pen I did today from a pre-drilled Brazilian Rosewood blanks and a PSI slimline kit. I rubbed two coats of urethane on it and cut in some finger grooves.
I got those ideas from this forum, so thanks.
I also got my neighbor at the lathe and he made his first pen. You should have seen his face. He was so proud.

I have a long way to go and would appreciate any suggestions you may have.Thanks for looking.
Andy
 

Attachments

  • 100_0136.jpg
    100_0136.jpg
    38.3 KB · Views: 330
Signed-In Members Don't See This Ad

PenMan1

Member
Joined
Jul 8, 2009
Messages
6,380
Location
Eatonton, Georgia
Good first effort, Andy. And welcome to the IAP.

While your urathane finish looks fine, you are very lucky to have Russell Eaton near you, who attends the Georgia IAP meetings. Russell has some great technique for finishing with a more durable finish and frequently demonstrates the new Stick Fast CA finsh.

Having seen many of his "new" CA finsh pens, IMHO, they are lightyears ahead of what most of us here are currently doing.

Again, nice first!
 

ragz

Member
Joined
Jul 21, 2008
Messages
241
Location
Bartlett, TN
Excellent start!
Your top pen shows that you have already learned from the bottom pen.

Some tips for you....
1 Sand lengthwise to remove tool and lower grit swirls
2 If you don't have a set get some calipers and always measure the fittings. Bushings will get you very close but they aren't always exact especially after using them a few times.
3 Make sure not to overtighten the nut on your mandrel or your tailstock as that can make your wood barrels oval or a little eccentric along with wearing out your mandrel.

Again though great start!
 

jbswearingen

Member
Joined
Dec 10, 2008
Messages
752
Location
Bowie, MD
I just re-read my initial response. It seems rude to me. I'm sorry for that! It was supposed to be supportive. Yours look a heckuva lot better than my first. My dad still uses it, nearly a decade later, so you know these things can last!

My bit of advice, to save you a lot of heartache and annoyance up front...

Turn your barrels one at a time on the mandrel, even if it holds two. For the life of me, I have NEVER been able to get the barrel on the right side to turn straight. It's always out of round a bit. So I turn the left one, sand it, and then swap them around and turn the other.

Figure out the CA finishing method. It's easy. DON'T apply finish on the mandrel.

Get a 60* dead center and a 60* live center. Pull your mandrel out. Insert the dead center in the head and the live in the tail. Mount your barrels, individually, between the centers. Apply your CA finish. This way your barrels won't stick to the bushings.

Here's my method for CA (not my video, but what I watched to learn). I do two things differently--I use medium thickness CA, and I apply it to the towel, not the blank. This way it doesn't get flung about.

http://www.youtube.com/watch?v=Y8wdHFrVadY

Monty (a member here) has the best prices I've seen on CA, accelerator, and debonder. www.woodenwonderstx.com
 
Top Bottom