Morse Taper Sockets Adapter

Signed-In Members Don't See This Ad

TurtleTom

Member
Joined
Jul 24, 2015
Messages
701
Location
Checotah, Oklahoma 74426
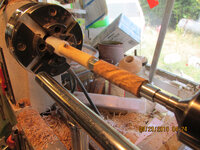
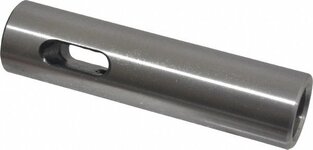
I seem to spend an inordinate amount of time taking the chuck off, cleaning the taper inside the headstock and putting the mandrel back in. If I used a straight #2MT adapter I could just leave the chuck on all the time. It's like $24 but has anyone else tried this.
I don't suppose it will be too much bother to slide the live center up to zero the thing while I tighten the chuck. What I really need is 2 lathes but that will be awhile.
 

Attachments

  • Straight to #2MT.jpg
    Straight to #2MT.jpg
    16.1 KB · Views: 495
Last edited:
Signed-In Members Don't See This Ad

KenV

Member
Joined
Oct 28, 2005
Messages
4,720
Location
Juneau, Alaska.
Not visualizing how an extender/adapter will help much with going from external threads to internal MT --

I do use a ER32 collet chuck for most of my pen mandrel turning. Collet chuck with a 1/4 inch collet allows easy adjustment and the collet holder threads on.

Still have to clean the MT of debris to put in the dead center for turning between centers though.

I just use a toothbrush to sweep out debris from the MTs -- though some use the "green cleaner" to do that task.
 

chartle

Member
Joined
Mar 13, 2015
Messages
1,287
Location
Pgh, PA
Ok think I got it you are going to mount the mandrel in the adapter and then insert that assembly into the Chuck. Seems like a lot of room for things to get mis aligned.
 

monophoto

Member
Joined
Mar 13, 2010
Messages
2,543
Location
Saratoga Springs, NY
Not at all clear what you are trying to do.

I have a MT sleeve that allows me to use an MT1 pen mandrel on an MT2 headstock. Works fine - the only issue is removing the sleeve from the mandrel for storage (you have to wedge a screwdriver in the hole in the side to pop the mandrel MT out of the sleeve).

But it's not clear to me how this would minimize the need to clean out the inside of the headstock MT. Are you thinking about an adaptor that attaches to the headstock by means of a thread rather than an MT?
 

chartle

Member
Joined
Mar 13, 2015
Messages
1,287
Location
Pgh, PA
Not at all clear what you are trying to do.

I have a MT sleeve that allows me to use an MT1 pen mandrel on an MT2 headstock. Works fine - the only issue is removing the sleeve from the mandrel for storage (you have to wedge a screwdriver in the hole in the side to pop the mandrel MT out of the sleeve).

But it's not clear to me how this would minimize the need to clean out the inside of the headstock MT. Are you thinking about an adaptor that attaches to the headstock by means of a thread rather than an MT?

Per what I posted above.

Mount the mandrel in the straight adapter and now the mandrel has a straight shaft on it that can be placed in the chuck.
 

magpens

Member
Joined
Feb 2, 2011
Messages
15,912
Location
Canada
Can you unscrew the MT off the end of your mandrel ? And then just mount the mandrel end in the headstock chuck ? That's what I did until I went over to the TBC technique, which I find is preferable to, and more accurate than using a mandrel.
 

chartle

Member
Joined
Mar 13, 2015
Messages
1,287
Location
Pgh, PA
Can you unscrew the MT off the end of your mandrel ? And then just mount the mandrel end in the headstock chuck ? That's what I did until I went over to the TBC technique, which I find is preferable to, and more accurate than using a mandrel.

I was thinking that too or just get a replacement mandrel but don't know much about lathe chucks.

I thought that maybe that requires a jaw replacement to go from drilling blanks to holding a 7mm rod.
 

magpens

Member
Joined
Feb 2, 2011
Messages
15,912
Location
Canada
I think it would be possible to get a set of small chuck jaws which would close down on the 7mm mandrel, but replacing chuck jaws is a pain.

You might be able to grip your MT tapered mandrel end in the same jaws you use for drilling, but the act of gripping the tapered MT might damage it.

Can you unscrew the MT off the end of your mandrel ? And then just mount the mandrel end in the headstock chuck ? That's what I did until I went over to the TBC technique, which I find is preferable to, and more accurate than using a mandrel.

I was thinking that too or just get a replacement mandrel but don't know much about lathe chucks.

I thought that maybe that requires a jaw replacement to go from drilling blanks to holding a 7mm rod.
 

TurtleTom

Member
Joined
Jul 24, 2015
Messages
701
Location
Checotah, Oklahoma 74426
Sorry for getting back to this so late, this will teach me not to subscribe to my own threads! Chartle and Magpens are correct, the idea is to chuck up the mandrel without removing the chuck from the lathe. And the caveat is to not have to indicate it in line Chartle noted. It doesn't take much to get it off center. These aren't exactly LeBlonde Chucks either.
I'll have to try the technique magpens was talking about, that is just to remove the shaft from the mandrel. I wasn't sure the 7mm shaft would present enough material for a solid bit from the chuck. I'm sure this will work till I get my TBC's made without having to buy some more iron for my already overcrowded lathe accessories drawer.
I know Paul is a talented machinist but I'm just not visualizing the plastic thingee.
 

Paul in OKC

Member
Joined
Jul 26, 2004
Messages
3,090
Location
Oklahoma City, OK, USA.
Wouldn't have to be plastic. As I think a bit, it could be wood. Make a plug and use a loooong bolt or all thread. Could be just two large washers and all thread, I guess. As I picture using the chuck to clamp on the mandrel, isn't that going to limit how tight you can get the brass nut, or am I missing? As you tighten the nut against the blanks, the mandrel will want to pull out.
 

TurtleTom

Member
Joined
Jul 24, 2015
Messages
701
Location
Checotah, Oklahoma 74426
Thanks Paul, this will work and quickly too.

Wouldn't have to be plastic. As I think a bit, it could be wood. Make a plug and use a loooong bolt or all thread. Could be just two large washers and all thread, I guess. As I picture using the chuck to clamp on the mandrel, isn't that going to limit how tight you can get the brass nut, or am I missing? As you tighten the nut against the blanks, the mandrel will want to pull out.

I'm still not sure what you are saying but I think I'm on to a solution. If I'm worried about chewing up the mandrel then all I need is a much larger bushing to put in the chuck that the mandrel would just slide into The face of the chuck would bear the load via a large bushing on the mandrel. I'll make one of pecan or oak. The brass nut is moot because I tighten with the mandrel saver via the tailstock so all I'll be doing is pushing against the chuck. Is this what you were suggesting?
Thanks Paul, I need to get over that way and check out the operation pretty soon.
I'll post a picture here when I'm finished.
 
Last edited:

Skie_M

Member
Joined
Aug 7, 2015
Messages
2,737
Location
Lawton, Ok
Mount a piece of 1/4 inch aluminum or brass rod in your chuck with a good 4 inches sticking out .... put on a turned piece of wood that has been center drilled (perhaps an inch wide, 3 inches long)

Using a cutoff wheel, make random cuts in the inch that is still sticking out, and then apply epoxy, slide the mandrel an inch further into the chuck to even up the ends.

Once cured, turn the wood round with respect to the mandrel (just to make sure it is on center).

Flip your new mandrel around and mount the wooden end in the chuck.

Using sandpaper (and a dust mask, with good dust collection), sand your mandrel down to .245 inches (in order to accept standard 7mm bushings).

Apply polish and wax (helps prevent CA from sticking to the mandrel)


Don't forget a mandrel saver ....
 

TurtleTom

Member
Joined
Jul 24, 2015
Messages
701
Location
Checotah, Oklahoma 74426
This is what I put together. but it's just a proof till I redesign. A short piece of HDPE with a B letter drill hole through it (matches mandrel). The mandrel is inserted (without morse taper adapter) into the hole. The B letter bit makes a snug fit in the HDPE so I don't have to worry about it falling off when I'm changing out. The blanks and bushings are inserted, then the mandrel saver is tightened and you're ready to turn. The white blank on the left is just waste to get me away from the chuck, I will probably remake all of this in brass and get it as tight as I can, I might glue it on.
Skie might me right as I'm relying on friction between the chuck and the blank to turn everything. I did turn down a square blank ok. It stopped about the same number of times as the other mandrel before I got it to the right tension. Still need that washer tensioner.
This is going to save me a lot of time. And no re-Morse. Was there a code?:biggrin:
 

Attachments

  • nomorse.JPG
    nomorse.JPG
    191.7 KB · Views: 140
Last edited:

TurtleTom

Member
Joined
Jul 24, 2015
Messages
701
Location
Checotah, Oklahoma 74426
Mount a piece of 1/4 inch aluminum or brass rod in your chuck with a good 4 inches sticking out .... put on a turned piece of wood that has been center drilled (perhaps an inch wide, 3 inches long)

Using a cutoff wheel, make random cuts in the inch that is still sticking out, and then apply epoxy, slide the mandrel an inch further into the chuck to even up the ends.

Once cured, turn the wood round with respect to the mandrel (just to make sure it is on center).

Flip your new mandrel around and mount the wooden end in the chuck.

Using sandpaper (and a dust mask, with good dust collection), sand your mandrel down to .245 inches (in order to accept standard 7mm bushings).

Apply polish and wax (helps prevent CA from sticking to the mandrel)


Don't forget a mandrel saver ....

Wouldn't it be better to do all this with brass threaded onto the mandrel. Turn it around, chuck it close and true it up. I know I'm going to try it. Methinks we shall learn much about centers on chucks. My brass is due here on Tuesday. With brass I won't have to worry about chuck jaws ruining the wood plug. You still get half the royalties. :wink:
 
Last edited:

Skie_M

Member
Joined
Aug 7, 2015
Messages
2,737
Location
Lawton, Ok
Well, yeah .... brass or aluminum. Wood is much less expensive, but the metal will last you much much longer.

I'll have to head down to my local Fastenal and see if they happen to have some brass rod stock in at around an inch so I can do this for myself.

I already have a small aluminum mandrel that I made to hold in my 3-jaw chuck for when I just want to make a bead or something really small.


Also, concerning threading .... make sure you are not turning in the wrong direction, or you'll spin that thing right off. Probably best to solder the brass in place on a brass mandrel, threads or not.
 

TurtleTom

Member
Joined
Jul 24, 2015
Messages
701
Location
Checotah, Oklahoma 74426
Also, concerning threading .... make sure you are not turning in the wrong direction, or you'll spin that thing right off. Probably best to solder the brass in place on a brass mandrel, threads or not.[/QUOTE]

Oddly, that was the first thing I thought about. Murphy and I go way back. It just won't run backwards without risk, but my lathe doesn't even run backwards.
 

Skie_M

Member
Joined
Aug 7, 2015
Messages
2,737
Location
Lawton, Ok
Heh .... well, if you thread something on in one direction so that it tightens as it's spinning and then you flip it around, you'll be turning that thing right off the threads now .... :p


There are several methods to deal with it, of course ....

Using a nut on the back that locks against the face of the brass chuck collar... (with threads)

Soldering the mandrel in place (with or without threads) to lock it in place...

Drill and tap a hole through the collar into the mandrel hole to use a screw to lock the mandrel in place... (with or without threads)
 

TurtleTom

Member
Joined
Jul 24, 2015
Messages
701
Location
Checotah, Oklahoma 74426
These designs will work best with a mandrel saver but isn't limited to using one.
What would improve everything is if someone would invent bushings with a high friction coefficient. Everything on a mandrel turns by nothing but friction between the bushings, blanks and ends. That's why we have to keep tightening the mandrel. I think I'm going to sand the ends of mine with rough sandpaper. That should increase friction considerably.
 

Skie_M

Member
Joined
Aug 7, 2015
Messages
2,737
Location
Lawton, Ok
Bad idea.


What makes a morse taper work is the close fit .... it has to be a nice SMOOTH surface that grips the other tightly.

If you sand it to a rough surface, you will have peaks and valleys in the taper .... only the peaks will make contact with the face of the taper, and you will have constant slippage until you end up with galling inside the taper and outside on the mandrel taper. After it starts galling, you will end up with a mandrel that gets stuck in the taper as it virtually welds itself together.
 

TurtleTom

Member
Joined
Jul 24, 2015
Messages
701
Location
Checotah, Oklahoma 74426
Lord have mercy, sand a taper? Never in a million years. I grew up in a machine shop.
I meant sand the ends of the bushings. The friction on the bushings is the only thing that makes the blanks turn. I'm sure different makes of bushings will have different friction coefficients depending on how they were made and this probably accounts for why some people have more trouble tightening the brass nut or the mandrel saver.
 

Skie_M

Member
Joined
Aug 7, 2015
Messages
2,737
Location
Lawton, Ok
*whew* ... I was sweating bullets there, for a minute ...

Sanding the taper is a fast way to ruin a good machine ...


The one thing I see that's bad about sanding the bushings is .... whatever you have on them for texture *WILL* be permanently pressed into the ends of your blanks.

I like to polish the ends of my bushings, for that reason.


I generally start off at high speed these days, to knock those corners down .... nice very sharp chisels that are freshly buffed do a good job of that.
 

TurtleTom

Member
Joined
Jul 24, 2015
Messages
701
Location
Checotah, Oklahoma 74426
If you consider how the mandrel works, you might want to roughen up those bushings.
As the mandrel turns, (isn't that a soap opera?:)), nothing on the mandrel itself causes your blank to move, the tube will spin freely on the mandrel. Friction on all the parts between the washer on the mandrel, (well designed washer at that) and the brass nut is the only thing that turns your blank. The more polished the bushing ends are the less friction is between them and the more your blank will stall on the mandrel. I'm only talking about going from a mirror finish to a lightly sanded finish. This change will have no affect whatever on the blank except at a microscopic level.
(I'm doing some research on this and plan to publish an article in the near future.)
 

Skie_M

Member
Joined
Aug 7, 2015
Messages
2,737
Location
Lawton, Ok
I could probably get away with lightly sanding my bushing ends to 360 or 400 for extra grip, but it wouldn't help me much til I can get my tailstock locked down tight. It still slips on me while in use. At the moment, I'm experimenting with putting some small strips of 220 grit under my tailstock to see of that will help me.

If that doesn't work, I'm thinking about coating my lathe bed with something mildly abrasive to increase the traction.
 

Paul in OKC

Member
Joined
Jul 26, 2004
Messages
3,090
Location
Oklahoma City, OK, USA.
Wow, you guys are giving me a headache! Not really, but an awful lot of thinking going on here. Things pressed together is generally enough force to drive the blanks on the mandrel. I get the thought of friction. This is where you may want to look into turning between centers. My only thought of relying on the chuck for concentricity in a range I expect to have, it won't repeat each time you take the mandrel out and put it back the next time. That is where I get pretty annul.
Just got an idea. Will have to see if I can make it work, and get back to you. May send you a PM for some info, and your thoughts in a day or two.
 

Skie_M

Member
Joined
Aug 7, 2015
Messages
2,737
Location
Lawton, Ok
Mark the mandrel bushing and the chuck to let you know where to set it when you put it back in? Though, if it's turned round on center, it should be repeatable no matter it's orientation, if your chuck is working properly ...
 

Paul in OKC

Member
Joined
Jul 26, 2004
Messages
3,090
Location
Oklahoma City, OK, USA.
Ok, new thoughts. (PM sent, btw Tom) can you just leave the tapered part of the mandrel in the head stock, and get a 1/4-28 screw to plug the hole? When using the mandrel, just leave the chuck on, closing the jaws lightly on the mandrel and go. You would lose some length, but would there still be enough room to turn one blank at a time?
 

TurtleTom

Member
Joined
Jul 24, 2015
Messages
701
Location
Checotah, Oklahoma 74426
Ok, new thoughts. (PM sent, btw Tom) can you just leave the tapered part of the mandrel in the head stock, and get a 1/4-28 screw to plug the hole? When using the mandrel, just leave the chuck on, closing the jaws lightly on the mandrel and go. You would lose some length, but would there still be enough room to turn one blank at a time?

No, the mandrel head doesn't come apart to allow it to be chucked up. Do you think it would overheat? That was why I wanted the Morse adapter so I could still use the entire mandrel.

I need to run my HDPE bushing setup for a little while and check the temperature on it to make sure it doesn't overheat. The brass mandrel holder will solve all these problems. Instead of threading the brass I'm going to mill a flat and use a set screw.
 

TurtleTom

Member
Joined
Jul 24, 2015
Messages
701
Location
Checotah, Oklahoma 74426
Solution found, but why isn't the simplest winning solution more obvious?
I had just assumed the chuck throat wasn't big enough or long enough to capture the entire mandrel head WITH the #2 taper. But it did. All my chucks (4 PSI CSC2000C Barracudas) will clamp on the whole thing. I just wish I was getting a government grant to waste that much time and energy when it was so simple. It runs very true. I'm so glad we discovered this before my TBC building material got here or I would never have gone this far with it.
No need to remove chuck to use the mandrel.
(Many thanks to Paul who began this line of thought)
 
Last edited:

Skie_M

Member
Joined
Aug 7, 2015
Messages
2,737
Location
Lawton, Ok
Are you clamping the #2mt directly in the 4-jaw chuck?

Or are you clamping on the nose of the mandrel, allowing the taper to pass through the chuck?
 

TurtleTom

Member
Joined
Jul 24, 2015
Messages
701
Location
Checotah, Oklahoma 74426
I tightened the mandrel in the headstock and tightened the chuck onto both sections of the headstock with the #2 MT behind the jaws. Pretty amazed it worked.
I have several jaw types, some have teeth and some don't, I'm not sure which is best yet.
I even tried it with the mandrel loose in the headstock to test my theory on friction and it worked fine.
We ferreted that rabbit right out of that hole Paul.
 
Last edited:

Skie_M

Member
Joined
Aug 7, 2015
Messages
2,737
Location
Lawton, Ok
With teeth is good for softer woods and plastics .... no teeth is better for harder woods, plastics, metals ...
 

Paul in OKC

Member
Joined
Jul 26, 2004
Messages
3,090
Location
Oklahoma City, OK, USA.
By teeth do you mean grooves on the contact area? For what you are doing with using the mandrel saver, I don't think it will matter. Are you using the jaws as the pressure point turning? You could drill a whole in some steel and chuck on it for that. Make it long enough to go against the taper in the head stock, and stick out past the jaws. That would keep pressure off the jaws in a way that might not be good for the chuck in the long run.
 

TurtleTom

Member
Joined
Jul 24, 2015
Messages
701
Location
Checotah, Oklahoma 74426
To update this old thread I followed magpens advice and bought a plain 7 mm mandrel which is use when I don't have the correct bushings. I don't even tighten it up massively since rotary force is delivered through whichever bushings I'm using.
 
Signed-In Members Don't See This Ad
Top Bottom