Matching upper and lower barrels

Signed-In Members Don't See This Ad

bwg

Member
Joined
Jul 14, 2014
Messages
13
Location
Pittsburgh
Can someone offer some advice about matching the upper and lower barrels of slimlines. I have decided to put my efforts into slimline modifications. As nice as the other pens are, they really aren't mine...
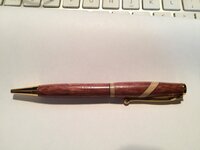
The problem I have is matching the upper and lower barrels. I have attached a sample. Maybe you can see where the barrels meet and are just a hair off. What is the best way to deal with this?
Am I just not exact enough in turning?
Would it be better to fit the bottom barrel a little into the top?
How did yinz (I'm from Pittsburgh:)) deal with this issue.
Any ideas would very much appreciated.

ps..When reviewing the pic I just noticed the tool marks I left in the pen...sheesh!
 

Attachments

  • IMG_0254.jpg
    IMG_0254.jpg
    126.4 KB · Views: 272
Last edited:
Signed-In Members Don't See This Ad

lyonsacc

Member
Joined
Aug 31, 2012
Messages
1,615
Location
Cincinnati, OH
Well, I was going to reply, but then I noticed you were from Pittsburgh . . .

But, as an act of good sportsmanship, I'll comment. I am guessing you are referring to the slight difference between the lower barrel and the lower edge of your custom centerband. A good set of calipers will help get those really close - and you may have to measure during your sanding process to make sure the final diameters match.

Oh, and I am sorry you city will be VERY SAD next Saturday evening!
WHO DEY!
 

Cwalker935

Member
Joined
May 18, 2014
Messages
3,506
Location
Richmond, Va
Are you using a pen mandrel, if so square your blanks and butt the upper an lower barrels together on the mandrel and turn as if it was one long barrel. You might still have issues if they are a little out of round or if the transmission is not pushed in perfectly straight.
 

JimB

Member
Joined
Mar 18, 2008
Messages
4,682
Location
West Henrietta, NY, USA.
I'm not sure what you are referring to but if there is a gap between the bottom barrel and the custom ring I can think of two problems.

1. If it goes all the way around the pen then you may have been over aggressive squaring the ends leaving the brass tube protruding slightly.

2. If it doesn't go all the way around the pen then you didn't square the ends well.

I don't see a gap. It looks like the bottom barrel near the center ring is blackened. This can be caused by sanding dust from the bushings.
 

bwg

Member
Joined
Jul 14, 2014
Messages
13
Location
Pittsburgh
Sorry about being unclear. The diameter is the same... no problem there. The issue is that the butt ends are a little off. If you look at the shadow of the pen in the picture you can see what I mean.
btw I did use a pen mill
 

JimB

Member
Joined
Mar 18, 2008
Messages
4,682
Location
West Henrietta, NY, USA.
Sorry about being unclear. The diameter is the same... no problem there. The issue is that the butt ends are a little off. If you look at the shadow of the pen in the picture you can see what I mean.
btw I did use a pen mill

I see the gap in the shadow! Using a pen mill can still cause the two problems I describe for several reasons. You can still over mill the ends and remove too much wood below the brass tube. Also, if the mill doesn't have a good fit into the brass tube it will cut unevenly. Third, if you have sharpened your mill and not done it correctly it can cause various problems.

It is only a guess but I think you over milled and the brass tube is sticking out a tiny, tiny amount.
 

JimB

Member
Joined
Mar 18, 2008
Messages
4,682
Location
West Henrietta, NY, USA.
You may also have some of your finish on the ends preventing them from coming together. Do you clean up the ends after you apply your finish?
 

bwg

Member
Joined
Jul 14, 2014
Messages
13
Location
Pittsburgh
I think the mill (or my use of it) might be the problem. As a matter of fact I did buy a new one because I thought that maybe I sharpened it incorrectly. But I still don't like the iffy situation I get when milling the end of a tube. I can't actually see what I'm doing until its done. Do you think it would be better to rig up a jig to use a sanding disc. I figured that I could keep everything easily squared up by using the lathe. And then some sort of off-center rig to keep from burning up the center of the sand paper. I don't know--that's why I am looking for advice. I don't think I'm the first person with this issue.
 

JimB

Member
Joined
Mar 18, 2008
Messages
4,682
Location
West Henrietta, NY, USA.
I use the mill to do mine. Just need to go slow and easy when you get close and check often. I have a simple jig for my lathe if I want to use it. For cleaning up the end after finishing I use the lathe jig. It's just a piece of wood I tapped to thread onto my headstock. I flattened the end and stick a piece of sandpaper on it. I put a Jacobs chuck with a rod in the tailstock. Slide the blank onto the rod and bring it up to the sandpaper.

There is a member who sells an off center jig that works the way you describe. At the moment I can't remember who it is.
 

Hawkdave

Member
Joined
Jan 1, 2016
Messages
243
Location
Adelaide, Australia
Hi bwg....I use the sanding disc to square all of my blanks. To help keep them square I use a mitre sled set at 90 degrees (also ensure your table is square to the sanding disc). Then I touch the blank to the disc, I then turn it to another side and do the same. I keep doing this until I have done all four sides. You will hear a slight change in sound as you come down to the brass tube. But nothing beats checking visually each time to see how much you have left to sand.
To stop the burning you can do a couple of things;

Keep your disc clean with a disc cleaning rubber.
Sand with very light strokes and keep moving the blank.

I also make sure my blanks are not too long because that means more sanding.

If you go to the 'Library' at the top of the page, then to 'tools and jigs' you will find a pdf done by Eric Haardt entitled 'Off Centre Squaring Jig'

Dave
 
Last edited:

mecompco

Member
Joined
Apr 24, 2015
Messages
1,607
Location
Fairfield, Maine
Ditch the pen mill and do as in the post above. It's easy to make (or purchase) a flat disc to chuck in your headstock. Use a drill chuck in the tailstock and get a set of punches (cheap on Amazon and you can also use them to take pens apart when needed). Chuck the appropriately sized punch in the chuck, put the tubed blank on and press against the sanding disc (at slow speed).

I had gaps on the few pens I used the mill with. Now squaring on the lathe, no problems. Also, you can square up brittle blanks this way that the pen mill would shatter.
 

2shoes

Member
Joined
Dec 21, 2015
Messages
9
Location
Colorado
It's Richard Harrell that makes the jigs for sanding the ends on the lathe. Just received a post and rest from him, excellent work he does.
 

BSea

Member
Joined
Dec 28, 2009
Messages
4,628
Location
Little Rock, Arkansas
I agree with the 3 posts above. And since you are doing a custom centerband, you could make the diameter of the centerband bigger than the lower barrel. If you have the right tools, you can undercut the centerband so the lower barrel is slightly covered by the centerband. It gives the pen a cleaner transition IMHO.

Overall, I like your pen. And the fact that you're paying attention to these details will make you a better turner. Good Job! :good:
 

mredburn

IAP Activities Manager
Staff member
Joined
Jul 5, 2009
Messages
8,753
Location
Fort Myers FL
I have found that sometimes the transmission is the problem. I will have perfectly matching ends at the join and as I turn the top you can watch the top blank turn on an eccentric orbit at the join or the finial end will wave in the breeze.
 
Top Bottom