Maple Burl issue

Signed-In Members Don't See This Ad

shoelessjj

Member
Joined
Mar 12, 2013
Messages
17
Location
Kenutcky
Greetings - My experience making pens in limited. Things have gone well since I started and I feel as though I'm getting good results. I have run into something though that I do not know how to address. Perhaps someone here can advise or redirect me to the correct forum.

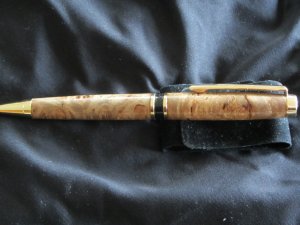
I picked up a couple of maple burl blanks in my initial quest to sample different woods. I began turning the blanks for a Woodcraft Hart double twist pen last night.

As I finalized the shape of the top portion, I stopped the lathe and I detected what must be called "pitting" in the blank. What I saw were places in the blank where there were recessed pockets (uneven surface - not from any from of gouging on my part) . This seemed to be next to some of the swirls of the blank.

I looked at it and wondered how do I proceed with this. If I complete the blank and finish it (I'm only at a point where I'm using Mylands), then I'm not going to have a universally smooth surface.

I wondered is this a case where I need to fill this somehow with CA glue and then sand it down? I apparently have reached a point where my newbie status has hit a wall and I am unsure of how to proceed.

How does one address this? I did a search for something on this but I didn't see anything. If something already exists just throw me in that direction.:biggrin:

Thanks for any guidance
ShoelessJJ
 
Signed-In Members Don't See This Ad

Hendu3270

Member
Joined
Mar 13, 2012
Messages
919
Location
Pearland, Texas
JJ,

First off, welcome to the forum! You're in the right place.

What you've encountered is a "void". Many burls have it, some more than others. At times, I actually seek out the voids so I can fill them with CA and PearlEX powder to add some color and accentuate the voids. What I do is (depending on the size to fill), add a drop or two of Meduim CA, then add a small amount of the PearlEX and spread into the void. Sometimes I need to do this more than once. Then remove excess material either by turning again or sanding. There are many different techniques to doing this and folks use different fillers as well as different glues.

Here's an example of a pen I turned for a client during Christmas. It's Claro Walnut Burl with the voids filled with green PearlEX. It's 100% smooth across the voids.


Oh and if you don't particularly want to add any color, you can still fill them to get that smooth finish. Just use instant coffee or cinnamon instead of the pigments and it will just look like a natural spot in the wood. I used paprika once as well, and it was so dark even it looked natural.
 

Attachments

  • Continental (claro walnut burl).jpg
    Continental (claro walnut burl).jpg
    34 KB · Views: 335
Last edited:

Monty

Group Buy Coordinator
Joined
Mar 4, 2005
Messages
8,357
Location
Pearland, Texas, USA.
First off, welcome to IAP.
As Chris suggested, you can use PearlEx powder and CA to fill the voids. Other options are dried coffee grounds or sanding dust from sanding the pen. I do mine slightly different from Chris in that I turn the blank almost to final diameter, then I fill the void with whatever I choose, than drizzle a drop or 2 of thin CA over the fill and let it wick in.
 

Rodnall

Member
Joined
Sep 5, 2012
Messages
443
Location
Miami, FL
You can also finish how you always do and leave the little indentations to give it more character. Or try turning oversize a little and saturating it with ca before final turning.
 
Joined
Jan 31, 2013
Messages
15
Location
South Africa
CA

First off, welcome to IAP.
As Chris suggested, you can use PearlEx powder and CA to fill the voids. Other options are dried coffee grounds or sanding dust from sanding the pen. I do mine slightly different from Chris in that I turn the blank almost to final diameter, then I fill the void with whatever I choose, than drizzle a drop or 2 of thin CA over the fill and let it wick in.
Hi, I am Attie from South Africa. I have been reading and following a lot of discussions. I read a lot of mention of " CA " This term is not general or known in S A . Please explain.
 

Hendu3270

Member
Joined
Mar 13, 2012
Messages
919
Location
Pearland, Texas
First off, welcome to IAP.
As Chris suggested, you can use PearlEx powder and CA to fill the voids. Other options are dried coffee grounds or sanding dust from sanding the pen. I do mine slightly different from Chris in that I turn the blank almost to final diameter, then I fill the void with whatever I choose, than drizzle a drop or 2 of thin CA over the fill and let it wick in.


Mannie, I turn pretty close to final diameter before filling as well, but that PearlEX powder is wierd stuff if you put it on before the CA. The CA just rolls off of it and onto the lathe bed. Man, the first time I did it, I was scrambling to keep it on the pen, (whoo, haa, noo, wait, stop, ugh :biggrin:). Live and learn I reckon. The lathe bed is covered once I start filling anything now.
 

Hendu3270

Member
Joined
Mar 13, 2012
Messages
919
Location
Pearland, Texas
First off, welcome to IAP.
As Chris suggested, you can use PearlEx powder and CA to fill the voids. Other options are dried coffee grounds or sanding dust from sanding the pen. I do mine slightly different from Chris in that I turn the blank almost to final diameter, then I fill the void with whatever I choose, than drizzle a drop or 2 of thin CA over the fill and let it wick in.
Hi, I am Attie from South Africa. I have been reading and following a lot of discussions. I read a lot of mention of " CA " This term is not general or known in S A . Please explain.

CA = Cyanoacrylate. It's essentially super glue.
 

shoelessjj

Member
Joined
Mar 12, 2013
Messages
17
Location
Kenutcky
Chris ... Thanks for the reply. So a quick Startpage search for PearlEx appears to indicate you are referring to powdered pigment with the brand name of PearlEx. So you are using that to color the medium CA prior to spreading it on the blank?

In the case of the maple burl there isn't a lot of color except perhaps a bit of rust in and around some of the eyes ... so I'm guessing I'd be targeting that color.

I guess I'm wondering how to view the thought of adding color to the blank. When I think about what I saw, I did see many small voids throughout the blank and then larger voids only in places. It seems like I could afford to almost spread this over the entire blank to fill in and then remove the CA from the surface and leave what fills in the voids. Heck maybe the goal would be to try to match the base color of the maple.

Let me know if I'm not getting what you were saying. I have thin and thick CA so I guess I'll need to grab some medium and some PearlEx. Do you find that a PearlEx set the most efficient way to get the pigment or are there really only certain colors that you find you use?

Is this common with Maple Burl?

- ShoelessJJ

I've missed a lot already ... so I'll have to read the other replies as well. Thanks for the input.
 

shoelessjj

Member
Joined
Mar 12, 2013
Messages
17
Location
Kenutcky
OK ... I'm glad you supplied an example. In that case it was a nice touch to see the different color. Perhaps for now, I'll stick with something that is closer to what is on the blank already.

Interesting idea about using various spices. In fact cinnamon or paprika might work well. I'm guessing to that you could have multiple colors but not mix it uniformly. Sounds like I can play around a bit.

I did wonder about finishing it like I normally would and having the character.

- ShoelessJJ
 

shoelessjj

Member
Joined
Mar 12, 2013
Messages
17
Location
Kenutcky
Oh wait ... this also brings me to another issue but related in that the solutions could be the same. I have turned multiple acrylics but I did a light pink/purple one and even though I used white powder coated tubes, I could see the glue adhering to the inside of the drilled hole.

Someone suggested that I paint the inside of the hole prior to gluing in the tubes and then use Gorilla glue instead of CA glue. I was going to try that but now that Chris indicated that you can basically tint the CA glue, could you tint the CA glue that you use to adhere the tubes with a color that is close or compliments the acrylic blank?

I don't want to change topic but I'm curious about this as well.

- ShoelessJJ
 

Hendu3270

Member
Joined
Mar 13, 2012
Messages
919
Location
Pearland, Texas
Chris ... Thanks for the reply. So a quick Startpage search for PearlEx appears to indicate you are referring to powdered pigment with the brand name of PearlEx. So you are using that to color the medium CA prior to spreading it on the blank?

In the case of the maple burl there isn't a lot of color except perhaps a bit of rust in and around some of the eyes ... so I'm guessing I'd be targeting that color.

I guess I'm wondering how to view the thought of adding color to the blank. When I think about what I saw, I did see many small voids throughout the blank and then larger voids only in places. It seems like I could afford to almost spread this over the entire blank to fill in and then remove the CA from the surface and leave what fills in the voids. Heck maybe the goal would be to try to match the base color of the maple.

Let me know if I'm not getting what you were saying. I have thin and thick CA so I guess I'll need to grab some medium and some PearlEx. Do you find that a PearlEx set the most efficient way to get the pigment or are there really only certain colors that you find you use?

Is this common with Maple Burl?

- ShoelessJJ

I've missed a lot already ... so I'll have to read the other replies as well. Thanks for the input.

I don't actually mix the CA and pigment prior to applying. The consistancy of the PearlEX powder is like graphite powder. If you put the powder on then put a drop of CA on it, the CA just rolls off the blank. I'll place a drop of CA on the blank directly into the void, then, (I use a very technical tool) I use a paint can opener as a scoop, and scoop out a small amount of the powder and let it fall onto the drop of CA. Then I use another highly technical piece of equipment. I use a small piece of cardboard to spread and force the glue and powder into the voids. As you do this, it pretty much mixes up. It really only takes once or twice to figure out how they behave together and what you need to do, so the best advice is really to just give it a go. Try it with a piece of scrap wood first though so you don't mess up that nice maple blank you're working with.

You could probably do it with thick CA as well but it wouldn't give you as much working time. Sounds like you understand what I said just fine. I have done a couple that also had many small voids and ended up spreading the mixture over almost the entire surface of the blank. Just make sure you get as many filled as you can the first time, to cut down on the number of times you have to go back.

I bought a couple of different colors from a craft store then ordered a variety pack on Amazon and have used several colors. For me though, the dark green (think hunter green) really goes well with the dark brown coloration you get with Claro Walnut. I've used that combo several times.

As far as Maple burl is concerned. I couldn't tell you if this is common for it. I've turned spalted maple, but not the burl. Maybe it's tiny worm holes?
 

shoelessjj

Member
Joined
Mar 12, 2013
Messages
17
Location
Kenutcky
OK ... I have a plan. Thanks for the tips everyone. Beautiful pen Chris. I play bass guitar and Carvin made a beautiful Claro Walnut bass. It looked like a piece of furniture.

Initially I may attempt to "spice" mine up with a touch of paprika. I'll grab some PearlEX for the future.

- ShoelessJJ
 

Rodnall

Member
Joined
Sep 5, 2012
Messages
443
Location
Miami, FL
As for the acrylics, paint the inside of the blank, then you can't see the glue. Be careful what paint you use. I tried using lacquer and the glue didn't hold. I've been using the paint from a model train store Tamiya color acrylic and haven't had any problems. If you do a search there has been lots of posts on this subject.
 

Monty

Group Buy Coordinator
Joined
Mar 4, 2005
Messages
8,357
Location
Pearland, Texas, USA.
You could probably do it with thick CA as well but it wouldn't give you as much working time.
I've found the opposite to be true, the thicker the CA the longer the working time. When I've tinted my thick CA with mica or PearlEx, my working time is 1-2 minutes.

As for the acrylics, paint the inside of the blank, then you can't see the glue. Be careful what paint you use...
I use the cheapest spray paint from Lowe's or Wal Mart. I'll lightly sand my tubes then I hang them from a thin wire suspended in my shop to paint them. I also will spray the paint inside the blank from both ends. These then stand on end on a piece of plastic and dry over night before I glue the tube in with thick CA. I twist the tube around and in and out a few times to spread the glue. You should have about about 1 minute of working time before the thick CA grabs. Be sure to plug the end of the tube you are inserting into the blank with wax, a piece of potato or putty of some type, this will push the glue inside the blank and not inside the tube. If I want a color other than the basic ones, I'll use Krylon or Rustolium brand.
So far the only spray paint that has not worked for me is DupliColor brand. Everyone I've painted with DupliColor paint, the paint has not held to the tube after the tube has been glued in.
 
Last edited:

Hendu3270

Member
Joined
Mar 13, 2012
Messages
919
Location
Pearland, Texas
I've found the opposite to be true, the thicker the CA the longer the working time. When I've tinted my thick CA with mica or PearlEx, my working time is 1-2 minutes.

Well then perhaps I should start using thick for my filling. Thanks for the tip.
 

shoelessjj

Member
Joined
Mar 12, 2013
Messages
17
Location
Kenutcky
I'm here to report back on what happened. I went home and turned the pen down to where I was pretty much ready to sand the thing. I inspected the blanks and decided that paprika was going to be too red (although it might have been nice to see that additional color on there). I decided that cinnamon was the way to go.

I took one of the larger voids and went at that one first. I only had thick CA so I figured I'd give it a whirl. I put the CA in the void and then I added the cinnamon. I felt like I was patching a wall with spackling. I used some cardboard and kind of pressed and scraped across the void and I was shocked. It looked like it was going to work.

I did the remaining voids on both blanks and sanded it down and it turned out amazing! I cannot thank you all enough for your help. The cinnamon was perfect. I'll be a little more adventurous later.

Thanks again!
ShoelessJJ
 

Hendu3270

Member
Joined
Mar 13, 2012
Messages
919
Location
Pearland, Texas
I'm here to report back on what happened. I went home and turned the pen down to where I was pretty much ready to sand the thing. I inspected the blanks and decided that paprika was going to be too red (although it might have been nice to see that additional color on there). I decided that cinnamon was the way to go.

I took one of the larger voids and went at that one first. I only had thick CA so I figured I'd give it a whirl. I put the CA in the void and then I added the cinnamon. I felt like I was patching a wall with spackling. I used some cardboard and kind of pressed and scraped across the void and I was shocked. It looked like it was going to work.

I did the remaining voids on both blanks and sanded it down and it turned out amazing! I cannot thank you all enough for your help. The cinnamon was perfect. I'll be a little more adventurous later.

Thanks again!
ShoelessJJ


AWESOME!! Glad it worked out for ya.

FYI - The law of forums state, that unless you post pics, it didn't actually happen. So you'll now need to post up some proof. LOL
 

shoelessjj

Member
Joined
Mar 12, 2013
Messages
17
Location
Kenutcky
LOL ... You both are correct. I thought about taking a picture and posting it. I will do so tonight if I get some time. I'll definitely take the picture. I may post it tomorrow. I will say it might not look as good as the results you all get but I can at least say that the cinnamon was perfect. You can't even tell it from the natural coloration.

As Displaced Canadian recommended, I had fun learning this trick and produced something that I was happy with.

Also ... thanks for the tips on the painting tubes and blanks.

- ShoelessJJ
 

shoelessjj

Member
Joined
Mar 12, 2013
Messages
17
Location
Kenutcky
I've determined that the best thing about delaying posting the picture of the results is that in essence I felt the satisfaction of apparently completing this on Wednesday but as Chris pointed out, I actually didn't do it until I posted the picture. I get the joy of accomplishment twice. :)

So ... here it is. Don't laugh at my photo. :p Ok you can laugh at it. On the top of the pen, around mid clip is one of the more prominent voids. below that is natural color and below that was another void. The top void was made up of multiple segments.

On the bottom, the dark half moon near the center band was a void and down past halfway along the top edge were voids. Everything else was natural. There were some more on the other side.

That was the result. Maple Burl on a Woodcraft Hart double twist. Sounds like a type of dive in platform diving.

Thanks for the help!
ShoelessJJ


Hendu3270

Member
Joined
Mar 13, 2012
Messages
919
Location
Pearland, Texas
Turned out fantastic JJ!! love the grain and the filled voids just look like part of the burl. Great job and the more you do this, the more you'll experiment. :good:
 
Top Bottom