Lucite- What went wrong?

Signed-In Members Don't See This Ad

Mapster

Member
Joined
May 21, 2010
Messages
505
Location
Orlando, Florida
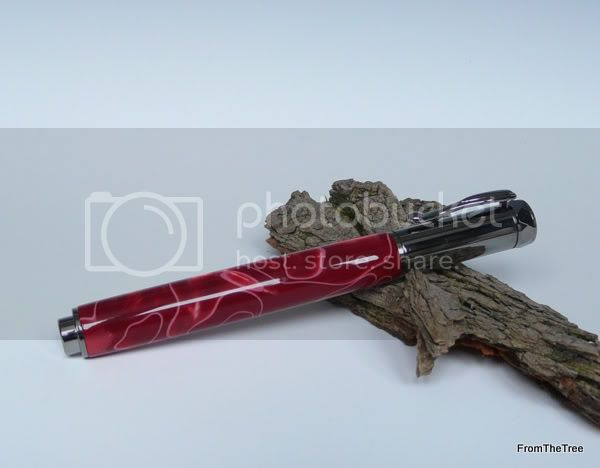
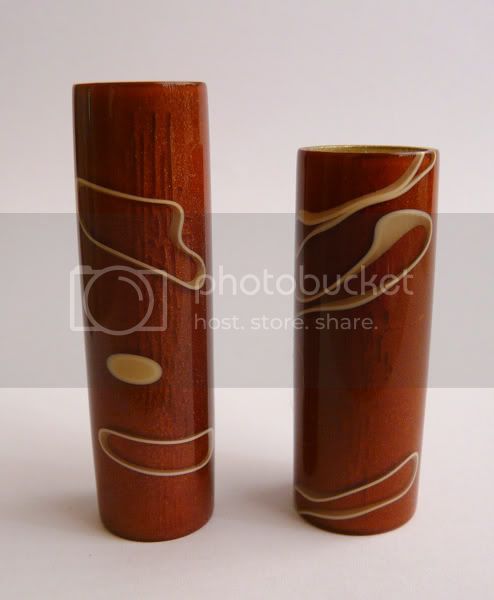
I recently bought some glacier lucite from exotic blanks. It is an amazing material that makes some truly stunning pens, I have just not been able to make such a pen...

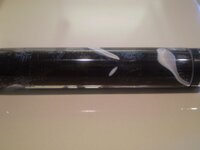
The first time I tried it, I drilled on the lathe as usual: Dust collection, about 2500 rpm, a little wd-40. It doesn't build much heat and works well for me. I then sanded the inside of the blank and reverse painted it black with a high quality spray paint. Upon turning the blank, I noticed there were some small fuzzy, crack like objects that protrude from the outside of the hole into the blank itself. I didn't like that so I tried again...

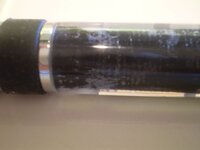
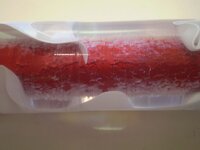
This time I drilled at a speed of 10 minutes per inch. I turned the lathe down to 1100 rpm and only advanced the tailstock at the pace it wanted, no pressure at all. I drilled about a quarter inch, then backed out to clear chips, then back in. I made sure the bit was cool enough that I could hold it with no discomfort. The whole process took 30 minutes. I then proceeded to sanding for a long time, then reverse painting. I did two coats of clear to fill in any imperfections (so I thought). Then one coat of red. I roughed the blank and the cracks are back and worse than before.

This is a brand new drill bit, and there are no problems with the blank moving or anything. Does anyone know anything special about lucite or how to drill it?

All comments are greatly appreciated,
Marshall
 

Attachments

  • P1010003.jpg
    P1010003.jpg
    32.7 KB · Views: 351
  • P1010010.jpg
    P1010010.jpg
    34.7 KB · Views: 373
  • P1010007.jpg
    P1010007.jpg
    37.6 KB · Views: 481
  • P1010008.jpg
    P1010008.jpg
    41.8 KB · Views: 386
Signed-In Members Don't See This Ad

IPD_Mr

Member
Joined
Jun 27, 2007
Messages
3,707
Location
Zionsville, In
When we drill on the lathe we do it at the slowest setting which is 500rpm for us. It does not matter what the material is, Lucite, wood, Ebonite or PR. Generally we are through the blank (3" length) in about 5 minutes. You mentioned a new drill bit. New does not always equate to quality. The reason I say this is because of bits that are not straight. If your bit is off by say .002, then this will allow shavings that are coming through the bit flute to get between the bit and the blank wall, thus marring the side walls. (this is my theory anyway) New also does not always mean sharp either. We touch up our bits about every 15-20 blanks with the Drill Dr.

Consider it good or bad, when you drill something that is that translucent, you will see everything that is not working correctly. It would not matter if you are drilling Lucite, Plexiglass or clear PR. When you get it to work it is great and you can get some really neat results that you would not get with any other material. Because that particular blank is so clear we have avoided it until we can come up with an easy way to prevent something like what you have experienced.
 

DozerMite

Banned
Joined
Jun 26, 2007
Messages
1,568
It doesn't look like a problem with the material but, rather the paint. It looks as if the paint is pulling from the blank.
What are you using for an adhesive? There could be a reaction between the paint and adhesive. Try a paint that specifies plastics on it and let it dry overnight.
Also, there isn't a need to sand the inside of the blank before painting it. You can create a lot of heat very quickly when sanding. Lucite has a low melting point anyway.
Also when Lucite is exposed to certain solvents, it will craze. Ammonium-based solvents and cleaners can cause crazing.
 
Last edited:

JimMc7

Member
Joined
May 12, 2009
Messages
731
Location
NE Oklahoma
It doesn't look like a problem with the material but, rather the paint.<snip>

+1 -- looks like the paint is crackling. I had similar problem with some Testor's white when reverse painting blanks. I switched to Apple Barrel brand acrylic (from Michaels) applied with a Q-tip and no similar problems since.

See this thread for Testor's v. Apple Barrel photos:

http://www.penturners.org/forum/showthread.php?t=55222
 

JerrySambrook

Member
Joined
Dec 4, 2006
Messages
1,312
Location
Southwick, MA, USA.
The red blank is definetely heat cracking. You can see the depth of the cracking.
The green blank looks the same as well, but also has the look of paint not adhering in some spots.
Slow down on your speed, and continue with the peck drilling method.

The other issue with the green one can be caused by sanding too good.

The issue with transparent blanks, or very very translucent blanks is the ability to see all the problems on the machining of the id
 
Last edited:

KenV

Member
Joined
Oct 28, 2005
Messages
4,720
Location
Juneau, Alaska.
and it could be ".....a little wd-40." and the paint. Both photos show signs of styrations around the inside of the blank - too finely together to be drilling marks if you are using a high quality drill bit but could be from a coarse abrasive.

An epoxy for glue???

Shine a light down the inside of the blank after drilling and see how many marks are on the inside. I suspect you are seeking to rough the inside seeking mechanical adhesion and making the mirror effect of the lucite show all the irregularities, and lack of adhesion of the paint adding to the issue.
 

workinforwood

Member
Joined
Mar 1, 2007
Messages
8,173
Location
Eaton Rapids, Michigan, USA.
Looks like an ugly pen contest winner. Tough to say over a photograph too as to what the problem is. Sure looks like the pen is coated in micro cracks on the inside, like you put acetone on it. I generally drill in the 2-500 rpm range. It's possible speed was a factor. I don't know what you glued it in with..I know I would use 5 min epoxy dyed with powder to try and match the paint. It's possible the paint is the problem. You have some extra little pieces laying around? If so, cut off a thin slice, hand sand it smooth and then put some of that same paint on one side and let it sit for 24 hrs. See then if the acrylic did any checking below the paint. I know with some plastics, they react with certain chemicals which cause them to surface crack. I've seen it happen in person in my shop with acrylics..matter of fact, just going off memory, but I think it's plexiglass and CA I've experienced that with. You put one drop of CA on some plexiglass and in a short amount of time you will have a lightning looking effect of shallow surface cracks below it. So..are you using CA? Cut some thin slices of material and do some tests..test the paint, test the glue. Most likely one of those is the problem.
 

leehljp

Member Liaison
Joined
Feb 6, 2005
Messages
9,329
Location
Tunica, Mississippi,
As Ken said concerning the paint: . . . a little wd-40. WD 40 is notorious for preventing paint from sticking. It doesn't wipe off or clean out as easily as one might think.
 

Mapster

Member
Joined
May 21, 2010
Messages
505
Location
Orlando, Florida
Thanks for your thoughts, I will be more specific:

The black one was drilled normally at relatively high speeds and a fair amount of heat. Yes its paint didn't adhere too well, and I did use CA glue to put the tubes in. I corrected all of this on the other.

The red I drilled at 1100 rpm and drilled slow enough with enough lubricant that right after pulling the bit out I could hold it and it was no hotter than a piece of plastic that has sit in the sun. No heat, so the heat is not the problem (I don't think). That was a good idea though. As far as sanding, I wet sanded with a light touch, so that didn't build any heat either. I cleaned the inside of the blank out thoroughly before painting so there was no reaction between the paint and wd-40. The paint does not cause the problem because paint gets all over the sides of the blank when I paint it, and it doesn't cause any cracks. All that is left is glue, and I used 15 minute epoxy this time because of CA reactions.

Hope that is more clear as far as my procedure. What I don't understand is how when I was careful, the blank came out worse. The red is clearly worse than the black (no pun intended) even though I did what I thought was correct. Thanks again for the help, and hopefully the gears will keep spinning!
 

DozerMite

Banned
Joined
Jun 26, 2007
Messages
1,568
If you believe it isn't a paint issue, and it is actual crazing in the plastic, then I'm guessing it's a solvent reaction. Could be an ingredient in the paint you are using.
 

Mapster

Member
Joined
May 21, 2010
Messages
505
Location
Orlando, Florida
I agree with it not being paint because the cracks radiate into the blank starting at the outer edge of the hole. I will check solvents in paint and wd-40. Anything special I should look for?
 
Last edited:

ed4copies

Local Chapter Manager
Joined
Mar 25, 2005
Messages
24,528
Location
Racine, WI, USA.
Diagnosing ANY problem is a step-by-step process. In this case, we start with a blank that is very translucent. So, we can SEE if there are any problems before beginning---nope, no problem.

So, we drill. Once the drilling is finished, do we see these "cracks"? Having used an oil-based lubricant, we now need to eliminate that oil from the material and make certain it is dry to see any flaws. Do we see the flaws?

If not, allow to set for a day or two. Now it will be very dry--can you feel any oil residue? IF you can't see or feel it, you are still not CERTAIN it is not present, but you can continue. Paint the inside, as you normally would and do the same to a cut-off piece of the same Lucite (control piece). A day later do the two surfaces look the same? The control piece was never subjected to WD40--so if there is a difference, that is probably it.

Like all problems, this is a case of deductive reasoning--eliminate one possibility at a time, use a "control" piece for comparison.

Eventually, you find the exact cause of the problem, whatever the problem might be.

Good luck--you are young--could be years!!!:eek::eek::biggrin::biggrin::biggrin:
 
Last edited:

Mapster

Member
Joined
May 21, 2010
Messages
505
Location
Orlando, Florida
Jim, that is pretty interesting about the paint, now that does make me wonder if it is the paint. I will have to head to michaels and pick up some apple paint. I have read that spray paint is fine, but I guess it isn't. I will see how that works. It still doesn't solve the question of why? Why is this reaction happening? What is the reaction? And how can it be avoided? These answers would help everyone with the reverse painting if we can figure it out.
 

ed4copies

Local Chapter Manager
Joined
Mar 25, 2005
Messages
24,528
Location
Racine, WI, USA.
Have you ever heard of "crackle" paint??

Similar situation--you apply one chemical to the surface so that the paint will get an old, crackled look--chemical reaction.
 

NewLondon88

Local Chapter Leader
Joined
May 15, 2008
Messages
5,077
Location
Claremont NH
Can you try any scrap material with the WD40? I know from using a
laser on plexiglas, you can't use solvents on it. Lucite, Perspex, Plexiglas,
Optix, Perclax .. all the same thing. (polymethyl methacrylate)
And the crazing seems to be worse after heating in any way.

If I were drilling it, I'd probably use dish soap as a lubricant. WD40 isn't
likely to wash off easily, especially inside the tube.. the WD stands for
Water Displacement. And it is about 50% or more solvents.. like
hexane and naptha. Not great for PMMA ..
 

Mapster

Member
Joined
May 21, 2010
Messages
505
Location
Orlando, Florida
You know, age isn't everything Ed :wink:, it is a lot, but not everything. With age comes experience, and that is where I lack. That is true though, it is a process. That is what I tried to do the second time, and I would keep doing different things, but it is such a beautiful and fairly rare material I hate to keep wasting it. I hope it will satisfy everyone including me if I try once more, and hopefully we will all learn something:

For this last try I will drill at 500 rpm, the slowest my lathe will go. I will still peck drill and clear chips often. I will use good ol' water as my lubricant to remove the wd-40 all together. I won't let any heat build up. After my usual wet sanding I will take some pictures of the blank to see if there are any cracks. From there I will go to michaels and buy some of this apple paint that has been proven to work and I will use my 15 minute epoxy to rid any CA reactions.

Hopefully I will end up with a nice pen and we will have a new, better means of reverse painting. I will try to do the majority of this tomorrow and get back to you as soon as possible.
 

PR_Princess

Member
Joined
Jun 1, 2007
Messages
2,384
Location
Sturtevant WI, USA.
Marshall, just for giggles and grins, check for solvents in the clear spray that you used. See if any are listed on the can. Meanwhile, I will send you some lucite to experiment with...and some clear PR blanks as well. :)
 
Last edited:

ed4copies

Local Chapter Manager
Joined
Mar 25, 2005
Messages
24,528
Location
Racine, WI, USA.
She means more blanks, not more clear spray.

(Always happy to encourage good answers!!!)
 
Last edited:

Mapster

Member
Joined
May 21, 2010
Messages
505
Location
Orlando, Florida
That sounds good to me. I will check the clear, the color, and the wd-40 for any of those pesky solvents. I will post what I find tomorrow. That would be great having some clear pr to mess with, I think the lucite is far too precious. Hopefully we can get to the bottom of this so future lucite turners do not have such a hard time. I thought the sanding of the inside would be the hardest! Little did I know...
 

DozerMite

Banned
Joined
Jun 26, 2007
Messages
1,568
The Lucite and the PR do not react the same. Solvents don't tend to react with the PR. I've used DNA, acetone, silicone sprays, penetrants, WD-40, and the list goes on, with PR and haven't had a reaction.
Lucite, being petrolium based, might be what causes the reaction.
I can look into it a bit and see if I can find out the solvents that can't be used with Lucite.
I haven't turned any Lucite yet but, it is intriguing. I may give it a try.
 

BKelley

Member
Joined
Jan 31, 2010
Messages
891
Location
Tucker, Georgia, 30084
Marshall,

I would leave off the WD-40, use a good straight drill. I use Colt brand and get good results. You should not have to sand inside of blank. When painting inside of blank make sure to use paint that is compatiable with Lucite. Paint both blank and tube. Don't rush things let paint cure over night. Check under threads started by me and look at Cloudy Toni this was a glacier blank from Exotics. Maybe color of paint has some thing to do with out come. I used white paint on a glacier blank and it was kinda bla. Remember you can do every thing right and still have less than desirable resullts. Another thing, go down to Home Depot and purchase a length of clear plastic rod. Practice on it instead of a expensive blank. Good luck.

Ben
 

CaptG

Member
Joined
Jan 3, 2007
Messages
2,686
Location
Otsego, Mi, USA.
Hey Marshal, have not had a chance to talk to you since we met in Ft. Myers Woodcraft a couple months back. I used to have the same issues with lucite. Use pam cooking spray for lube when drilling lucite and drill slow, clearing chips often. When finished drilling, the hole will always have some tears and rough spots and these will show up even when the tube is painted because the lucite can be so clear. Take a wood dowel rod that fits loose in the blank, cut a slot about 3/4 inch long in the end with a band saw. Now take a strip of rag 3/4 inch wide, insert it in the slot with the ends about even on both sides that are hanging out and roll the rod winding up the rag until it is an almost snug fit in the blank. Now coat the rag with EEE or your favorite polishing compound, put the other end in a drill and polish the inside of the blank. The smooth polish on the inside of a lucite blank is the key. Use a clean, dry strip of rag when done to clean any residue out of the blank when you are done polishing. Now paint the blank, let dry at least 24 hours. I use epoxy to glue the tube, do not use ca. Let me know how this works for you, it works well for me.
 

Dudley Young

Member
Joined
Feb 26, 2010
Messages
583
Location
Sebastian, Florida
As Ken said concerning the paint: . . . a little wd-40. WD 40 is notorious for preventing paint from sticking. It doesn't wipe off or clean out as easily as one might think.
I agree. Throw the WD 40 out. You don't need lube to drill any of that stuff, just take it slow and easy.
 

CaptG

Member
Joined
Jan 3, 2007
Messages
2,686
Location
Otsego, Mi, USA.
Marshal, I forgot to say that before I paint the blank, I wash it out in warm water with Dawn dish soap, then rinse in warm water and let dry. The paint sticks well.
 

johncrane

Member
Joined
Jan 17, 2006
Messages
9,657
Location
Melbourne, Victoria, Australia.
Marshall after looking at the larger photo's here, i can see clearly there are scratch marks and cracks showing,this is a drilling problem,could be the drill bit and also heat. to give you and idea if you where to jam say a round nose tool into the blank this would catch and leave a fracture in lucite. A poor drill will also scratch, with a new drill you would think it would be ok, anyway on your next blank try using soapy water when drilling and slow it down,cover your lathe bed and use a drip tray if you still get marks, sand the blank length ways using sand paper a wood dowel and soapy water, the water will make it easy to sand, and it will keep the dust down, l can also see some sort of a reaction between the paint and the blank,when using spray can paint you need to use the clear plastic undercoat in the same brand, the undercoat makes the paint stick to the blank,also read the paint can label, l let mine dry over night in a warm spot, i have tried many different ways and there will always be better ways to do things just keep trying.
 

workinforwood

Member
Joined
Mar 1, 2007
Messages
8,173
Location
Eaton Rapids, Michigan, USA.
Every pen blank I have painted and used CA glue to hold it in has done exactly what you have! I found that when using paint I use epoxy and have no problem.
Ron

I am extremely suspect of the CA being the root of the problem too. If I had a piece of lucite, I'd put a drop of CA on it and see what happens. I know that if you put a drop of CA on plexiglass, you get exactly what you see here..a web of surface cracks. Experimentation is the key to success.
 

NewLondon88

Local Chapter Leader
Joined
May 15, 2008
Messages
5,077
Location
Claremont NH
Yep .. .Plexiglas and Lucite are trade names, but they are the same product.
polymethyl methacrylate. Broken plexi is a good place to test as it is
rather inexpensive (free :tongue: )
 
Joined
Apr 16, 2010
Messages
699
Location
Leicestershire, U.K
well i hope the OP dont mind but here's my take on this:

I Drilled both of these sets at 350 rpm then primed the brass tubes with white then painted them with the colour all done with rattle cans and left 4 hours before glueing in with 30 min epoxy- i also reverse painted the holes with the colour

I'm not sure whats going on with the el-grande tubes but the zen tube is diffrent there's only 1/3rd which has the problem which leads me to belive its heat associated as it would have been the last 3rd to be drilled and the bit would have been getting hot especially on such a long tube.


P1080921.jpg


P1080928.jpg


I have another blank to do today which i've sanded the inside of the holes to 4oo grit then painted-i'll report back on how that turned out!!

I did do this red lucite pen at the same time as the two above with no problems-
P1080987.jpg
 

fernhills

Member
Joined
Jan 22, 2007
Messages
2,142
Location
Hellertown, PA, USA.
Same thing happened to me with Lucite. It was fine when drilling, flaws appeared when the profile of blank was turned down. Not all colors of Lucite will this happened to, just some, that is what i found it to be. Carl
 

cnirenberg

Member
Joined
Jan 26, 2004
Messages
2,700
Location
Fort Myers, Fl
Marshall,
I drill with Pam as a lubricant. Haven't had any problems. Basically used Gary's method, and it hve worked on all the translucents I've done.
 

leehljp

Member Liaison
Joined
Feb 6, 2005
Messages
9,329
Location
Tunica, Mississippi,
For those of you who use a lot of plexiglass/plastic/lucite, etc, have you or do you use the drill bits made specifically FOR that material?

Here is a link to a company that sells specialty bits. I am not sure if they have the correct size but they do have quite a few.

There are other companies that sell such bits. I used to have a link to a company in Florida that had all kinds of bits of all sizes, even metrics, but I cannot find that link now.

Here is another link that might be of interest.
 

Mapster

Member
Joined
May 21, 2010
Messages
505
Location
Orlando, Florida
Well all interesting ideas, and very interesting that it happens to almost everyone. George, that is very interesting, but I strongly believe it is not heat because the one that I drilled with literally no heat had more cracks than the one I drilled hot. Jeff, I took a piece and poured ca on it, wd-40 on another part, and then painted the whole outside with clear, including over the wd-40 and nothing happened, so it must be a combination. Dawn sent me some information about a plexiglass material virtually the same as lucite and it said when cutting with a laser, the internal stresses upon the material cause crazing when any solvent is introduced EXCEPT soap and water. This makes me think drilling with soapy water and then giving it a thorough cleaning would help a lot. I would be trying it, but unfortunately I have run out of kits except for slimlines, and I don't want to waste lucite on a slimline. I will let you guys know when I try again.
 
Joined
Apr 16, 2010
Messages
699
Location
Leicestershire, U.K
well i tried again and had similar problems!!!

P1090091.jpg


I just dont think Lucite is worth the trouble- i'd like to know how to solve it.... but i think there are much better looking blanks without having these problems.
I did this euro a few weeks ago- the bottom half is a very see thru acrylic blank called citrine water- it has/had no issue's with paint or reactions etc
P1080556.jpg


if it wasnt heat on that black blank of mine mapster- why has only 1/3rd of it got the issue? same paint same glue- why only have a reaction in one area?
 
Signed-In Members Don't See This Ad

wolftat

Product Reviews Manager
Joined
Aug 19, 2007
Messages
5,377
Location
Fairfield, CT, USA.
It appears to be a heat build up issue to me (just my opinion, doesn't mean much), I would try drilling a smaller hole first and then redrilling it to the needed size to allow airflow (cooling) through the blank as it is being drilled.
 
Top Bottom