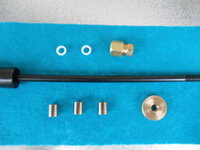
I need help deciphering this Woodcraft mandrel. I just opened it and I am confused. The stuff above the rod looks like I could hook up an ice maker. What's that for? I imagine the bushings g on the outsides of my pen bushings. Am I right? Sorry, but new is new!:biggrin:
Yes, Lenny has already gave you pretty much, all the information you need to work it but, I though I could add a little more. The compressing brass nut set with those 2 nylon bushes, were added to the mandrel design, which is one of the older types available or the most common. This happened when people started to get into TBC which means Turn Between Centers.
While many manufacturers started making new mandrel designs where the rod length is adjustable by the new apparatus created to make it adjustable (more than 1 type available), so that people have the option to shorten the rod and created a system where only 1 pen barrel is turned at one time, therefore reducing the possible wobble of the full extended rod turning, which is the closer thing you can have to the proper TBC set-up which your JonnyC is a specialist at and sell them.
To use the tension brass nut set-up you've got there, you unscrew the 2 part brass nut system, insert the smallest piece on the mandrel rod first, making sure the threaded end is towards the beginning of the rod where you insert these stuff from. After you have that first brass nut in you insert the 2 nylon bushes ad then the other part of the brass nut.
Screw them together until the complete brass nut system feel tight to the rod, then release the pressure a little and push into the right location and tight it again. Most times, hand pressure in enough to tighten these tension nuts but, if not, use a coupe of spanners (one on each end) but be gentle, do not over-tight...!
Now, you have probably already realized that, this tension nut system only needs to be used if you want to turn 1 blank at the time or if you are turning a single barrel pen kit, such as the Sierras. The tension nut, should only be inserted after the pen barrel is already in the mandrel rod with the 2 proper kit metal bushes on each end so that the tension nut can then push everything together and be tighten. At this time, the big brass nut, is not needed, you just push the tail stock to the mandrel's rod end, which has a 60 degree recess (hole) where the dead center of the tail-stock will butt to gently but firmly.
After that you are ready to go...!:wink:
While this all seem an excessive detailed information guidelines, for most of us, is not so for those that never seen or worked with many of these tools, we often forget the questions we asked ourselves in the very beginning, huh...???
Good luck...!
Cheers
George