Leather blank making widget

Signed-In Members Don't See This Ad

jskeen

Member
Joined
Oct 11, 2007
Messages
1,754
Location
Crosby, Texas, USA.
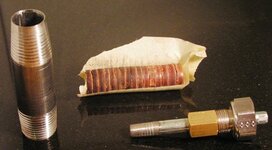
Somebody said they wanted to see this, so here's the widget in question, and a few of the products. It's a standard 5/8" id pipe nipple, about a buck at the hw store. the little chrome fitting I had in the misc plumbing drawer of my rollaway, and the bolt and brass nut were in the misc bolt drawer (I'm sorta strange that way) Anyway, I happened to have a tap on hand for the threads on the bolt, so I tapped some threads into the neck of the fitting, so that the bolt screws in. I originally planned to use that to force the leather washers out, but it was way too much trouble. It does center the stem on the pipe pretty well, but it's not necessary. you could do the same with a bolt that was a nice snug fit, or a stud and a nut inside the fitting, as long as it was less that 5/8" so the pipe will fit over it. I just put the pipe between centers on my lathe and sharpened one end with a file. Anyway, I mount the widget in the drill press at low speed, and punch away. It cuts about 10 washers before it gets tight and starts burning the outside edges from friction. Not a life threatening problem, but I usually cut about 10 and then punch them out. Depending on the leather you're using of course.

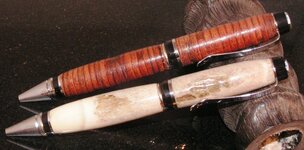
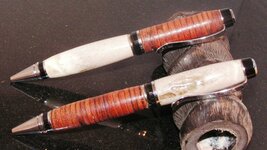
I try to keep at least 4 of the cigar's on hand, cause I can never guess which version somebody is going to want, and I don't seem to have much luck saying "let me show you this" and switching the tops. Thought at first it would sell as a gimick "look, you get 4 different pens for the price of two. Nope. Don't know why, but with 4 of them sitting there, it seems like if somebody stops to look at them, they only pick up one, and it's always a different one for different people. Go Figure!

Anyway, which one do YOU like best?
 

Attachments

  • PICT0085.JPG
    PICT0085.JPG
    47.1 KB · Views: 406
  • PICT0087.JPG
    PICT0087.JPG
    74.3 KB · Views: 329
  • PICT0090.JPG
    PICT0090.JPG
    86.4 KB · Views: 284
  • PICT0098.JPG
    PICT0098.JPG
    60.6 KB · Views: 281
Signed-In Members Don't See This Ad

rjwolfe3

Member
Joined
Feb 12, 2008
Messages
8,352
Location
Mansfield, Ohio, USA.
Neat idea, if I am looking at this correctly it does both the outside diameter and the inside hole for the tube at the same time?

BTW I love the last one the best!
 

holmqer

Local Chapter Leader
Joined
Aug 3, 2007
Messages
1,662
Location
CT, USA.
So this thing cranks out 5/8" leather disks. You then glue them in a stack, drill for the tube you want to use and glue that in place?
 

jskeen

Member
Joined
Oct 11, 2007
Messages
1,754
Location
Crosby, Texas, USA.
Neat idea, if I am looking at this correctly it does both the outside diameter and the inside hole for the tube at the same time?

BTW I love the last one the best!
The bottom of the stud is just solid. The disks usually don't stack up that high in the pipe before they start getting hard to punch.

I'm thinking about going down to the VFW sometime soon, and I always take a few of those with me. Don't always sell all of them, but I do always get a few cool stories about somebody's M1, or their KA-BAR or both.


So this thing cranks out 5/8" leather disks. You then glue them in a stack, drill for the tube you want to use and glue that in place?


This cuts the disks, and sorta friction forms them together into a stack. I then line them up on a piece of tape, and form the tape around about 3/4 of the way up on both sides to hold the ca in. drip on some glue, and clamp till the glue squeezes out, then back off till it all reabsorbs and let dry. then chuck in the lathe, tape and all, and drill for whatever tube you are using. Insert the tube, soak down again with glue, and put back in the clamp. I really clamp down to compress the washers as close to the length of the tube as I can. Treat as any soft blank from there on.
 

jskeen

Member
Joined
Oct 11, 2007
Messages
1,754
Location
Crosby, Texas, USA.
Same way they make the old USMC knife handles?

Pretty much, except KA-BAR precuts the leather ovals to almost exact finished shape, with the center slots, and then stacks them on the tang. They then use an industrial press to press the pommel on and compress the leather dry. The Pommel is pinned, then the leather ground to final shape and finished, so most of the finish is on the outside, rather than impregnated into the leather. They do several thousand a day. I do a couple if I'm lucky.
 

Rmartin

Member
Joined
Jan 14, 2007
Messages
1,263
Location
Columbus, Ga, USA.
Very nice!

I really like the fourth pic with the bullet casing. What does the upper cap look like? Is it a once fired with the primer still in tack? Do you glue the clip and cap to the upper barrel, or is it press fit? Any in info on how you handle the upper cap is welcome. Thanks!
 

jskeen

Member
Joined
Oct 11, 2007
Messages
1,754
Location
Crosby, Texas, USA.
Very nice!

I really like the fourth pic with the bullet casing. What does the upper cap look like? Is it a once fired with the primer still in tack? Do you glue the clip and cap to the upper barrel, or is it press fit? Any in info on how you handle the upper cap is welcome. Thanks!

I start with the press in insert from a Euro kit. Find a screw that will start to screw in, but stops because of the nonstandard threads in the insert. clamp insert in vise and force screw through to reform threads. once through, cut screw off to about 1/2 in long so that when you remove from the insert, it will clean up the thread at the end. Then press out the primer in fired casing. Drill out flash hole large enough for threads of screw to pass through, then part off base of casing. Put screw back into insert and clamp insert in jacobs chuck in headstock of lathe (use the drawbar!) Turn head of screw to press fit in the primer pocket of casing, then face off the slot, and polish to simulate unfired primer. Remove from chuck and remove insert. Now file small slot in edge of casing for clip to fit through. THEN press the screw into the primer pocket till flush. Press insert into top of upper pen body. The diameter of the 30-06 is such that a slimline clip will fit just right against the screw and overhang the body just right. If you cut the casing off just right, (unlike me, usually) the inside of the casing will hold the ring of the clip tight against the top of the threaded insert in the pen tube (I usually have to use a couple of drops of thick CA to keep it all nice and tight) after you thread the cap down, let the ca dry overnight then assemble finished pen.
 

Rmartin

Member
Joined
Jan 14, 2007
Messages
1,263
Location
Columbus, Ga, USA.
Very nice!

I really like the fourth pic with the bullet casing. What does the upper cap look like? Is it a once fired with the primer still in tack? Do you glue the clip and cap to the upper barrel, or is it press fit? Any in info on how you handle the upper cap is welcome. Thanks!

I start with the press in insert from a Euro kit. Find a screw that will start to screw in, but stops because of the nonstandard threads in the insert. clamp insert in vise and force screw through to reform threads. once through, cut screw off to about 1/2 in long so that when you remove from the insert, it will clean up the thread at the end. Then press out the primer in fired casing. Drill out flash hole large enough for threads of screw to pass through, then part off base of casing. Put screw back into insert and clamp insert in jacobs chuck in headstock of lathe (use the drawbar!) Turn head of screw to press fit in the primer pocket of casing, then face off the slot, and polish to simulate unfired primer. Remove from chuck and remove insert. Now file small slot in edge of casing for clip to fit through. THEN press the screw into the primer pocket till flush. Press insert into top of upper pen body. The diameter of the 30-06 is such that a slimline clip will fit just right against the screw and overhang the body just right. If you cut the casing off just right, (unlike me, usually) the inside of the casing will hold the ring of the clip tight against the top of the threaded insert in the pen tube (I usually have to use a couple of drops of thick CA to keep it all nice and tight) after you thread the cap down, let the ca dry overnight then assemble finished pen.

Thanks for sharing. Makes perfect sense.
 
Top Bottom