lathe questions

Signed-In Members Don't See This Ad
Joined
Feb 18, 2017
Messages
56
Location
SW Michigan
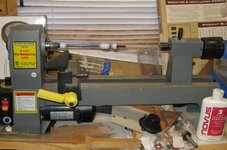
My daughter JUST bought me a new lathe yesterday. Got it at harborfreight, a discontinued "out of box" model called
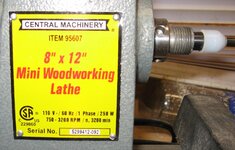
central machinery 8 x 12 mini woodworking lathe.
Here's a picture I plucked off the web.
https://images-na.ssl-images-amazon.com/images/I/71zL5RqPKqL._SL1200_.jpg

Now… can't beat the price. Just over 30.00. But I quickly found out it's missing some parts.
Comes with the big 8" wheel as pictured here, but it's also suppose to come with a smaller one. I don't have that. Now I might not even need it for pen turning would I?????

It also was suppose to come with a flat wrench to tighten that wheel with. NO wrench I own will fit. A youtube video I found also showed some long rods with nice handles. (I used a screw driver to insert in one of the holes to hold the nut thing so you can tighten up the disk. but since we don't really have a tool to tighten it well, not even going to try to use that.
If anyone knows where I might pick up these parts please let me know.

My guess is I need a mandrel kit which a few turning sites have.
Here is one… anyone have thoughts? Right size? Not?
https://www.pennstateind.com/store/PKM-ELC.html


I'm probably going to start out with cured polymer clay over a slimline barrel. So for now no glues, or finishes needed. (They come out just dandy with a whole lot of sanding.) At some point I will try wood or acrylic, but polyclay I know. Turning will open up a whole new range of possibilities.
 
Signed-In Members Don't See This Ad

magpens

Member
Joined
Feb 2, 2011
Messages
15,912
Location
Canada
I would say you got a really good deal for $30.00+

To answer your questions we need to know a bit more about your lathe.

When you take off that big disc on the left (headstock side) there will be a threaded spindle.

We need to know the thread size on the spindle ... commonly 1" by 8 turns per inch (TPI).

When you look into the end of the spindle, there will be a tapered hole. We need to know the specifications of that taper ... commonly MT#1 or MT#2.
MT means Morse Taper and I would guess that your lathe has MT#1 taper both on the headstock end and the other end (tailstock).
If that is correct then the mandrel you referenced would fit in your headstock, but the taper size needs confirmation.

Did you get a manual with the lathe ?

Do you know the model number of the lathe ? (should be on a stick-on label on the side of the lathe or its motor).

I did a google search for SL1200 and did not come up with anything that looks like your picture.

Please give us some of this info and we can help you more.
 
Last edited:

Mr Vic

Member
Joined
Aug 11, 2008
Messages
1,865
Location
Falcon, CO
Hi Jen,

Welcome to the forum. If your lathe looks the attached picture it's a central Machinery Model #95607. Here's a link to the manual ->

http://manuals.harborfreight.com/manuals/95000-95999/95607.pdf

The round plate is called a faceplate and it is used to mount bowl blanks. Sounds like you'll need a knock out bar for a pen mandrel. This model uses a Morse Taper #1 for both head and tail stock.
 

Attachments

  • IMG_2634_1.jpg
    IMG_2634_1.jpg
    247.6 KB · Views: 811
  • IMG_2635_1.jpg
    IMG_2635_1.jpg
    208.2 KB · Views: 567

Skie_M

Member
Joined
Aug 7, 2015
Messages
2,737
Location
Lawton, Ok
I have that lathe ...


The spindle size is 3/4 x 16 (you can find 3/4" nuts with that thread size and pitch easily enough to make your own faceplates). (fixed, thx Mal!)


The small "wheel" you describe is a faceplate. As I just mentioned, making your own is fairly simple if you have the correct nut size to fit the spindle.

Countersink a nut into a block of wood or squared off section of a board, epoxy it in place, turn it true and you're good to go. You can use it as a glue block style mounting system or you can put screws through it to secure your blank like a traditional face plate. The missing small one won't cause you any issues in pen turning. It"s for small bowls, platters, goblets, and lidded boxes.


Other things of note ... headstock and tailstock have a #1 morse taper. Harbor Freight only has 1 #1 MT accessory of note that you might want ... it's a 3-jaw scrolling jaw mini chuck (uses tommy bars to tighten and loosen). It's fairly well made, but it's made for their METAL TURNING lathe, so it doesn't have a dovetail on the jaws. It still works extremely well for drilling already round stock, cutting to length, ect ... and for 30 dollars it's a steal of a deal. Second best I've seen was from PSI for over 55 dollars.


Doesn't come with any turning tools ... just a faceplate wrench to fit the faceplates and another wrench that you won't see any apparrent use for (fits the REVERSE THREADED NUT that is INSIDE THE HEADSTOCK). Don't worry about it, just save it someplace safe till you think you may need it someday. Also comes with #1MT dead center (spur center) and live center (cup center with a center spur). If you're missing the knockout bar, it's pretty simple to make one yourself out of 5/8" steel rod and any old chunk of wood turned between centers for the handle.


Drilling on this lathe works pretty well even without a drill chuck (I get mine from PSI ... great deal and they have them in #1MT), if you haven't got one you can grip your round blank in that 3-jaw chuck I mentioned earlier and hold your bit in a pair of vice grips or make a custom handle for your drill bit the same way you would for that knockout bar.

(I recently removed that nut and created a faceplate ... re-mounted it on the back of the headstock and turned it down. Makes a great handwheel.)


I hear that the tailstock and banjo (toolrest) lockdown arrangements can sometimes use some tweaking so that they don't slip around on you... Make sure you keep the lathe bed properly clean (it's not stainless steel, more like cast iron ... IT WILL RUST IF YOU LEAVE WATER ON IT). Waxing your lathe bed can help with rust prevention, especially if you do wet sanding for finishing work like I do.


The motor is directly under the lathe bed ... it seems to be a bad place on first examination, as shavings and dust will naturally fall right down past the air intake for cooling. Make sure you keep that intake clear by cleaning it off now and then ... there IS an internal filter to prevent shavings and dust from getting into the motor itself, but I doubt it will like anything liquid.


Make sure your lathe is sitting level. I've found that I do NOT have to bolt my lathe down, but I do have to be careful of how fast I'm spinning a blank that is out of balance because my lathe isn't secured .... it can walk around on my table top if I'm not careful.


All in all, I spend 108 dollars after tax, using a 25% off coupon to buy my lathe, and I'm very happy with it. Treat yours right and you should be quite happy with it too!


(Take a file and sandpaper to the top edge of the toolrests to make them smooth, by the way ... There should be 2 of them, one short and one long. Don't forget to wax them too, to give your tools smooth movement!)


Speaking of tools - Harbor Freight has an 8-pack of common lathe tools that does the job decently well. They are NOT SHARP out of the box ... get yourself a grinder setup or a sander to put a decent edge on these before you get down to business. Remember what I said about making your own faceplates? Do up several and attach different grits of sandpaper on them ... now you have a variable speed sanding station you can use to put a custom edge on your tools!


On the very END of the lathe (past the tailstock) there is a small piece of plastic held in place with 2 screws .... this is just a stopper to keep the tailstock and banjo from sliding off the ways. Perfectly safe to remove this thing so that you can take your tailstock and toolrest banjo off the lathe bed for cleaning, tweaking, ect... in fact, I lost mine somewhere and really don't care! :)
 
Last edited:

Skie_M

Member
Joined
Aug 7, 2015
Messages
2,737
Location
Lawton, Ok
Oops .. yes, 3/4" x 16 !! :)


The 1" x 10 is the other common lathe spindle thread, thanks Mal!


Plus ... I think the reason that one was in the "discontinued" pile was because it was the store's "display model" and that's why parts were missing .... hence the HUGE discount. I'ld love to get a discount like that and end up with a spare lathe (or three!)...


As for the faceplate "wrench" issue ... I've never really bothered with it.

I grab my handwheel with my left hand, grab the faceplate itself with my right hand, and loosen .... it turns off the lathe spindle easily. Also, when putting it on, YOU DO NOT TIGHTEN IT. You spin the faceplate onto the lathe spindle after ensuring that it is threaded properly and you seat it snugly against the spindle shoulder. You can just give it a little spin and it'll snap to a stop when it hits the shoulder ... that's generally what you want. Overtightening it will cause you major headaches later on!
 
Last edited:

jbg230

Member
Joined
Jun 13, 2016
Messages
95
Location
Kansas City
Ashame if they truly discontinued this. It's a great entry level lathe. If they did d/c it, I hope HF replaces it with something even better, maybe more horse power or with a turning handle/wheel on the headstock spindle.

Anyway, I've never used the small faceplate. I think the important things to have are the live center, the spur center, and the knock out rod. But mostly, I use a MT#1 mandrel with mandrel saver and it's great.

I made a turning wheel out of a PVC cap for the headstock spindle. For me, it is a pleasure to have. I can send you pics if you'd like.

I've made nice tool handles with the lathe and it's perfect for all the little turning kits like PSI sells.

I agree with smoothing the tool rests and I have also noticed the known issue of the banjo loosening and plan to address it when I get annoyed enough.

I have a 5" flex duct connected to a Grizzly lathe hood which is installed on this lathe so even as inexpensive as it is, this little bench top lathe can hold its own.

Enjoy!
 
Last edited:

eharri446

Member
Joined
Mar 17, 2016
Messages
1,036
Location
Marietta, GA
Harbor Freight had that lathe in the Clearance section of their web site for $79.00. Neither of the two stores in my area have one in stock, and now it is not even on their web site.
 
Joined
Feb 18, 2017
Messages
56
Location
SW Michigan
Wow I wish I knew I had replies here. Will go see if there is a setting someplace I missed to watch this thread. Only way I knew to check is stats on my personal site, seems someone from here clicked my sig file. Good thing.

So… I see some great info…. and to add to my saga, I have a bag of parts I haven't even had a chance to open yet.
Meanwhile my daughter was on her way to look at a house and of course that's when her car decided to throw a rod. So between hauling butt to take her house hunting, and now in a hurry to replace a car too. Playing with my new toy will have to wait.

BUT…. just to be sure I can find this again, I'll bookmark it too. Again I see some good info, just no time to read.
Will look more when all this stuff stops hitting the fan here.
Cheers.

~~~~~~~~~~~~
Boy I sure can't find it. Does this forum not have any "subscribe to thread" links anywhere?


oops.. nevermind. Found it. Under thread tools.
 
Last edited:

RileyD

Member
Joined
Feb 28, 2017
Messages
31
Location
New Hampshire
I just bought a couple of these clearance lathes so me and my girlfriend could start pen turning. I've been pretty happy with then so far.

Here's the stuff I bought for turning wood/acrylic pens.

I bought the Rockler carbide pen tools that are on sale until 3/3. I went with carbide because I don't have a good sharpening solution for anything other than planes/chisels, and I kinda hate sharpening.

At the minimum you'll need a pen mandrel in #1 MT. I picked up mine at Rockler but PSI has a similar one https://www.pennstateind.com/store/PKM-ELC.html. I went with an adjustable one, I'm not sure that's necessary but it was only + a couple of bucks. This'll will probably work for polymer as well, I don't think there's really any difference in the mandrel used.

You'll need either a 60 degree live center (the lathe comes w/ a 45) or a mandrel saver in #1 MT for the tail stock. I went with the mandrel saver, due to good reviews. https://www.pennstateind.com/store/PKMSTS1.html

You'll need at least a 7mm drill bit for drilling blanks.

You'll need a barrel trimming kit for squaring up and trimming blanks. I went with this one https://www.pennstateind.com/store/PKTRIMKIT.html

You'll need kits, Rockler has 24kt gold kits on sale for $2 until 3/3. Blanks, I started by just cutting up some scrap. Some medium CA glue, can be found at any woodworking/hobby shop. Probably some spare brass tubes in 7mm, we screwed up a couple and it was nice to have spares.

Everything else is optional or just makes things more convenient.

A pen press. You can press your pen kits with clamps if you don't get one of these, but I'm kind of lazy. I went with this one https://www.amazon.com/Milescraft-4...98G6/ref=sr_1_1?ie=UTF8&qid=1488376599&sr=8-1 because I didn't want to worry about losing any of the insert pieces.

I wanted to use the lathe to drill blanks, because my drill press is cheap and doesn't have a ton of travel. For this you need a #1 MT drill chuck for the tail stock and a chuck for the head stock. I picked up the drill chuck from amazon but PSI sells one too https://www.pennstateind.com/store/TM31.html. Don't get a live one you don't want the chuck to turn. The chuck I went with was the PSI Barracuda2 https://www.pennstateind.com/store/CSC3000C.html. Yup, it's expensive, but it comes with the thread adapter for this lathe and a bunch of jaws. I also bought a set of pen blank jaws to go with it https://www.pennstateind.com/store/CJAWPEN.html.

I may pick up a pen vise, I trim the blanks on the drill press. But for right now I'm just using a couple of wood screw clamps and that's working OK.

We've actually had a bunch of fun learning to turn pens, even though we've screwed up a bunch. I hope this helps and you enjoy your new lathe.

Edit: Shop around for stuff some places have better prices than PSI, I just linked to PSI for convenience
 
Last edited:
Joined
Feb 18, 2017
Messages
56
Location
SW Michigan
Hi guys, ok, updates.
I bolted the lathe to a piece of wood, and clamp that to my table. Seems to work fine. Plus it's portable this way. Parts I bought (and I wont post the whole list.)
#1 Morse Taper Mandrel (Adjustable Length) - WoodTurningz

And this tool… I can't believe is twice what I paid for the lathe. But… ya need proper tools right? SO I got it.
EWT 9620: Easy Start Finisher: Round - WoodTurningz

Got other stuff I haven't played with. Including some blanks to try BUT… I can't do wood until I figure out how to drill a straight hole. My daughter has a small drill press she's not happy with because it only has a few inches clearance. She's buying a house right now, with a huge barn and cement floors. And plans to get a full size drill press. She's going to give me the small one. POSSIBLY as soon as this weekend. So…. I would hope it has enough clearance to drill a pen blank.

Meanwhile, I've been making polymer clay pens for years now. I have my own technique of rolling and have impressed a few turners with just how dang awesomely good I am.
(lol… no modesty there huh?) Anyway, eager to try my new toy out I quickly whipped together a few blanks, put the clay on much thicker than I normally would so I had some wiggle room getting use to the tool. And…. I'll post my first attempt.

(Great, this forum doesn't allow one to post off my device? grrrr. that will have to wait until I can upload it to my website I guess.)

Only issue I can see now, (other than I clearly need practice.) Is all the shavings.
I had a shop vac hose I put behind the lathe but it barely does squat. This is a messy tool!
That shavings land right on the motor scares me. What a stupid design! I might try and figure out a way of making a shield for the top of it. Something.

Guess I can't ask any more until I post images. And even that… I can feel ridge lines in my new turned pen no matter how light, how steady I was. And I hoped sanding would be easier on a lathe but this one is noticeably duller than the pen I roll by hand and sand by hand. All a matter of technique and practice I'm sure.
 
Joined
Feb 18, 2017
Messages
56
Location
SW Michigan
OH!!!! One question. When we got this tool, another part it's missing is the safety switch thing that just sticks onto the switch. Just to test it in the store the sales guy pulled one off some other machine. But he wouldn't give me that. Said to just stick a popsicle stick in it. Which DOES NOT WORK! A screwdriver, with considerable fussing will eventually get it on. Then I just leave it on and use the switch on the outlet strip to turn it on and off. This is NOT an ideal arrangement. Any way to just buy that part? I'm not even sure what it's called. Can't get it from HF since they don't carry this lathe anymore.
 
Joined
Feb 18, 2017
Messages
56
Location
SW Michigan
penturning.JPG


Ok, here it is. The bottom pen, gold trim was hand rolled.
The top one, silver trim is my first (well actually second, one needs work.) turned pen.

Now it probably doesn't show much, but you can feel lines around both barrels. They felt mush smoother while on the lathe. I don't know if this is just a matter of practice, or what. And I thought sanding on a lathe would be better. Maybe it's because I can't really put any pressure on the thing or it just stops spinning. Or maybe my wet sand paper was spent. (400, 600, then a whole stack of micro sander pads.) Maybe I was just tired and it was late, kinda dark and I was in a rush to play. Or all of the above.

Still I like the shape. I can't get that nice wide bulge by rolling. A slight one, but not like on the lathe. But… this might be a tool best used for wood or acrylic blanks, and stick to clay work as I have been. Sure wastes a lot of clay. My rolling method wastes none. We'll see. More practice to do for sure.

Anyone have tips on just what angle to hold the cutting tool? I'll go hit up youtube and see if I can find something. Or post a link if you have or know of a good one.
 

BeeAMaker

Member
Joined
Jan 30, 2017
Messages
695
Location
Elkhart IN, USA
Anyone have tips on just what angle to hold the cutting tool? I'll go hit up youtube and see if I can find something. Or post a link if you have or know of a good one.

Maybe this will help, it is what I have figured out, may or may not be completely correct according to the masters, but it is what works for me, I get nice long strings off the plastic blanks so I think I'm doing something right :) but will be interesting to hear what works better for others, I'll try it. :smile-big:

As for your switch, do a search on Amazon for "Locking Switch", or "Band Saw Switch", or "Safety Key Switch" for a replacement. If you can take your switch out, it should have a number you can search too.

toolangle.jpg
 
Last edited:

Skie_M

Member
Joined
Aug 7, 2015
Messages
2,737
Location
Lawton, Ok
Hi guys, ok, updates.
I bolted the lathe to a piece of wood, and clamp that to my table. Seems to work fine. Plus it's portable this way. Parts I bought (and I wont post the whole list.)
#1 Morse Taper Mandrel (Adjustable Length) - WoodTurningz

Good ... bolted/clamped down means it'll be more stable while turning, and will "walk" much less when you are turning something that is out of round and heavy. Higher speeds while off balance = walking more.

And this tool… I can't believe is twice what I paid for the lathe. But… ya need proper tools right? SO I got it.
EWT 9620: Easy Start Finisher: Round - WoodTurningz

Well ... you get what you pay for, and most lathe workers aren't machinists. While it's VERY easy for us to make a tool handle to go on the end of the tool, that metal bar and the properly sized and shaped (and drilled/tapped) end of it can be beyond most beginners easily. That having been said, a home made carbide tool would probably serve you just as well, and cost less than 1/4 what you paid for your lathe to make.

Got other stuff I haven't played with. Including some blanks to try BUT… I can't do wood until I figure out how to drill a straight hole. My daughter has a small drill press she's not happy with because it only has a few inches clearance. She's buying a house right now, with a huge barn and cement floors. And plans to get a full size drill press. She's going to give me the small one. POSSIBLY as soon as this weekend. So…. I would hope it has enough clearance to drill a pen blank.

Drilling on the lathe is actually your best bet, but there are ways you can use a drill press to at least get reasonably close. If you have a table saw, cut a corner piece out of the middle of a wide board, and then rip it down the middle to give you 2 matching sides for your clamp, or use some kind of vice with a modified face that will hold your blanks perfectly vertical while you drill.

Meanwhile, I've been making polymer clay pens for years now. I have my own technique of rolling and have impressed a few turners with just how dang awesomely good I am.
(lol… no modesty there huh?) Anyway, eager to try my new toy out I quickly whipped together a few blanks, put the clay on much thicker than I normally would so I had some wiggle room getting use to the tool. And…. I'll post my first attempt.

Generally, polyclay users can get away with MUCH LESS WASTE than wood or acrylic turning ... even metal turning has a good bit of extremely dangerous waste. There are, however, some effects you just can't get by rolling your clay barrels.

(Great, this forum doesn't allow one to post off my device? grrrr. that will have to wait until I can upload it to my website I guess.)

Only issue I can see now, (other than I clearly need practice.) Is all the shavings.
I had a shop vac hose I put behind the lathe but it barely does squat. This is a messy tool!
That shavings land right on the motor scares me. What a stupid design! I might try and figure out a way of making a shield for the top of it. Something.

The motor is double shielded and has a decent air filter right where the exhaust and the intake are located for cooling the motor. It is also designed to run fairly cool. That they put it underneath the lathe head means that they can save a LOT of money in the design by keeping the motor spindle lined up with the pulley linkage on the lathe spindle. The K.I.S.S. principle works well, here .... "Keep It Simple, Stupid!". With less moving parts, there's virtually no maintenance you need to do to keep it working properly.

You'll want a "hood" to help your shop vac pick up the large dust and debris, and you may want to drill holes in your mounting board for a shop vac hose directly below the lathe where the shavings fall, just make sure you have some kind of screen over it or you'll constantly be losing little things down it.

You'll also want something to lay over the lathe bed while you're finishing and wet sanding. Shavings wont hurt your motor one bit ... water might! Make sure it's waterproof or at least water resistant, I like to use a magnet or two CA glued to some craft foam, and lay some paper towel on top of that to soak up water and keep it in place.


Guess I can't ask any more until I post images. And even that… I can feel ridge lines in my new turned pen no matter how light, how steady I was. And I hoped sanding would be easier on a lathe but this one is noticeably duller than the pen I roll by hand and sand by hand. All a matter of technique and practice I'm sure.

The reason you're getting radial lines and ridges (lines and ridges that go around the pen) is that you are not stopping the lathe to sand laterally ("with the grain" or along the spindle, from side to side down the length of the blank) between grits in order to break those radial lines as they appear.

Once you've finished sanding with one grit with the lathe on, turn the lathe off and using the same grit you just finish with, spin your barrel blanks BY HAND while you run the paper or micromesh up and down the barrels. Go all the way round the barrels at least once, and then continue on to the next grit. You can typically get away with skipping this and doing every other grit, but it's better to get in the habit of doing it every time.

Polyclay doesn't "polish up" like most other materials. You can do certain things with it that can help to soften it's appearance or even make it more translucent for an otherworldly glow in the light... (I won't be giving away other people's secrets here....) Polyclay is also somewhat delicate, being easy to scratch and damage, especially when dropped ... they can easily crack. To protect my polyclay pens and to give them a much better shine and appearance, I finish them with CA and wet sand/micromesh up to 12,000 grit, followed by a plastic polish like Plast-X. A car wax like Turtle Wax on top of that can help to keep a glossy shine and oily fingerprints off the pen barrel.
 
Joined
Feb 18, 2017
Messages
56
Location
SW Michigan
Drilling on the lathe is actually your best bet,

Oh yea?????? How? Oh man, that would be so much easier.

ok, hit youtube, before I run out and buy more stuff….. seems I need a chuck of some kind????? Can you recommend one that fits my lathe?

Thanks for all the other tips. I'm soaking up as much as I can. Clearly I messed up the whole sanding process. Completely brain farted the buffing I usually do too.


As for poly clay, I LOVE the stuff. Never once had one crack from dropping or anything. And I have played with several finishes, for pens, the best bet is none at all. Just good sanding and buffing, mine come out like polished stone.

Just watched a few videos, most are using plain old chisels for their cutting. Somehow I think the flat surface of a chisel would be easier to do than that round disk on my finishing tool. THough I can see that being easier when I get into more unique shapes.
 

Skie_M

Member
Joined
Aug 7, 2015
Messages
2,737
Location
Lawton, Ok
Ha, looks like hf has one. See what you think. Pretty sure it's a #1 taper which is what I have. 2" Mini Lathe Chuck with MT-1 Shank

That's actually the exact same one that I have and use.

It beats the PSI price for their similar item by almost half ...

One thing to remember when using a 3-jaw chuck ... it holds ROUND ITEMS perfectly, but wont hold square items very well at all. I turn all my blanks round and pre-finish them so that prospective buyers can examine the blanks and see what the finished pen may look like when complete. It also gives me a chance to hold a pre-finished pen blank next to the pen kit and see if it matches up as well as I imagined it might ...


You'll find that a lot of DIYers out there will do all sorts of tomfoolery and crazy stuff that a professional wouldn't touch with a 10-foot non-conductive pole. That having been said, I have a set of four old wood-handled square shanked screwdrivers that I ground and re-shaped the tips on to use for up close detail work. It helps that these tools are only about 6 inches long, so that I can get into tight spaces, like for face plate turning inside a bowl or small lidded box. As you progress in your woodturning, you'll see all sorts of uses for an old broken down screwdriver or other tool ...


Need a quick and easy tenoning tool and happen to have a messed up (wrenches missing or broken) set of spanners? Take a spanner the size you need to make the tenon in (or grind it to the proper size) and grind one of the sides of the wrench into a BLADE that you can use to very quickly size your tenon. I would suggest using a size larger than what you're aiming for, just to get in the ballpark, at first, and use calipers to go the rest of the way. In order to get these to work, you DO need to get it close enough that you can get the wrench nearly around the spindle ... but it takes a LOT of the guesswork out of it.

Lathe tools are just that easy, if you know what you're looking for and what you want to do.


Now ... once you have your 3-jaw chuck... You"ll want your barrel blank to be round and as close to a perfect cylinder as you can get it quick and easy. Chuck it up and cut your barrel blanks just a little bit oversize (1/4" or so ...)

Drill your barrel blank right there on the lathe while it's still in the 3-jaw chuck. You can actually drill by HAND and still have a great deal of accuracy. Drill a spare piece of wood with your 7mm bit and turn it into a handle. Glue or secure your 7mm bit into it and there's your hand drill ... just hold it steady on the center and give it gentle pressure ... watch it drill into the wood. Back out now and then to clear the chips, and make sure you are drilling at the lowest speed you can go and still keep the blank turning.

If you have a drill chuck adapter in #1MT (PSI has a great price on these ... save up and get their 1/2" version at about 30 dollars and you won't be sorry. Their 3/8" version is under 20 dollars, but it wont hold anything bigger than 10mm! :tongue: ) Drill it the same way, just make certain you keep a hand on the drill chuck while you advance and retract the quill to keep it from spinning. This method is more accurate than drilling by hand unless you've got a steady hand and a LOT of practice! :biggrin:
 

Skie_M

Member
Joined
Aug 7, 2015
Messages
2,737
Location
Lawton, Ok
Ha, looks like hf has one. See what you think. Pretty sure it's a #1 taper which is what I have. 2" Mini Lathe Chuck with MT-1 Shank

As long as it holds a drill bit it would work,
There are these too
https://www.pennstateind.com/store/TM31.html
https://www.pennstateind.com/store/TM21.html

Ehh ... he meant a chuck for holding the barrel blank, not the drill bit. But he'll want one of those eventually too! :)

The lowest price 4-jaw scrolling chucks I've seen on the market are PSI's Utililty Grip Chuck for $89 ... they are a good deal, and can use the EXACT same jaw sets as the Barracuda 2 lathe chucks. You'll be used to using tommy bars for the utility grip by then, as the 3-jaw chuck from Harbor Freight uses the same system. The Barracuda 2 uses a keyed chuck system, for 1-handed open and close, making it a little easier to mount and remove things from the jaws.

Still a great deal for 140 dollars when on sale, and comes with a similar set of jaws as the Utility Grip... but it's missing the extra deal that the Utility Grip comes with the jumbo bowl grip plates for flipping bowls and plates over, gripping them by the lip so that you can turn and finish the very bottom.
 
Joined
Feb 18, 2017
Messages
56
Location
SW Michigan
This is all getting too complicated and expensive. I think I'll wait for my daughters drill press and see what kind of vice I can come up with to hold the blank. That will have to do.
 

Skie_M

Member
Joined
Aug 7, 2015
Messages
2,737
Location
Lawton, Ok
Haha ... it's not terribly expensive or complicated for me.


I turn my blanks round between centers ... you have a spur center and a live center that came with your lathe. This is sufficient for my needs ... I make a simple cylinder and sand it nice and flat. I go a step further and sand it up to 1000 grit, and finish it so that I know what the finished pen barrel will sort of look like.

Once it's a cylinder, you can chuck it in the 3-jaw and easily and precisely cut to length and drill it right down the middle.

Glue your tubes in, make certain you ream the ends of the brass and remove any glue that got inside ... square your blanks (ream again!) and mount on the mandrel for turning.

Once your done finishing on the lathe, you may want to square the ends again to remove excess finish .... sanding to square them is the best option for this (make a simple sanding disc and mount your drill chuck in the tailstock with a transfer punch or even the correct size drill bit to fit the brass tube, gently touch the blank to the sanding disc while using 500 grit or better sandpaper on the disc...)

Don't forget to ream the brass tube one last time before assembly, to ensure that no glue or finish got in the tube while you weren't looking!
 

Skie_M

Member
Joined
Aug 7, 2015
Messages
2,737
Location
Lawton, Ok
Also ... Harbor Freight sells a drill press vice for about 17 dollars. I'ld take the steel jaws off and replace with wooden ones that have a vertical V cutout on both sizes (make it on the table saw or use a router ... you could even cut it by hand with a saw or chisel and hammer, whatever works). Mount them on the vise (actually, you could just glue them on the vise, or even glue magnets in the wooden vise face replacements and that would keep them in place) and use a square to make sure your vise is holding your blank vertically in all directions. Also make sure to use a square to make certain your drill press table is square to your drill bit.
 

BeeAMaker

Member
Joined
Jan 30, 2017
Messages
695
Location
Elkhart IN, USA
The lowest price 4-jaw scrolling chucks I've seen on the market are PSI's Utililty Grip Chuck for $89 ... they are a good deal, and can use the EXACT same jaw sets as the Barracuda 2 lathe chucks.

That is the chuck I got, Like it so far. So Barracuda jaws will fit - I thought it might. What about Nova checks? (don't mean to hijack the thread)
 
Joined
Feb 18, 2017
Messages
56
Location
SW Michigan
I watched a video that shows a chuck you can put a not quite square blank into.
https://www.youtube.com/watch?v=uBzpCC9YPEo&t=61s BUT I'm not sure the (oh terms… backstop?) end will hold a drill bit. (snowing out now, garage isn't heated. I'll play on a warmer day.) Besides this chuck looks like one of the more expensive ones. Again…. lets wait for daughters drill press and hope the bit and blank will fit. I think the thing was designed to drill holes on flat metal. So we'll see.
 
Joined
Feb 18, 2017
Messages
56
Location
SW Michigan
Well… it was SUPPOSE to be warm today. Flipping snow!!!!! But I had to go look.
Now terms again…. the pointy bit on the tail end does not seem to have a way to remove.
So I don't see how I could even get a drill bit in there.
Back to wait for daughters drill press. And if that doesn't work, I buy a small drill press. Could use it for other things anyway.
 

Skie_M

Member
Joined
Aug 7, 2015
Messages
2,737
Location
Lawton, Ok
The "pointy bit" in the tail end .... *giggles* ...


OK ... the far end of the lathe is the "tailstock". In between the headstock (the business end with the controls) and the tailstock is the base of the lathe, with the very smooth metal top. These are called the "lathe ways", or just the "ways" for short. They keep the tailstock and headstock aligned for proper operation of the lathe. You'll want to protect this from moisture, so that you don't get rust all over it ... a coat of wax now and then helps things slide along properly and keeps the rust away.

The part that travels in and out of it towards the headstock and back is the "quill" ... the part you turn to achieve this is the "handwheel", or in our case, more like a knob.

There is a hole in the back of the "knob" handwheel thingy that you put your knockout bar in. Put it in as far as it will go, then back it out about an inch or two, and while keeping your OTHER hand in front of your live center (the pointy thing that's in the quill), give the ball of your knockout tool a smack to push it forward into your live center. This is how to remove it normally. You use the same basic procedure on the headstock to remove the spur center when you want to use a different accessory.

If you are missing the knockout bar, you can substitute an 8-inch or so length of 1/4" steel rod with a handle on it, or something similar. Even a hardwood dowel would work, as long as it fits in the hole.

Once you have it out, examine the part that was stuck in the tailstock quill or headstock spindle. You will notice that there is a taper to the metal part that gets narrower as it goes further back ... this exactly matches the taper inside of the tailstock quill and the headstock spindle. The size of taper is quite precise and is called a #1MT (number one morse taper). The only tool accessories your lathe can use in the tailstock quill must all have that exact morse taper size, or it wont fit.

The headstock spindle, on the other hand, can make use of some adapters to adjust for various spindle thread types on accessories, but the size of morse taper there is also a #1MT. The spindle thread is 3/4" x 16 .... 3 quarter inch by 16 tpi. Remember that ... write it down so that if you ever go shopping at the local hardware store, you can find large metal nuts of that size and thread pitch, for making your own faceplates someday.

A lot of people just screw a wooden faceplate directly onto their spindle, and while that may work a time or two, it's ruined after a short while ... steel threads against wooden threads never ends well for the wood.

The tool rest .... originally comes with 2 sizes of toolrest that fits in the thing that secures them and helps you move them around. That part is called the "toolrest banjo" (not the musical instrument banjo).


Last, but not least, something you don't have on your lathe, but I made one up for my lathe .... a headstock handwheel, which mounts on the back of the headstock. Mine has a through hole, is made of MDF and finished in CA for a durable protective layer, and was turned right there on the back side of the headstock after I mounted it, so it turns true and balanced. This makes it extremely easy for me to stop my lathe and do my lateral sanding or examine my blank without touching it, or even to easily and quickly apply finish that I dont want flying off the lathe while it's running.
 

Curly

Member
Joined
Nov 20, 2010
Messages
4,840
Location
Saskatoon SK., Canada.
OH!!!! One question. When we got this tool, another part it's missing is the safety switch thing that just sticks onto the switch. Just to test it in the store the sales guy pulled one off some other machine. But he wouldn't give me that. Said to just stick a popsicle stick in it. Which DOES NOT WORK! A screwdriver, with considerable fussing will eventually get it on. Then I just leave it on and use the switch on the outlet strip to turn it on and off. This is NOT an ideal arrangement. Any way to just buy that part? I'm not even sure what it's called. Can't get it from HF since they don't carry this lathe anymore.

Pull your switch out and see if one of these two are a match and replace it. Don't bother calling Grizzly to ask for the yellow key thingy since I doubt they will sell it to fit someone else lathe but it is almost certain the switch will drop into the lathe you have and connect fine.

Safety Paddle Switch | Grizzly Industrial

Paddle Switch 110V | Grizzly Industrial
 

RileyD

Member
Joined
Feb 28, 2017
Messages
31
Location
New Hampshire
OH!!!! One question. When we got this tool, another part it's missing is the safety switch thing that just sticks onto the switch. Just to test it in the store the sales guy pulled one off some other machine. But he wouldn't give me that. Said to just stick a popsicle stick in it. Which DOES NOT WORK! A screwdriver, with considerable fussing will eventually get it on. Then I just leave it on and use the switch on the outlet strip to turn it on and off. This is NOT an ideal arrangement. Any way to just buy that part? I'm not even sure what it's called. Can't get it from HF since they don't carry this lathe anymore.

I just checked and the Switch Key form my Ryobi scroll saw fits the HF lathe. Part # 089051003083 if that helps.
 
Joined
Feb 18, 2017
Messages
56
Location
SW Michigan
copy
There is a hole in the back of the "knob" handwheel thingy that you put your knockout bar in. Put it in as far as it will go, then back it out about an inch or two, and while keeping your OTHER hand in front of your live center (the pointy thing that's in the quill), give the ball of your knockout tool a smack to push it forward into your live center. This is how to remove it normally. You use the same basic procedure on the headstock to remove the spur center when you want to use a different accessory.

If you are missing the knockout bar, you can substitute an 8-inch or so length of 1/4" steel rod with a handle on it, or something similar. Even a hardwood dowel would work, as long as it fits in the hole.


I wish I had pictures of this. Too darn dark and cold out there now. But I'll get a look and see if I can figure out what your talking about hopefully tomorrow.

Thanks for ALL the tips guys. I did look up that key switch…. no photo available. and up to 20 days to ship… Going to see if we can't just replace the whole switch. Again hopefully this weekend. The switch on it seems wiggly to me. Granted it doesn't have that safety thing inserted, but I just don't trust wiggly switches on anything. Easy enough to replace. Should be at least.
 

Skie_M

Member
Joined
Aug 7, 2015
Messages
2,737
Location
Lawton, Ok
161037


OK ... this is pretty much our lathe. It's being marketed under a new name, same manufacturer, nearly 100% identical stats, and twice the price with a 5 year warranty.


The long black part on the bottom that includes the legs ... this is the ways, or lathe bed.

The red part on the left is the headstock, the black part on the back of it is where I have my handwheel, but that was custom made.

Sticking out the front of the headstock is the spindle shaft, you can see the threads on the spindle. The model shown has a 1" x 8 spindle thread, ours is a 3/4" x 16, and this is pretty much the major difference between ours and this new version. Installed in the headstock spindle is the spur center.

In the black cover on the back, there is a hole you use to place the knockout bar into the back side of the spindle to remove a morse taper accessory by tapping it out.

The toolrest banjo with wide toolrest on top of it is out in the middle of the lathe bed.

The red part on the right side is the tailstock. The part that's pointed and sticking out on the left side of it is the live center, which is inserted into the tailstock quill.

The black thing on top is the quill lock, which you can tighten down when you do not want the quill to move around. Leave this loose enough for easy movement when you are drilling or adjusting the tailstock pressure ...

The knob on the right is the tailstock "handwheel" ... which is a knob for this model. It's hollow, and has a hole running through it right up to the back of the live center. Use a knockout bar here as well to tap out morse taper accessories.


The handle attached to the toolrest banjo and the tailstock can be adjusted ... simply lock the item into position where desired or for convenience, and then PULL the handle directly away from it's attachment point about a half inch or so ... then you can freely rotate the handle to any desired position. Release the handle - it's spring loaded so it will return to a normal position.
 
Last edited by a moderator:
Joined
Feb 18, 2017
Messages
56
Location
SW Michigan
Got another question, trying to get parts to drill blanks. woodturningz asked what the thread count is on my lathe. And suggested this part.
Spindle
Adapter, LA3418X
Here, direct link Internal Spindle Adapter - WoodTurningz

But he also sent me to another part using a #2 morse taper. I KNOW mine is a #1 because I already bought the mandrel and it's a #1. But he doesn't know and neither do I if I need this adapter or not. All he could find was a PDF file of the manual and wow, it's not even mentioned in there.

So before I order, then have to return, or not order than have to pay another shipping charge, thought I'd hit you folks up again. SOMEONE out there must have the same lathe as mine and know.
 

Skie_M

Member
Joined
Aug 7, 2015
Messages
2,737
Location
Lawton, Ok
The Harbor Freight Mini Wood Lathe 8x12 has a #1 Morse Taper for headstock and tailstock, and a 3/4" x 16 tpi threaded spindle.


If you have an accessory (like a chuck for your lathe) that takes a 1" x 8 tpi threaded connection, then the spindle adapter would be a good idea so that you can attach it to your lathe. (Personally, while you really only NEED to have one of them ... they're reasonably cheap, get one for each accessory!)
 
Signed-In Members Don't See This Ad
Top Bottom