Lapel Pin

Signed-In Members Don't See This Ad

Fireengines

Member
Joined
Jan 22, 2012
Messages
540
Location
Plano, TX
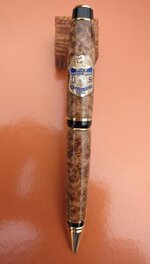
I have a badge lapel pen from a federal agency and would like to add it to a pen.

I would like to add it to the pen itelf but would like to bounce my idea off everyone:

Use a wood blank;
Sand the lapel pin down to as thin as possible without losing detail;
Form the pin around the pen;
Using epoxy, glue the pin to the finish RAW wood (no CA applied);

Here is the problem...

I have to cover the pen with CA. However, the pin does have some height and applying CA would build up at the base of the pin in the direction the pen is spinning on the lathe. My solution is to simply reverse the blanks and allow them to spin in the opposite direction and apply the CA. Does this sound like it would work?

Another option is to apply the CA as normal to the pen and glue the badge to the pen after CA application but not to sure how epoxy will stick to the CA.

It may be easier to attach the pin to the clip but I am not sure how secure that would be and how to do it.
 
Last edited:
Signed-In Members Don't See This Ad

joefrog

Member
Joined
Mar 14, 2012
Messages
409
Location
Birmingham, AL area (Alabaster)
Wow, this is a question for someone with far more experience than me -- but it does SOUND like it will work. Any chance you can get a spare pin, just in case it doesn't work with that method?
 

Justturnin

Member
Joined
Aug 19, 2011
Messages
2,235
Location
Houston, Tx
I would be nervous that you would never get the CA built up evenly. I would cut the wood back a little further and cast it in PR.
 

Harley2001

Member
Joined
Feb 13, 2008
Messages
477
Location
Dublin,Ohio
I would paint the tub and then glue the pin on after you sand the pin off .and than cast it in clear pr.then turn down to size.
 

Harley2001

Member
Joined
Feb 13, 2008
Messages
477
Location
Dublin,Ohio
You could always put it on the pen after you put your ca on the only thing with that is the pin will not be smoth with the wood. Casting is your best bet.
 

Fireengines

Member
Joined
Jan 22, 2012
Messages
540
Location
Plano, TX
I have two pins to work with and more where they came from. Looking at the pin, I think I can get it down pretty thin if I am careful and don't use any "electronic methods" to speed the process.
 

MrWright

Passed Away Oct 12, 2022
In Memoriam
Joined
Jan 11, 2010
Messages
282
Location
Lockeford, California
Put the Fed. pin in the printer-scanner. Scan it, save it to your computer software, make an insert of the picture on to a clear label or clear shipping label ( according to the size of the Fed. pin) apply the clear label decal onto a piece of light color wood turned to pen size, apply thin CA then medium CA and finish off. That is what I did to a Fire Fighter pen. Another way is make the decal on white label material, apply to a painted tube the pour clear acrylic.
 

KBs Pensnmore

Member
Joined
Oct 16, 2010
Messages
834
Location
Murray Bridge 5253 Australia
If you have a Dremel, turn the pen to size, cut out the shape and then glue in the pin. Coat with CA to finish. The only problem that I could see is that the enamel MAY crack when curving the pin.:frown:
Kryn
 

Fireengines

Member
Joined
Jan 22, 2012
Messages
540
Location
Plano, TX
Update:

Last evening I sanded the pin down. Frankly, I am surprised I can type this morning and I still have skin on my fingers.

I took a rod from my PSI pen disassembly kit and bent the pin to conform to the curve of the rod. I tested it on the pen and the fit needs some minor adjustements; I will do that today.

I like the lapel pen sticking out and I think it will be a great looking pen. However, like we all know, anything can happen.

I will post photos some time today.

Thanks to all!
 

Fireengines

Member
Joined
Jan 22, 2012
Messages
540
Location
Plano, TX
Well here it is...

I think I better learn how to cast for the next pen.
 

Attachments

  • badgepen.jpg
    badgepen.jpg
    17.1 KB · Views: 119
Joined
Oct 31, 2011
Messages
300
Location
Columbia, SC
This has been my experience. I usually turn it down below where it should be, and I make sure the barrel is straight as you will need as much space as you can get. I then use then attach the object with ca and put on more coats than I would like to think about. Words of Caution. 1. The CA very likely will settle over a few months, so you might be able to feel it. 2. Don't put on the CA too quick, as it will create air bubbles that you will find if you have to sand it. 3. Don't sand it until you are almost finished and you think you have put on way too much CA. Remember, the rest of your barrel may have a lot of CA on it, but the part you are covering does not have as much because it is raised, so when you put a coat on most is wiped off until the pen is almost round. The best way to deal with this is to measure the size of the object and take that into account before you round the barrel with a skew. 4. After you think you have enough CA on it, PUT MORE ON. You can always put turn it down, but you can't add metal to the pin once it is lost...5. Never sand unless you have too! And never sand wet until you are ready to go through the finishing process. If you do, there might be little white dots that appear all around the barrel, and if you sanded it wet they may not go away... :eek: 6. Do remember to turn the barrel around every once in awhile like you said, it does help. 7. Wish you had PR to cast it in after the pen is finished.

It looks like in your concept you are putting the pin on the finished pen, so you don't need almost everything I said. If you do decide to put it under the CA, hopefully some of these thoughts will help.

David
 
Last edited:
Top Bottom