Just took one on the chin

Signed-In Members Don't See This Ad
Joined
Aug 13, 2016
Messages
1,460
Location
Surprise, Arizona
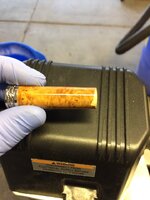
I was making a Majestic Jr with brown mallee burl as a gift and disaster struck. I was pressing the centerband assembly in and this happened. I spent several hours on this because I'm still new and have to go slow. Needless to say it was a bit of a letdown. If there's any saving grace it's that I was able to get the assembly out unharmed with flat punches and I have another blank from the same batch so I don't think I'll have to redo the lower barrel. I can also put a bevel on the next like it's supposed to have. I don't like bevels but didn't realize the bushings for the short barrel are a few hundreths different until it was too late. I wasn't torqueing it down at all. I'll admit my mistakes but I'm blaming this on the cupped end of my Penultimate pen press. The walls are thin and I think the cupped shape put too much pressure on the wood vs a flat piece butting up against it. I don't care for it at all, but it was a lot cheaper than a real pen press. To add insult to injury I thought of using a quick grip clamp afterwards. I should've known better than to buy it based solely on the name. It's a play on words but penultimate means second to last...
 

Attachments

  • IMG_1224.jpg
    IMG_1224.jpg
    214.9 KB · Views: 473
Signed-In Members Don't See This Ad

magpens

Member
Joined
Feb 2, 2011
Messages
15,912
Location
Canada
That is most disappointing !!!!

Looks like a beautiful mallee burl ... looks somewhat fragile also ... a letdown for you to have that happen.

I am unclear as to what you mean by a bevel. . I have adopted the practice of reaming out the brass tubes a little bit (perhaps 3 thou) and then gluing in the hardware pieces.
 

adirondak5

Member
Joined
Aug 9, 2016
Messages
242
Location
Long Island NY
Ouch , I feel your pain , that looks like a beautifully turned and finished barrel . I've had a few crack when I pressed them together , using a k-body parallel clamp instead of the Milescraft press I have sitting in the box unused .
 

randyrls

Member
Joined
Feb 2, 2006
Messages
4,829
Location
Harrisburg, PA 17112
I press pen parts in with my woodworkers vise. I made oak "soft jaws" with magnets to attach the oak to the vise jaws. Easily clamped and when they get scarred, I can replace easily.

You may be able to put an OOPS band on it. Score with a skew, then turn off the damaged part. Drill a small cut-off from another pen blank(red would look nice!), and glue onto the top of the blank. Re-finish the blank.

Just chalk it up to experience and move on... Remember: wood DOES grow on trees!
 

mecompco

Member
Joined
Apr 24, 2015
Messages
1,607
Location
Fairfield, Maine
Oh, yes, I have destroyed pens in the press. Now I make sure to de-burr them. Then, I will usually wrap an appropriately sized punch in 320 grit paper and chuck it in my hand drill and run that through the tube a few times--this gets rid of any glue that might still be there and makes the parts fit more easily (I also use blue Loc-Tite for assembly). As a final step before pressing, I'll run a brass gun cleaning brush through the tubes to remove any dust and/or chips.

For pressing in parts, I turned a couple of MT2ish inserts out of oak for my lathe, then epoxied on some cutting board material for pads. This works pretty well. On the sharp little 7mm transmissions I'll put a piece of hard wood over the plastic pad.

I have learned the hard way that if things aren't going together smoothly, to punch them back out and start over. Just what seems to work for me.

Regards,
Michael
 
Last edited:

KenV

Member
Joined
Oct 28, 2005
Messages
4,720
Location
Juneau, Alaska.
Hard to see the detail, but looks like the tube is adhesive starved at the chip out. Glue coverage is most important at the ends with thin walls and burls. Less critical in the middle with more thickness and support.
 
Joined
Aug 13, 2016
Messages
1,460
Location
Surprise, Arizona
I am unclear as to what you mean by a bevel. . I have adopted the practice of reaming out the brass tubes a little bit (perhaps 3 thou) and then gluing in the hardware pieces.

The bushings are slightly different in diameter, so the barrel should have a slight curve to it instead of the almost unnoticeable taper.

Hard to see the detail, but looks like the tube is adhesive starved at the chip out. Glue coverage is most important at the ends with thin walls and burls. Less critical in the middle with more thickness and support.

Hard to tell in the pic but there is dried adhesive on the brass tube. I really load up the epoxy when using a burl.

This wasn't the side that had anything being pressed into either, which really annoyed me. The taper on the cup of the press has caused issues before, I'll be replacing it very soon.
 

WriteON

Member
Joined
Aug 21, 2013
Messages
3,301
Location
Florida & Pa
I press pen parts in with my woodworkers vise. I made oak "soft jaws" with magnets to attach the oak to the vise jaws. Easily clamped and when they get scarred, I can replace easily.
!

I like the idea of pressing with controllable tension. Would you kindly post a pick of the set-up.
 

JP1337

Member
Joined
Aug 24, 2016
Messages
34
Location
VIC
I use my drill press to assemble my pens. It's made my life much easier.

In the past I used a vice but it was a royal pain with all the winding in and out, and having to do it horizontally at bench height annoyed me for no real reason.

I turned a cylinder of wood on the lathe with a tenon long enough for the drill chuck to grip, I put a flat scrap of wood on the drill bed/table/whatever term you like to use.

It is closer to eye level so I can better see what I am doing. There is enough quill travel to put the pens together without having to adjust any heights and I have absolute control over the pressure by using the lever to press the pen together.

I wouldn't use anything else.
 

Skie_M

Member
Joined
Aug 7, 2015
Messages
2,737
Location
Lawton, Ok
I use a drill press vice from Harbor Freight (around 20 bucks) with the steel jaws removed and replaced with vinyl jaws.

A shop just up the street from where I live was tossing out some shelving supports that were in their walls that happened to be made from half inch think vinyl angle that was nearly 1.5 inches wide each side. I took two 4-inch pieces and cut the angled part off and sanded it smooth, then used the steel jaws to give me my hole placement for the jaw screws... I drilled and countersunk the holes and installed them with the original steel jaw screws.

There are very few pens that can't be accommodated with this vice, and for those I have my 12-inch bar clamps. I always put the wood end up against the back (unmoving) jaw, and the components up against the front (moving) jaw, so that any denting/indentation on the jaw face is always up against a component rather than my wood, and the wood is always up against a flat face.
 
Top Bottom