Inlace Acrylester money blank

Signed-In Members Don't See This Ad

Monty

Group Buy Coordinator
Joined
Mar 4, 2005
Messages
8,358
Location
Pearland, Texas, USA.
I love turning Inlace Acrylester blanks but they can be a PITA. I use a sharp skew and take very light cuts. It can also be helpful to trim off the edges by sanding or carefully cutting them off on a band saw.
Sorry, don't have any picts of pens made with them.
 

Charlie_W

Member
Joined
Nov 16, 2011
Messages
5,918
Location
Sterling, VA USA
Well, it's not a pen but it is Inlace Acrylester!

Yes, very light cuts with a start tool. Bevel support will help prevent the tool taking too big a bite. Plan on sanding in to size if still getting chipping.
 

Attachments

  • image.jpg
    image.jpg
    140 KB · Views: 441

TonyL

Member
Joined
Mar 9, 2014
Messages
8,915
Location
Georgia
Inlace Acrylester was one of my motivations for using a skew although I have turned the material with less success using carbide (most likely do to my impatience). I do just as Monty says. I have made serve money pens and paint the inside of the barrel light green. Some like the way the brass and green go together. I prefer the light green paint. I follow the same approach with Rhino plasti. I love both of these materials. They are inexpensive and take on a brilliant shine. I am sure there are other approaches.

Getting back to the skew - I will sharpen (not just hone) my skews at least twice per barrel followed by a leather strop. I don't know if it is right or wrong, but haven't had a blow-out since. I also trim the barrels with Rick Herrell's sanding jig (i use that for all materials with 80 grit diablo SP.).
 

Skewer

Member
Joined
Oct 8, 2014
Messages
295
Location
Kentucky
I turned one recently and it had quite a few bubbles in it. The bubbles filled pretty easily with CA and were hard to find afterwards. I actually had it polished up and found another bubble and had to go back and fill it. Other than that, typical of inlace acrylester - if you apply a lot of pressure it can chip out...and something about the way it doesn't want to cut sometimes baits me into applying to much pressure.
 

Attachments

  • Capture13.JPG
    Capture13.JPG
    63.2 KB · Views: 338

Skewer

Member
Joined
Oct 8, 2014
Messages
295
Location
Kentucky
oh...and forgot to mention you will be able to see the tube through this blank - so consider reverse painting.
 

pianomanpj

Member
Joined
Sep 24, 2007
Messages
1,147
Location
Augusta, Maine, USA.
I turned one of those blanks several years ago, and found that the density of shredded currency was lacking. I reverse painted the drilled hole, but I still saw way more of the paint than I wanted to. Since I only did one, take that for what it's worth. YMMV.
 

Sabaharr

Member
Joined
Mar 7, 2009
Messages
598
Location
Slidell, LA
I wonder if you could glue a dollar bill around the tube and still get it in the blank? Sure would solve the see through problem. One dollar would cover 3 or 4 tubes.
 

CREID

Member
Joined
Jul 23, 2008
Messages
3,009
Location
Vancouver, wa
I turned one recently and it had quite a few bubbles in it. The bubbles filled pretty easily with CA and were hard to find afterwards. I actually had it polished up and found another bubble and had to go back and fill it. Other than that, typical of inlace acrylester - if you apply a lot of pressure it can chip out...and something about the way it doesn't want to cut sometimes baits me into applying to much pressure.

Interesting. I have two shredded money blanks from Rockler and they are really different looking. I don't think the ones I have will require painting of the tubes, I don't think there is any way to see through theses. Although I do like the look of the one in your picture.

Curt
 

Wood Butcher

Local Chapter Leader
Joined
Jun 8, 2005
Messages
970
Location
Westfield, IN, USA.
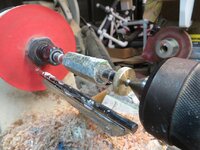
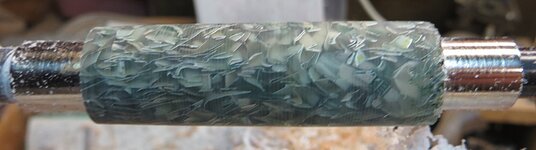
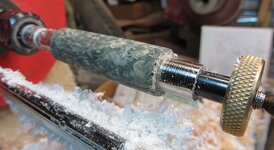
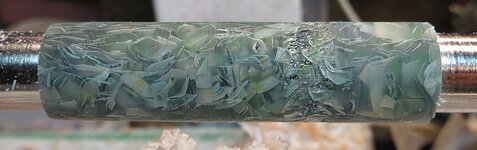
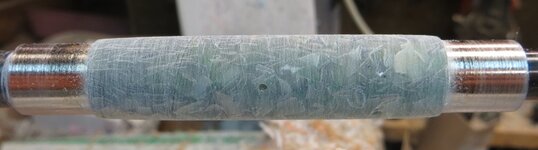
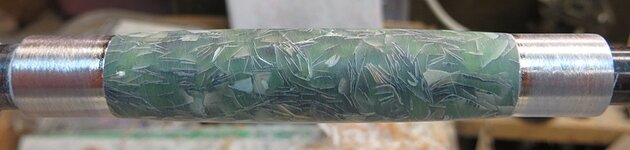
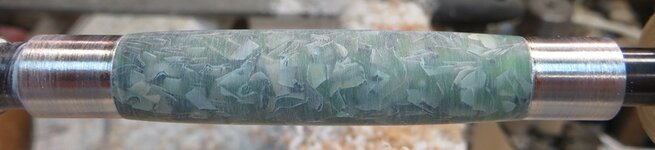
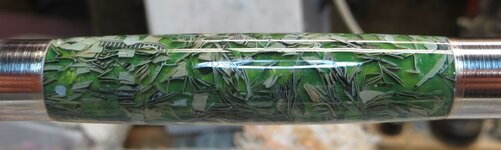
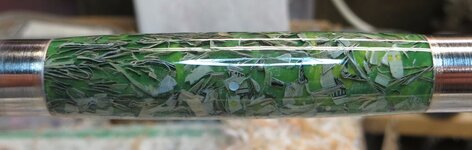
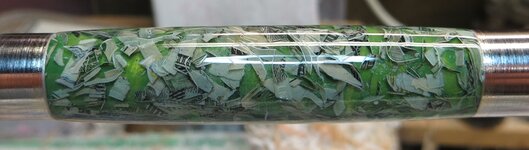
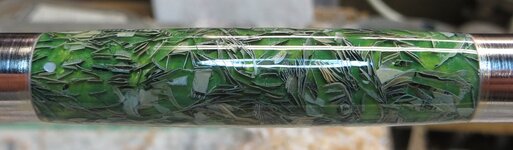
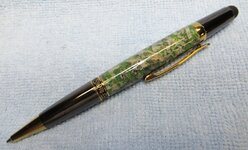
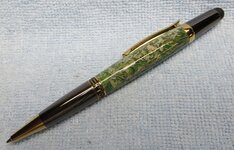
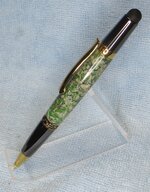
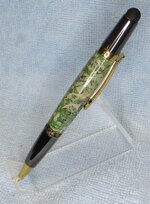
I have turned a lot of Inlace and, while it is a bit challenging, there are colors and patterns available in it like no other material. You can see how brittle it is by feeling the edges that were sawed when making the blanks from the larger sheets. I've used carbide tools, skews, spindle gouges and my favorite, the 3/4" roughing gouge. What has been said is absolutely true, sharp tools and light cuts. I find high speed, 2500rpm or so works well for me but you have to find your own comfort level with the speed. I'm seeing an unusual occurrence when I make the final cuts very, very lightly, the "bubbles" disappear. I spoke with the guys at WoodTurningz about this and they assures me that there are no bubbles; can't be because of the method of manufacturing. Well, we all must be hallucinating cause I sure as heck see them. CA will fill them and probably buffing will too. As for the $$ blanks, there has been a slow evolution of these. The first ones were good then the money was shredded coarser and was a bit sparse to say the least. The newer ones seem to be the best of the lot and I have come to like the sight of "gold" (brass) through the money particles but reverse paint is a good approach too. As with all this turning stuff, get some of the blanks when they are on sale and grind them up till you're comfy with the process. Above all else, drill short of the end of the blank or it will crack, assuming it doesn't fly all over the place, and when the sharp tool connects with that invisible crack....BOOM!. WT has an instruction sheet for turning Inlace but I have developed a way of turning it that gets it done for me and you'll find your way too.
Chuck, if you have the time some day call me and then drop by my shop and we'll have a go at Inlace and maybe a beer. Call first and I'll run over to WT and get a good supply.
WB
 

Sappheiros

Member
Joined
Sep 26, 2015
Messages
900
Location
Chicago, Illinois
While it's considered illegal to destroy money in the United States, there does happen to be one exception: pennies! There was actually a man who melted down a vast quantity of pennies and made a profit on the copper. Dollar bills, though, don't destroy.
 

Skeleton2014

Member
Joined
Jan 24, 2013
Messages
497
Location
Lynnwood, WA. USA
Has anyone turned one of these blanks? I have a friend who wants a pen made from one, but I haven't had any luck at all with Inlace Acrylester blanks. If anybody has turned one successfully, I'd love to hear how you did it and see the finished result.

Inlace Acrylester Pen Blank Money - WoodTurningz

Turned this a couple of years ago. Love IA but the money blank seemed to develope "pits" in the first few I tried. All the advice here so far is useful (reverse painting, sharp, sharp tools, light cuts, etc.). Finally had success with bringing the blank down to 1/8" or so wider than bushing, then lots of CA, sand, CA, sand, repeat to final dimension.
Good luck, Jeff
 

Attachments

  • image.jpeg
    image.jpeg
    106.9 KB · Views: 162

M. Newell

Member
Joined
Feb 1, 2012
Messages
32
Location
Green Bay, WI
I've made about six pens using Woodturningz money blanks. They turn well using EWT carbide tools. One blank had a couple very small holes that filled easily with CA. I will continue to buy these blanks. Customers love them!

FYI Woodturningz is where i buy the majority of my supplies. Fast shipping and great customer service has been my experience.

Good luck, Mike
 

qquake

Member
Joined
Feb 8, 2004
Messages
5,015
Location
Northern California
Thanks for all the advice, guys. A couple of posters have mentioned using carbide tools. But Woodturningz's instructions caution against using carbide, because it's essentially a scraper (albeit a very sharp scraper). They recommend using a fingernail bowl gouge or a skew, to get a shearing cut. I'll probably try a bowl gouge first, since I never learned to properly use a skew. The blank should be here Friday, so I'll find out before too long.
 

qquake

Member
Joined
Feb 8, 2004
Messages
5,015
Location
Northern California
I got the blank in the mail yesterday, and started turning it today. Drilling it was no problem. I back painted the blank with kelly green acrylic paint, and colored the epoxy with the same paint. I also trimmed the corners with the bandsaw, to give myself a headstart.
 

Attachments

  • 006.JPG
    006.JPG
    151.5 KB · Views: 138
  • 014c.JPG
    014c.JPG
    102.5 KB · Views: 132
  • 017.JPG
    017.JPG
    103.6 KB · Views: 139
  • 022.JPG
    022.JPG
    319.9 KB · Views: 181
  • 023.JPG
    023.JPG
    185 KB · Views: 126

qquake

Member
Joined
Feb 8, 2004
Messages
5,015
Location
Northern California
I tried several different chisels, including a 1" skew, 3/4" forged spindle gouge, and a 1/2" fingernail gouge. But the one I had the best success with was a 1" roughing gouge. I sharpened it several times during turning, and found that it cut best for me with it rotated slightly to the left. I don't know why. I did get some chipping here and there, but nothing too bad. I took my time, and channeled my inner patience. Yes, I still wear the glove. LOL
 

Attachments

  • 025.JPG
    025.JPG
    244.8 KB · Views: 188
  • 026.JPG
    026.JPG
    82.9 KB · Views: 167
  • 027.JPG
    027.JPG
    139.5 KB · Views: 184
  • 030.JPG
    030.JPG
    100.9 KB · Views: 142

qquake

Member
Joined
Feb 8, 2004
Messages
5,015
Location
Northern California
Once I got it turned close to the final diameter, I switched to the "sandpaper skew". I started with 100 and 150 grit dry to shape it, and then went to 320 and 400 wet. 320 and 400 wet is part of my normal polishing process. The last photo is after the wet sanding.
 

Attachments

  • 031.JPG
    031.JPG
    75.4 KB · Views: 133
  • 034.JPG
    034.JPG
    72.6 KB · Views: 119
  • 033.JPG
    033.JPG
    73.6 KB · Views: 134
  • 032.JPG
    032.JPG
    67.7 KB · Views: 109

qquake

Member
Joined
Feb 8, 2004
Messages
5,015
Location
Northern California
After wet sanding, I went through all 9 grades of Micro Mesh wet, then polished it with Meguiars PlastX plastic polish. There were a couple of small voids in it, but they disappeared during sanding. It polished out really nice. But you can see that the money shreds did get thin, and it's a good thing I reverse painted and colored the epoxy.
 

Attachments

  • 035.JPG
    035.JPG
    91.1 KB · Views: 168
  • 036.JPG
    036.JPG
    96.4 KB · Views: 151
  • 037.JPG
    037.JPG
    94.2 KB · Views: 160
  • 038.JPG
    038.JPG
    98.1 KB · Views: 184

qquake

Member
Joined
Feb 8, 2004
Messages
5,015
Location
Northern California
Overall, I'm very happy with how it turned out. It took me about three times longer than normal to turn the blank. Hanna will be ecstatic. She wanted a "money pen" really bad, but I told her I couldn't turn acrylester. Do I feel a sense of satisfaction and accomplishment? Most definitely. Do I like how the pen looks? Obviously. Would I turn another money blank? Hell no! LOL
 

Attachments

  • 040.JPG
    040.JPG
    199.1 KB · Views: 188
  • 041.JPG
    041.JPG
    166.4 KB · Views: 190
  • 042.JPG
    042.JPG
    218.7 KB · Views: 171
  • 043.JPG
    043.JPG
    192 KB · Views: 181
  • 046.JPG
    046.JPG
    176.1 KB · Views: 205
Last edited:

qquake

Member
Joined
Feb 8, 2004
Messages
5,015
Location
Northern California
I gave the pen to Hanna yesterday. She was beyond overjoyed! I knew she'd be happy, but I didn't think she'd be as happy as she was. She was totally surprised, she thought I wouldn't be able to make it (and I didn't either). It was worth all the effort.
 
Top Bottom