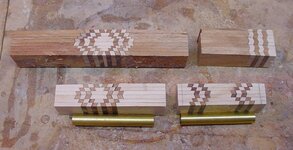
Indian Blanket segment underway

Signed-In Members Don't See This Ad
Joined
Mar 16, 2008
Messages
165
Location
Hayward, CA, USA.
I was inspired by Jeff's tutorial of how to slice and dice wood to make an indian blanket segment (found here): http://www.penturners.org/forum/showthread.php?t=735&highlight=indian+blanket

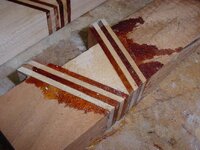
So this morning I selected some scraps of Mahogony and Maple from my woodpile and set out to try my hand at it.

It took less than an hour to cut all of the pieces and here's a picture of the dry fit assemblies...
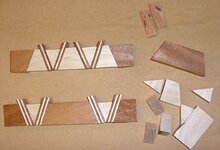
Picture 005.jpg

I'll glue them up and by tomorrow, they should be ready for step two.
 
Last edited:
Signed-In Members Don't See This Ad
Joined
Mar 16, 2008
Messages
165
Location
Hayward, CA, USA.
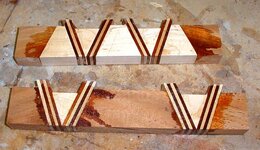
Parts are all glued up. The mahogony body blank is turning out perfect so far with the point of the triangle right at the edge of the piece, and the edge is perfectly square.

The Maple blank (in the background) slipped a bit in the clamps and the point of the triangle is going to get trimmed off when the edge is squared.

Picture 007.jpg Picture 006.jpg
 
Last edited:
Joined
Mar 16, 2008
Messages
165
Location
Hayward, CA, USA.
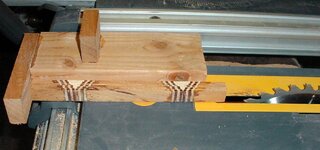
Well I tell ya, this is more difficult than it looks. I made a sled that is nice and square, but slicing these blanks lenghwise proved challenging. Since I don't have a decent band saw (but I do have a decent table saw) Mr. Toothy got the job. :eek:

The first blank was run through and I was not paying close enough attention and got a couple of slices that were noticably thinner than the others. I don't think this will be a serious problem as they are close to the outside and may very well be turned completely off.. We'll see 'bout that.

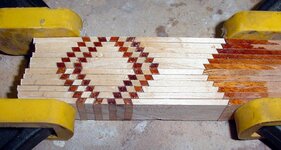
The second blank ran through much better with nice even 1/8" slices. Here's a dry fit... Only a very small amount of deviationis noticeable.

oh, and this is my first attempt at a segment this complex!:doctor:

Picture 009.jpg Picture 010.jpg
 

workinforwood

Member
Joined
Mar 1, 2007
Messages
8,173
Location
Eaton Rapids, Michigan, USA.
I do have a good band saw but would not use it for this. This is a table saw job, an indian blanket is one of many projects best known as table saw intarsia. Now I have to ask, what kind of pen are you making that is 1.5 inches wide? Or, maybe you are just holding all the pieces in the clamps and they are not glued yet. At 1/8 wide the most strips you can use is 4. 4 strips looks good, but if you do your strips 1/16 wide, you have 8 strips in a pen which looks much nicer. Regardless what you do, I certainly commend you for taking on the task!
 

VisExp

Member
Joined
Oct 1, 2007
Messages
2,738
Location
Palm Coast, FL, USA.
Hi Vince

I couldn't help but notice that you are ripping thin pieces on a table saw without a zero clearance insert. There is a very real danger of the piece you are cutting falling into the slot in the insert and getting trapped.

You might consider making a zero clearance insert. The added advantage of a zero clearance insert is a cleaner cut, there is less tear-out on the bottom of the workpiece as it is supported all the way to the blade.

When making thin cuts, in addition to using a zero clearance insert, I also use a vacuum rip fence. I made a variation of the one posted by David Reed Smith.

http://www.davidreedsmith.com/Articles/VacuumRipFence/VacuumRipFence.htm

Using a vacuum rip fence makes ripping thin pieces so much safer and more accurate. I can get pieces as thin as 0.020" using mine.

Lastly, I can't tell what blade you have on your table saw, but you can pick up a Freud Diablo 7 1/4" circular saw blade for around $15. It has a kerf of 1/16" which means less waste.
 

workinforwood

Member
Joined
Mar 1, 2007
Messages
8,173
Location
Eaton Rapids, Michigan, USA.
You people are too observant! I didn't notice that. I use a Freud 1/16 circular saw blade mounted in the tablesaw with a zero clearance insert. The strips should be cut at 1/16 width, the exact width of the blade. The first few strips feed in fine with the push fence, but as the main board gets thinner and thinner, I use masking tape to hold the strips against the fence. Now that I have a drum sander, I run the strips through it for a couple passes which makes the joints even better.
 
Joined
Mar 16, 2008
Messages
165
Location
Hayward, CA, USA.
Now I have to ask, what kind of pen are you making that is 1.5 inches wide? Or, maybe you are just holding all the pieces in the clamps and they are not glued yet. !

I'm actually going to divide the pieces up and make a total of 4 blanks (2 from each stick)
I haven't selected a pen style yet, most likely something fatter like a gent.

Vis: Thank you very much for the link for the vacuum fence, I'll check it out in detail today. The first thing I wanted to do was make a zero clearance insert, but I don't have material thin and stiff enough for the job readily available. Another problem with my current setup is that I was using a 36t general purpose blade because my fine cut blade is in need of replacement.
 
Last edited:

workinforwood

Member
Joined
Mar 1, 2007
Messages
8,173
Location
Eaton Rapids, Michigan, USA.
I am using a piece of 1/2" plywood as an insert. I simply traced the original and cut it out with my scroll saw. I used my router with a 1/2" rabbit bit and cut a rabbit in the bottom side to make the plywood thinner to sit flush to the table. If you remove just a hair too much material off the bottom, you put masking tape in the dado to build it back up. Simply lower the blade all the way down, set in the insert, hold down the insert with a stick off to the side of course and crank up the blade. The plywood is more than strong enough as an insert for any job you put to it.
 
Joined
Mar 16, 2008
Messages
165
Location
Hayward, CA, USA.
Jeff, thanks for the tip. I have some 1/4" marine grade ply (5 ply) that I'll make the insert with.

The blanks are all glued up now. I used scrap material from the Maple to make the cap piece of the Mahogony blank. It still needs length so when I trim off the longer Mahogony blank, I'll add the trimmings to the cap piece.

The Maple blank will be made into a hart double-twist. I haven't decided what to do with the Mahogony one yet.

Picture 016.jpg

That's it for today, I spent a good 4 hours assembling and gluing these parts, now its time for other activities.
 
Last edited:
Top Bottom